基于nGrinder进行负载测试
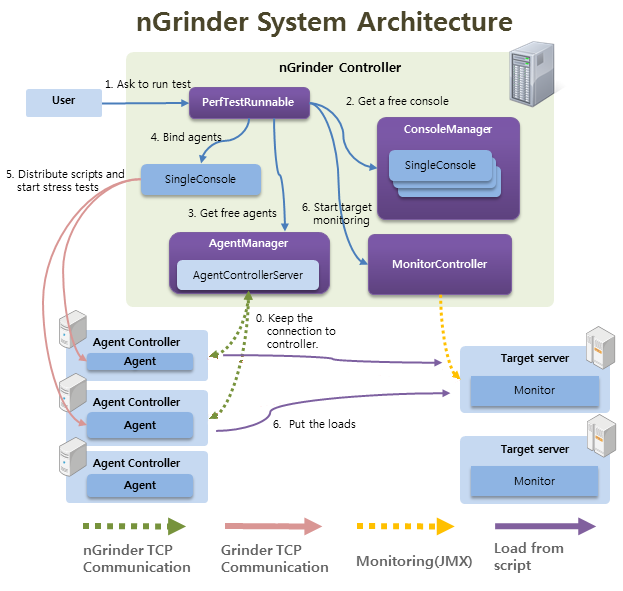
nGrinder是一个基于Grinder的压力测试平台。在此平台上你可以创建测试脚本、执行测试、监控目标服务器,同步的生成测试结果。
nGrinder由两种关键组件:
- 控制器:提供性能测试的Web接口,支持协调测试进程、收集并展示测试相关的统计信息,允许用户创建或修改测试脚本
- 代理,可以运行在两种模式下:
- Agent:运行线程、进程,将负载施加到目标服务器上
- Monitor:监控目标服务器的性能,例如CPU/内存
代理启动后会尝试连接到控制器,然后被添加到AgentControllerServer —— 类似于Agent的池中。当用户发起一个性能测试后,nGrinder会创建一个协调Agents的SingleConsole(和Grinder中的Console作区分,起名叫SingleConsole),所需数量的Agent从AgentControllerServer交付给SingleConsole管理,SingleConsole向Agents发送测试脚本、测试资源,并控制测试流,直到测试完毕。测试完毕后,Agents回到AgentControllerServer的Agent池中,供后续测试重用。SingleConsole则回到ConsoleManager中。
nGrinder和Grinder最大的不同是,前者在控制器中持有多个Console实例、Agents。Console之间是相互独立的,并且可以并行的运行。Agent可以被预先分配给Console,也可以根据需要随时被请求、分配。nGrinder力求对Agent机器的最大化利用。其它测试平台,常常为测试任务预先分配Agents。用户为了争抢资源,常常会提前申请Agent而不充分利用。nGrinder仅在测试运行时才真正动态分配Agent。
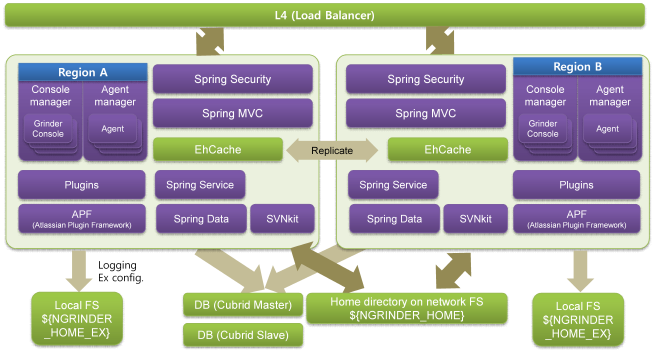
从3.1版本开始nGrinder开始支持控制器集群。性能测试可以被集群中的某个控制器调度,可以在多组Agent(称为Region)上执行。
上图的架构中,包含两个控制器组成的集群:
- 所有控制器共享数据库、网络文件系统。所有控制器的 ${NGRINDER_HOME}必须指向同一NFS路径
- 每个控制器可以有自己独特的属性、日志输出,这些信息存放在 ${NGRINDER_EX_HOME}
- 所有控制器同步EhCache缓存中的共享数据
每个nGrinder控制器实例都可以独立的服务用户,需要注意的是nGrinder没有提供分布式会话,因此切换控制器后你需要重新登陆。
在Quick Start中输入一个URL,可以自动生成一个测试脚本。测试脚本就是一段以Groovy语言编写的JUnit测试。
在Home页面点击Performance Test链接,可以进入已经定义的性能测试的列表。
点击列表项,可以进入单个性能测试的详情页面。其第一个选项卡是Test Configuration:
| 配置项 | 说明 | ||
| Agent | 使用的代理数量 | ||
| Vuser per agent |
每个代理的“虚拟用户”的数量,可以展开设置线程、进程数量 总线程数 = 线程*进程 = 虚拟用户数 和其它测试工具有所不同,nGrinder不去模拟真实的用户行为(比如说模拟10000个用户,在那每隔几秒发一个请求),而是专注于如何达到服务器的能力限制 如果你的确需要模拟真实用户行为,例如需要10000个虚拟用户, 你可以:
如果代理机器的内存较低,例如4GB,则10个或更多进程会导致swap进而影响性能 |
||
| Region | 使用哪个区域中的Agent/Console | ||
| Target Host |
被压测的主机,应当和脚本中所访问的主机一致。nGrinder控制器会在测试开始后,对Target host进行监控,你可以在图表中看到Target host的性能指标 你可以使用如下的形式来覆盖默认DNS解析:
|
||
| Duration | 测试执行多久 | ||
| Run Count | 测试运行多少次 | ||
| Enable Ramp-Up | 在每个间隔之后增加进程数量 | ||
| Initial Count | 启动测试时工作进程的数量 | ||
| Incremental Step | 每个间隔增加进程的数量 | ||
| Initial Sleep Time | 最初休眠的时间 | ||
| Interval | 每个间隔的区间 | ||
| Parameter | 能够向测试传递单个名为param的参数,填写此参数的值 |
在Home页面点击Script链接,可以进入已经定义的脚本的列表。
nGrinder内置了一个SVN服务器,用于管理用户编写的脚本文件以及资源,每个用户由独立的SVN存储库。你可以通过SVN客户端签出并管理脚本和资源,也可以通过nGrinder的UI来添加、删除、上传脚本或资源文件或目录。
从3.2版本开始,nGrinder在Jython的基础上支持Groovy作为脚本编写语言。
Groovy脚本是基于Junit的,因此对熟悉Java单元测试的人很友好。你可以通过SVN版本库管理压测脚本,甚至使用Maven来管理压测脚本的项目、在IDE中执行运行、调试压测脚本。
下面是一个基本的模板:
|
1 2 3 4 5 6 7 8 9 10 11 12 13 14 15 16 17 18 19 20 21 22 23 24 25 26 27 28 29 30 31 32 33 34 35 36 37 38 39 40 41 42 43 44 45 46 47 48 49 50 51 52 53 54 55 56 57 |
import static net.grinder.script.Grinder.grinder import static org.junit.Assert.* import static org.hamcrest.Matchers.* import net.grinder.plugin.http.HTTPRequest import net.grinder.script.GTest import net.grinder.script.Grinder import net.grinder.scriptengine.groovy.junit.GrinderRunner import net.grinder.scriptengine.groovy.junit.annotation.BeforeThread import net.grinder.scriptengine.groovy.junit.annotation.BeforeProcess import org.junit.BeforeClass import org.junit.Test import org.junit.runner.RunWith import HTTPClient.HTTPResponse // 测试用例必须附加如下注解 @RunWith(GrinderRunner) class Test { public static GTest test; public static HTTPRequest request; // 每个进程被创建之前,执行的方法 // 类似的还有@AfterProcess @BeforeProcess public static void beforeClass() { // 创建一个GTest实例 test = new GTest(1, "${name}"); // 录制对此HTTPRequest的任何调用,每次对它的调用都会增加TPS request = new HTTPRequest(); test.record(request); grinder.logger.info("before process."); // 如果需要录制多个HTTPRequest,需要使用多个名字不同的GTest实例 } // 每个线程被创建之前,执行的方法 // 类似的还有@AfterThread @BeforeThread public void beforeThread() { grinder.statistics.delayReports=true; grinder.logger.info("before thread."); } // 在停止测试之前,带有这个注解的方法会被持续不断的运行 @Test public void test(){ HTTPResponse result = request.GET("${url}"); if (result.statusCode == 301 || result.statusCode == 302) { grinder.logger.warn("Warning. The response may not be correct. The response code was {}.", result.statusCode); } else { // 可以进行断言,断言失败则绑定到当前线程的最后一次测试被标记为失败 assertThat(result.statusCode, is(200)); } } } |
| 注解 | 说明 |
| @BeforeProcess |
Groovy脚本引擎创建新进程后执行的逻辑,例如:
|
| @AfterProcess |
Groovy脚本引擎在进程被终结后执行的逻辑,例如:
|
| @BeforeThread |
在进程的每个测试线程执行之前执行的逻辑,例如:
|
| @AfterThread |
在进程的每个测试线程执行之后执行的逻辑,例如:
|
| @Before | 每次测试之前、之后执行的逻辑 |
| @After | |
| @Test |
需要执行的测试本身,会反复调用 你可以为多个方法添加此注解,但是需要注意,和JUnit不同,nGrinder会让所有这些方法共享实例变量 |
在Test Configuration中指定的单个参数,可以这样获取:
|
1 2 |
// 名字固定为param System.getProperty("param", "defaultValue") |
实际上,上述param参数是在命令行通过 -Dparam=value传递给测试进程的。
引入Maven依赖ngrinder-groovy,可以调用net.grinder.util.GrinderUtils定义的静态方法,获取参数并进行类型转换。
|
1 2 3 4 5 6 |
processnumber=grinder.processNumber //获取当前的进程号,应该会相应返回0,1,2,3,4 totalprocess=grinder.getProperties().getInt("grinder.processes", 1) //获取测试的进程总数,返回5 threadnumber=grinder.threadNumber //获取当前的线程号,应该会相应返回0,1 totalthread=grinder.getProperties().getInt("grinder.threads", 1) //获取测试的线程总数,应该返回2 run=grinder.runNumber; //获取当前的测试号,应该相应返回1,2,3 totalrun=grinder.getProperties().getInt("grinder.runs", 1); //返回测试的总数,如3 |
|
1 |
HTTPPluginControl.getConnectionDefaults().timeout = 6000 |
|
1 2 |
request = new HTTPRequest(); request.POST("http://www.google.com", [new NVPair("key1","value1"), new NVPair("key2":"value2")] as NVPair[]) |
|
1 2 3 |
def result = request.GET("http://www.google.co.kr") assertThat(result.statusCode, is(200)) // 状态码 assertThat(result.text, containsString("google")) // 响应体 |
而不是录制HTTPRequest调用:
|
1 2 3 4 5 6 7 8 9 10 11 12 13 14 15 16 17 18 19 20 21 22 23 24 25 |
@RunWith(GrinderRunner) class TestRunner { static GTest test1 static GTest test2 @BeforeProcess public static void beforeProcess() { test1 = new GTest(1,"test1_statistics") test2 = new GTest(2,"test2_statistics") } @BeforeThread public void beforeThread() { test1.record(this, "doTransaction1"); // 录制当前对象的doTransaction1调用到测试test1 test2.record(this, "doTransaction2"); // 录制当前对象的doTransaction2调用到测试test2 grinder.statistics.delayReports=true; } @Test public void doTransaction1(){ } @Test public void doTransaction2(){ } } |
被录制方法的执行耗时会影响测试报告。
你可以设置每个测试方法,占用总计的测试次数的比例:
|
1 2 3 4 5 6 7 8 9 |
@RunRate(50) // 此方法占所有测试次数(runs)的50% @Test public void test1() { } @RunRate(20) @Test public void test2() { } |
如果总和不到100,则会有一定的测试次数(runs)什么都不干。
|
1 |
LoggerFactory.getLogger("worker").setLevel(Level.ERROR) |
|
1 2 3 4 5 6 7 8 9 10 11 12 13 14 15 |
import groovy.json.JsonSlurper def message = """ { "glossary": { "title": "example glossary", "GlossDiv": { "title": "S" } } } }""" def jsonMsg = new JsonSlurper().parseText(message) grinder.logger.info(jsonMsg.glossary.title) |
|
1 |
def hello = new XmlParser().parseText(message); |
|
1 2 3 4 5 6 7 8 |
byte[] buffer = new byte[1000]; HTTPResponse result = request.GET("http://www.google.com"); // 只读取1000字节就结束 def stream = result.getInputStream(); stream.read(buffer); stream.close(); |
|
1 2 3 4 5 6 7 8 9 10 |
def threadId; @BeforeThread public void beforeThread() { threadId = GrinderUtils.threadUniqId; } @Test public doTest() { // 根据threadId进行条件分支 } |
有两种方式:
- 在测试脚本所在目录下,建立lib目录,其中存放jar
- 使用Maven依赖管理机制
- 在测试脚本所在目录下,建立resources目录,其中存放资源文件,然后参考下面的脚本加载资源:
1234@BeforeProcesspublic static void beforeProcess() {text = new File("./resources/resource1.txt").text;} - 使用Maven,从类路径下加载:
1ReflectionUtils.getCallingClass(0).getResourceAsStream("/resource1.txt");
nGrinder 3.3提供了超过40个REST API,使用这些REST API你可以构建自己的nGrinder前端,或者让其它工具和nGrinder进行集成。REST API的功能包括:
- 用户管理
- 代理管理
- 脚本管理
- 性能测试管理
- 系统管理
REST API使用HTTP基本身份验证。
|
1 2 3 4 5 6 7 8 9 10 |
# 克隆现有性能测试,然后启动,226为测试ID curl -u admin:admin http://ngrinder-host/perftest/api/226/clone_and_start # 返回JSON形式、新创建的测试 # 你可以传递agentCount、scriptRevision参数来指定代理数量、脚本的修订版 # 查看现有的性能测试 curl -u admin:admin http://ngrinder-host/perftest/api/226 # 查看性能测试列表 curl -u admin:admin http://ngrinder-host/perftest/api |
对于nGrinder UI的URL(其URL Path称为topic),后缀以/api通常就是其对应的REST API端点:
| URL | 动词 | 描述 |
| http://ngrinder-host/{topic}/api/ | GET | 获取元素列表 |
| http://ngrinder-host/{topic}/api?ids={id,id} | GET | 获取多个元素 |
| http://ngrinder-host/{topic}/api/{kind}?ids={id,id} | GET | 获得多个元素的某个特定信息 |
| http://ngrinder-host/{topic}/api/{id} | GET | 获得一个元素 |
| http://ngrinder-host/{topic}/api/{id}/{kind} | GET | 获取一个元素的某个特定信息 |
| http://ngrinder-host/{topic}/api/ | POST | 新建元素 |
| http://ngrinder-host/{topic}/api/{id} | PUT | 修改一个元素 |
| http://ngrinder-host/{topic}/api?ids={id,id} | PUT | 修改多个元素 |
| http://ngrinder-host/{topic}/api?action={action}&ids={id,id} | PUT | 指定若干元素上执行动作 |
| http://ngrinder-host/{topic}/api/{id}?action={action} | PUT | 在指定的元素上执行动作 |
| http://ngrinder-host/{topic}/api/{id} | DELETE | 删除一个元素 |
| http://ngrinder-host/{topic}/api?ids={id,id} | DELETE | 删除多个元素 |


Leave a Reply