Cilium学习笔记
Cilium是在Docker/K8S之类的容器管理平台下,透明的为应用程序服务提供安全网络连接的开源软件。Cilium的底层技术是eBPF,eBPF完全在内核中运行,因此改变Cilium的安全策略时不需要程序代码、容器配置的任何变更。
Hubble是一个完全分布式的网络和安全可观察性平台。它构建在Cilium + eBPF之上,它以完全透明的方式,实现了服务、网络基础设施的通信/行为的深度可观察性。
由于可观察性依赖于eBPF,因此是可动态编程的、成本最小化的、可深度定制的。
Hubble可以回答以下问题:
- 服务依赖和通信关系图:
- 两个服务是否通信,通信频度如何,服务之间的依赖关系是怎样的?
- 进行了哪些HTTP调用?
- 服务消费了哪些Kafka主题,发布了哪些Kafka主题
- 网络监控和报警:
- 网络通信是否失败,为何失败?是DNS导致的失败?还是L4/L7的原因
- 最近5分钟有哪些服务存在DNS解析问题
- 哪些服务出现连接超时、中断的问题
- 无应答SYN请求的频率是多高
- 应用程序监控:
- 特定服务/或者整个集群的5xx/4xx HTTP响应的频率是多高
- HTTP请求延迟的95th/99th位数是多少
- 哪两个服务之间的延迟最高
- 安全可观察性:
- 哪些服务因为网络策略而出现连接被阻止
- 哪些服务被从集群外部访问
- 哪些服务尝试解析了特定的域名
在监控(系统和应用)领域,从来没有一个技术能像eBPF一样做到如此的高性能、细粒度、透明化,以及动态性。
现代数据中心中运行的应用程序,通常基于微服务架构设计,应用程序被拆分为大量独立的小服务,这些服务基于轻量级的协议(例如HTTP)进行通信。这些微服务通常容器化部署,可以动态按需创建、销毁、扩缩容。
这种容器化的微服务架构,在连接安全性方面引入了挑战。传统的Linux网络安全机制,例如iptables,基于IP地址、TCP/UDP端口进行过滤。在容器化架构下IP地址会很快变化,这会导致ACL规则、LB表需要不断的、加速(随着业务规模扩大)更新。由于IP地址不稳定,给实现精准可观察性也带来了挑战。
依赖于eBPF,Cilium能够基于服务/Pod/容器的标识(而非IP地址),实现安全策略的更新。能够在L7/L4/L3进行过滤。
能够在L7进行过滤,支持REST/HTTP、gRPC、Kafka等协议。从而实现:
- 允许对/public/.*的GET请求,禁止其它任何请求
- 允许service1在Kafka的主题topic1上发布消息,service2在topic1上消费消息,禁止其它Kafka消息
- 要求所有HTTP请求具有头X-Token: [0-9]+
经典的容器防火墙,基于IP地址/端口来进行封包过滤,每当有新的容器启动,都要求所有服务器更新防火墙规则。
Cilium支持为一组应用程序分配身份标帜,共享同一安全策略。身份标识将关联到容器发出的所有网络封包,在接收封包的节点,可以校验身份信息。
上一段提到了,Cilium支持基于身份标识的内部服务之间的安全访问机制。对于外部服务,Cilium支持经典的基于CIDR的ingress/egress安全策略。
Cilium支持一个简单的、扁平的L3网络,能够跨越多个集群,连接所有容器。通过使用host scope的IP分配器,IP分配被保持简单,每个主机可以独立进行分配分配,不需要相互协作。
支持以下多节点网络模型:
- Overlay:目前内置支持VxLAN和Geneve,所有Linux支持的封装格式都可以启用
- Native Routing:也叫Direct Routing,使用Linux宿主机的路由表,底层网络必须具有路由容器IP的能力。支持原生的IP6网络,能够和云网络路由器协作
Cilium实现了分布式的负载均衡,可以完全代替kube-proxy。LB基于eBPF实现,使用高效的、可无限扩容的哈希表来存储信息。
对于南北向负载均衡,Cilium作了最大化性能的优化。支持XDP、DSR(Direct Server Return,LB仅仅修改转发封包的目标MAC地址)。
对于东西向负载均衡,Cilium在内核套接字层(TCP连接时)执行高效的service-to-backend转换(通过eBPF直接修改封包),避免了更低层次(IP)中per-packet的NAT(依赖conntrack,在高并发或大量连接的情况下有若干问题)操作成本。
Cilium利用eBPF实现高效的基于EDT(Earliest Departure Time)的egress限速,能够很大程度上避免HTB/TBF等经典qdisc的缺点,包括传输尾延迟,多队列NIC下的锁问题。
对于任何分布式系统,可观察性对于监控和故障诊断都非常重要。Cilium提供了更好的诊断工具:
- 携带元数据的事件监控:当封包被丢弃时,不但报告源地址,而能提供 完整的发送者/接收者元数据
- 策略决策跟踪:支持跟踪并发现是什么策略导致封包丢弃或请求拒绝
- 支持通过Prometheus暴露指标
- Hubble:一个专门为Cilium设计的可观察性平台,能够提供服务依赖图、监控和报警
整体上的组件架构如下:
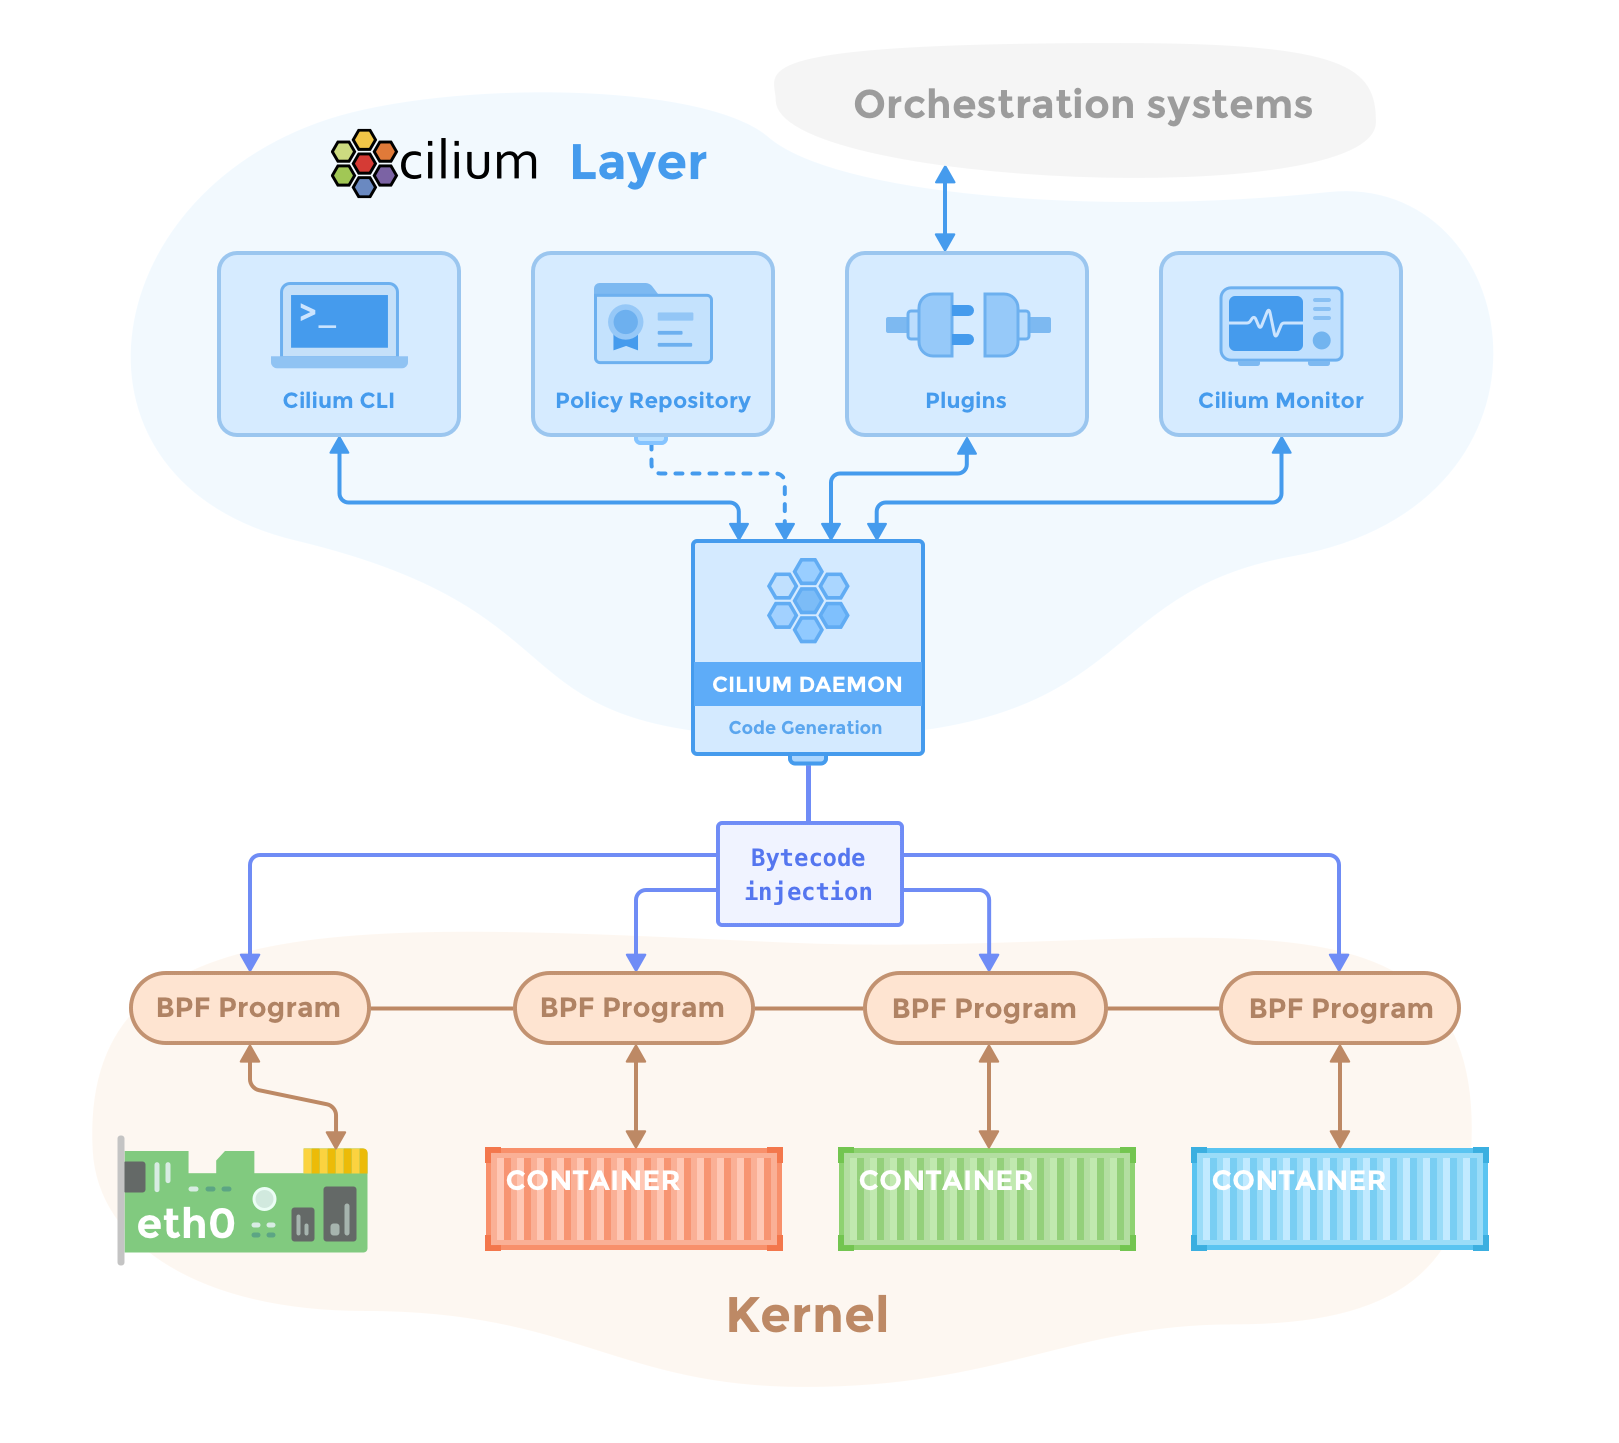
cilium-agent在集群的每个节点上运行,它通过K8S或API接收描述网络、服务负载均衡、网络策略、可观察性的配置信息。
cilium-agent监听来自容器编排系统的事件,从而知晓哪些容器被启动/停止,它管理所有eBPF程序,后者控制所有网络访问。
Cilium利用eBPF实现datapath的过滤、修改、监控、重定向,需要Linux 4.8+才能运行,推荐使用4.9.17+内核(因为4.8已经EOL)。Cilium会自动探测内核版本,识别可用特性。
cilium和cilium-agent一起安装,它和cilium-agent的REST API交互,从而探测本地agent的状态。CLI也提供了直接访问eBPF map的工具。
负责集群范围的工作,它不在任何封包转发/网络策略决策的关键路径上,即使operator暂时不可用,集群仍然能正常运作。
根据配置,operator持续不可用一段时间后,可能出现问题:
- 如果需要operator来分配IP地址,则会出现IPAM延迟,因此导致新的工作负载的调度延迟
- 由于没有operator来更新kvstore的心跳,会导致agent认为kvstore不健康,并重启
cilium-cni和当前节点上的Cilium API交互,触发必要的datapath配置,以提供容器网络、LB、网络策略。
在所有节点上运行,从cilium中抓去eBPF的可观察性数据。它被嵌入在cilium-agent中,以实现高性能和低overhead。它提供了一个gRPC服务,用于抓取flow和Prometheus指标。
hubble-relay是一个独立组件,能够连接到所有Server,通过Server的gRPC API,获取全集群的可观察性数据。这些数据又通过一个API来暴露出去。
hubble是一个命令行工具,能够连接到gRPC API、hubble-relay、本地server,来获取flow events。
hubble-ui能够利用hubble-relay的可观测性数据,提供图形化的服务依赖、连接图。
Cilium需要一个数据存储,用来在Agent之间传播状态。
默认数据存储。
外部键值存储,可以提供更好的性能。支持etcd和consul。
标签是定位大的资源集合的一种通用、灵活的方法。每当需要定位、选择、描述某些实体时,Cilium使用标签:
- Endpoint:从容器运行时、编排系统或者其它资源得到标签
- Network Policy:根据标签来选择可以相互通信的一组Endpoint,网络策略自身也基于标签来识别
标签就是键值对,值部分可以省略。键具有唯一性,一个实体上不会有两个相同键的标签。键通常仅仅包含字符[a-z0-9-.]。
标签从源提取,为了防止潜在的键冲突,Cilium为所有导入的键添加前缀。例如
- k8s:role=frontend:具有role=frontend的K8S Pod,对应的Cilium端点具有此标签
- container:user=alex:通过docker run -l user=alex运行的容器,对应的Cilium端点具有此标签
不同前缀含义如下:
container:从本地容器运行时得到的标签
k8s:从Kubernetes得到的标签
mesos:从Mesos得到的标签
reserved:专用于特殊的保留标签
unspec:未指定来源的标签
当通过标签来匹配资源时,使用前缀可以限定资源来源。如果不指定前缀,默认为 any:,标识匹配任何来源的资源。
通过为容器分配IP,Cilium让它在网络上可见。多个应容器可能具有相同IP,典型的例子是Pod中的容器。任何享有同一IP的容器,在Cilium的术语里面,叫做端点。
Cilium的默认行为是,同时分配IPv4/IPv6地址给每个端点,你可以使用--enable-ipv4=false这样的选项来禁用某个IP版本。
在内部,Cilium为每个端点,在节点范围内,分配为唯一性的ID。
端点会从关联的容器自动提取端点元数据(Endpoint Metadata)。这些元数据用来安全、策略、负载均衡、路由上识别端点。端点元数据可能来自K8S的Pod标签、Mesos的标签、Docker的容器标签。
任何端点都被分配身份标识(Identity),身份标识通过端点的标签确定,并且具有集群范围内的标识符(数字ID)。端点被分配的身份标识,和它的安全相关标签匹配,也就是说,具有相同安全相关标签的所有端点,共享同一身份标识。
仅仅安全相关标签用于确定端点的身份标识。安全相关标签具有特定前缀,默认情况下安全相关标签以 id.开头。启动cilium-agent时可以指定自定义的前缀。
特殊身份标识用于那些不被Cilium管理的端点,这些特殊标识以 reserved:作为前缀:
| 数字ID | 身份标识 | 描述 |
| 0 | reserved:unknown | 无法提取身份标识的任何端点 |
| 1 | reserved:host | localhost,任何来自/发往本机IP的流量,都牵涉到该端点 |
| 2 | reserved:world | 任何集群外的端点 |
| 3 | reserved:unmanaged | 不被Cilium管理的网络端点,例如在Cilium安装前就存在的Pod |
| 4 | reserved:health | 由cilium-agent发起健康检查流量而产生的端点 |
| 5 | reserved:init | 身份标识尚未提取的端点 |
| 6 | reserved:remote-node | 集群中所有其它节点的集合 |
Cilium能够识别一些知名标签,包括k8s-app=kube-dns,并自动分配安全标识。这个特性的目的是,让Cilium顺利的在启用Policy的情况下自举并获得网络连接性。
Cilium利用分布式的KV存储,为身份标识产生数字ID。cilium-agent为会使用身份标识去查询,如果KV存储已经没有对应的数字ID,就会新创建一个。
集群的单个成员,每个节点都必须运行cilium-agent。
Cilium提供多个层次的安全特性,这些特性可以单独或者联合使用。
容器编排系统中倾向于产生大量的Pod,这些Pod具有独立IP。传统的基于IP的网络策略,在容器场景下需要大量的、频繁变动的规则。
Cilium则完全将网络地址和安全策略分开。作为代替,它总是基于Pod的身份标识(通过它的标签提取)应用安全策略。它能够允许任何具有role=frontend标签的Pod访问role=backend的Pod,不管Pod的数量多少。
如果运行从A到B发起通信,则自动意味着允许B到A的报文传输,但是不意味着B能够发起到A的通信。
安全策略可以在ingress/egress端应用。
如果不提供任何策略,默认行为是允许任何通信。一旦提供一个安全策略规则,则所有不在白名单中的流量都被丢弃。
Cilium能够透明的为任何网络连接注入L4代理,这是L7网络策略的基础。目前支持的代理实现是Envoy。
你可以用Go语言编写少量的、用于解析新协议的代码。这种Go代码能够完全利用Cilium提供的高性能的转发到/自Envoy代理的能力、丰富的L7感知策略定义语言、访问日志、基于kTLS的加密流量可观察性。总而言之,作为开发者你只需要使用Go语言编写协议解析代码,其它的事情Cilium+Envoy+eBPF会做好。
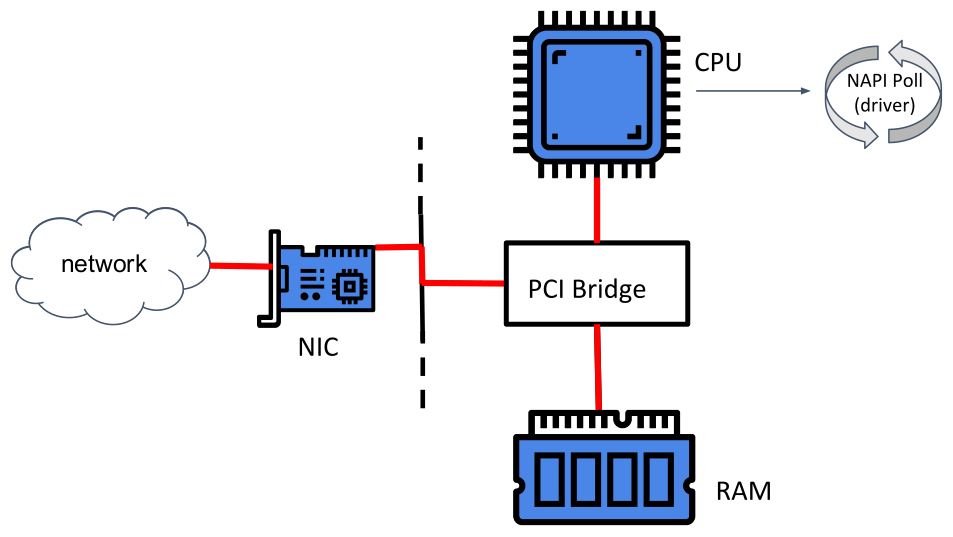
- 当网卡接收到封包后,它可以通过PCI桥,将其存放到内存(ring buffer)中
- 内核中一般化的轮询机制NAPI Poll(epoll、驱动程序都会使用该机制),会拉取到ring buffer中的数据,开始处理
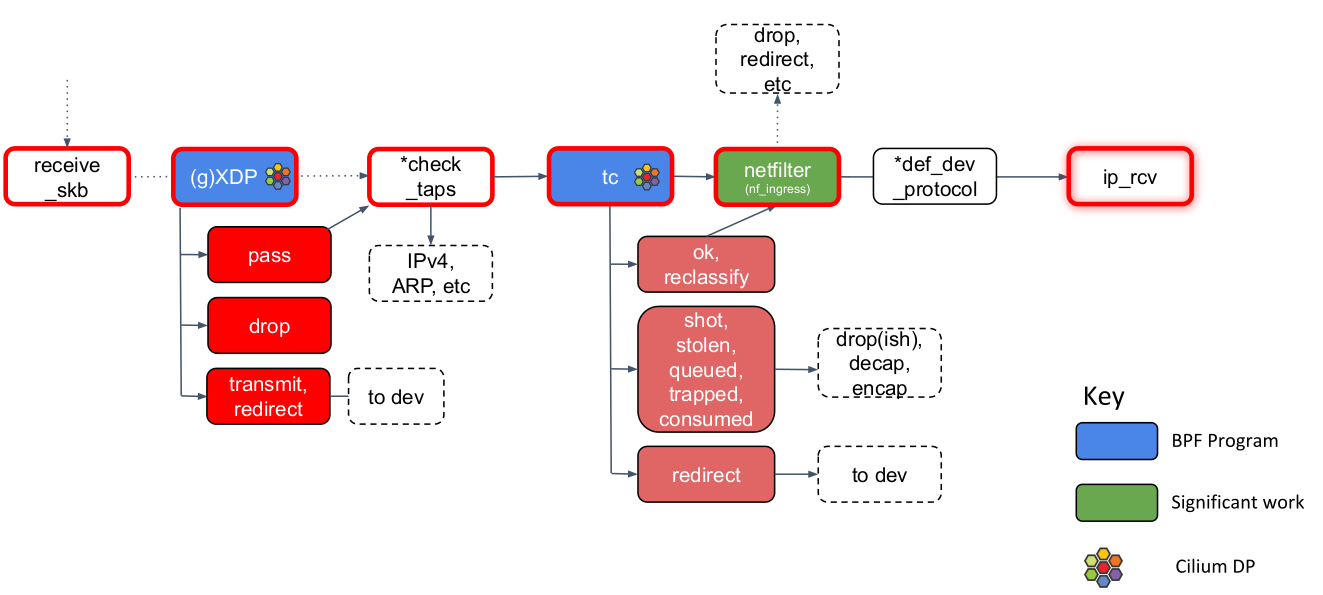
几乎所有驱动程序都会实现的 drvr_poll,它会调用第一个BPF程序,即XDP。
如果此程序返回 pass,内核会:
- 调用clean_rx,在此Linux分配skb
- 如果启用GRO(Generic receive offload),则调用gro_rx,在此封包会被聚合,以一点延迟来换取吞吐量的提升。如果tcpdump时发现不可理解的巨大封包,可能是因为启用了GRO,你看到的是内核给的fake封包
- 调用receive_skb,开始L2接收处理

当调用receive_skb后:
- 如果驱动没有实现XDP支持,则在此调用XDP BPF程序,这里的效率比较低
- 轮询所有的 socket tap,将包放到正确的(如果存在) tap 设备的缓冲区
- 调用tc BPF程序。这是Cilium最依赖的挂钩点,实现了修改封包(例如打标记)、重新路由、丢弃封包等操作。这里的BPF程序可能会影响qdisc统计信息,从而影响流量塑形。如果tc BPF程序返回OK,则进入netfilter
- netfilter 也会对入向的包进行处理,它是网络栈的下半部分,iptables规则越多,对网络栈下半部分造成的瓶颈也就越大
- 取决于L3协议的类型(几乎都是IP),调用相应L3接收函数并进入网络栈第三层
当调用ip_rcv后:
- 首先是netfilter钩子pre_routing,这里会从L4视角处理封包,会执行netfilter中的任何四层规则
- netfilter处理完毕后,回调ip_rcv_finish
- ip_rcv_finish会立即调用ip_routing对封包进行路由判断:是否位于lookback上,是否能够路由出去。如果Cilium没有使用隧道模式,则会使用到这里的路由功能
- 如果路由目的地是本机,则会调用ip_local_deliver。进而调用xfrm4_policy
- xfrm4_policy负责完成包的封装、解封装、加解密。IPSec就是在此完成
- 根据L4协议的不同,调用相应的L4接收函数
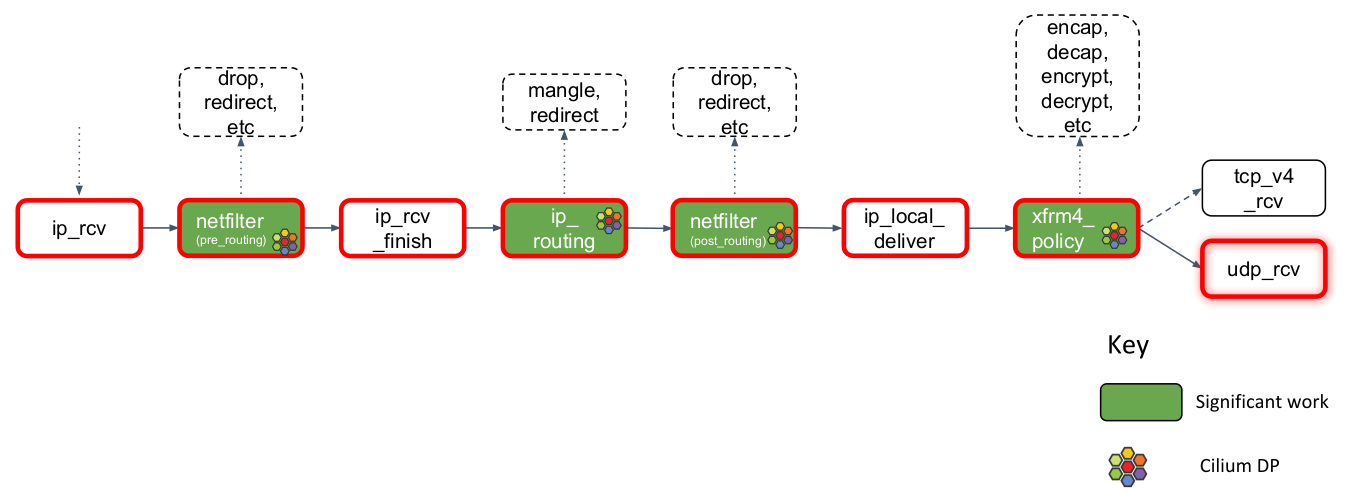
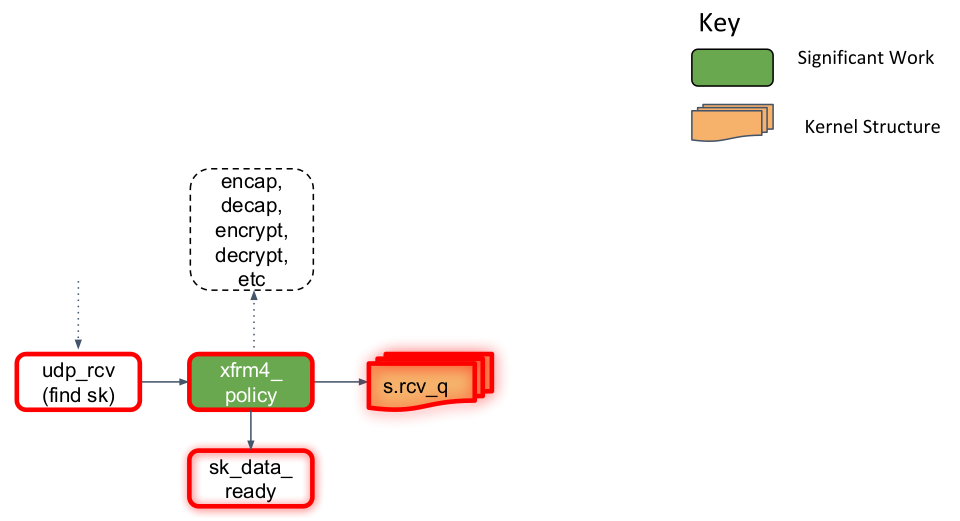
这里以UDP为例,L4入口函数为udp_rcv:
- 该函数会对封包的合法性进行验证,检查UDP的checksum
- 封包再次送到xfrm4_policy进行处理。这是因为某些transform policy能够指定L4协议,而此时L4协议才明确
- 根据端口,查找对应的套接字,然后将skb存放到一个链表s.rcv_q中
- 最后,调用sk_data_ready,标记套接字有数据待收取
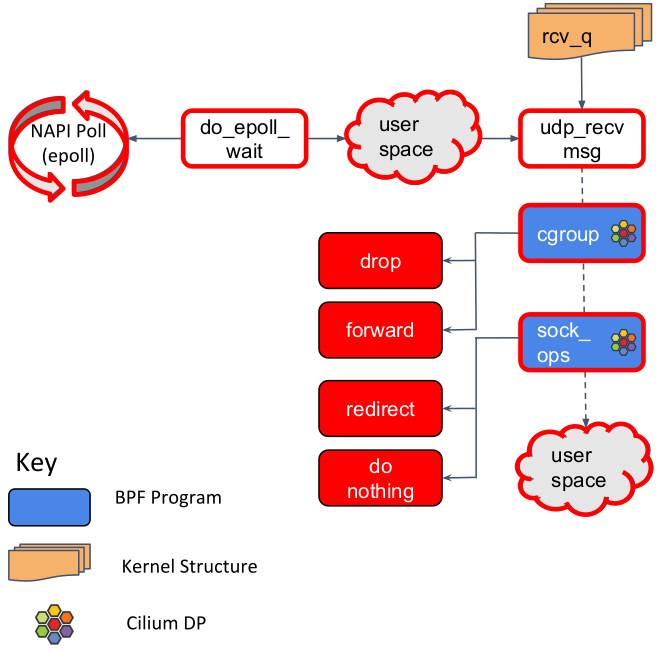
- 上节提到了,套接字(的等待队列)会被标记为有数据待收取。用户空间程序,通过epoll在等待队列上监听,而因获得通知
- 用户空间调用udp_recv_msg函数,后者会调用cgroup BPF程序。这种程序用来实现透明的客户端egressing负载均衡
- 最后是sock_ops BPF程序。用于socket level的细粒度流量塑形。对于某些功能来说这很重要,例如客户端限速
Linux内核在网络栈中支持一系列的BPF挂钩点,用于挂接BPF程序。Cilium利用这些挂钩点来实现高层次的网络功能。
Cilium用到的钩子包括:
| 钩子 | 说明 |
| XDP |
网络路径上最早的、可以软件介入的点,在驱动接收到封包之后,具有最好的封包处理性能 能够快速过滤恶意/非预期的流量,例如DDoS |
| tc ingress/egress |
在封包已经开始最初的处理之后的挂钩点,此时内核L3处理尚未开始,但是已经能够访问大部分的封包元数据 适合进行本节点相关的处理,例如应用L3/L4端点策略,重定向流量到特定端点 |
| socket operations | socket operation hook挂钩到特定的cgroup,并且当TCP事件发生时执行。Cilium挂钩到根cgroup,依此实现TCP状态转换的监控,特别是ESTABLISHED状态转换。当一个TCP套接字进入ESTABLISHED状态,并且它具有一个节点本地的对端(可能是一个本地的proxy),则自动执行socket send/recv钩子来进行加速 |
| socket send/recv |
每当TCP套接字执行send操作时触发,钩子可以探查消息,然后或者丢弃、或者将消息发送到TCP层,或者重定向给另外一个套接字 Cilium使用这种钩子来加速数据路径的重定向 |
利用上面这些挂钩点,以及虚拟接口(cilium_host, cilium_net)、一个可选的Overlay接口(cilium_vxlan)、内核的crypto支持、以及用户空间代理Envoy,Cilium创建以下类型的网络对象:
| 网络对象 | 说明 |
| Prefilter |
这类对象运行XDP程序,提供一系列的预过滤规则,获得最大性能的封包过滤 通过Cillium Agent提供的CIDR map,被用于快速查找,判定一个封包是否应该被丢弃。例如,假设目的地址不是有效的端点,则应该快速丢弃 |
| Endpoint Policy |
这类对象实现Cilium端点策略,它使用一个Map来查询当前封包关联的身份标识,当端点数量很大时,性能不会变差 根据策略,在这一层可能丢弃封包、转发给本地端点、转发给Service对象、转发给L7策略对象 在Cilium中,这是映射封包到身份标识、以及应用L3/L4策略的主要对象 |
| Service |
这类对象根据每个封包的目的地址来进行Map查找,寻找对应的Service,如果找到了,则封包被转发给Service的某个L3/L4端点 可以和Endpoint Policy对象集成;也可以实现独立的LB |
| L3 Encryption |
在ingress端,L3 Encryption对象标记封包为待解密,随后封包被传递给内核的xfrm(transform)层进行解密,随后解密后的封包传回,并交给网络栈中的其它对象进行后续处理 在egress端,首先根据目的地址进行Map查找,判断是否需要加密,如果是,目标节点上哪些key可用。同时在两端可用的、最近的key被用来加密。封包随后被标记为待解密,传递给内核的xfrm层。加密后的封包,传递给下一层处理,可能是传递给Linux网络栈进行路由,使用overlay的情况下可能直接发起一个尾调用 |
| Socket Layer Enforcement |
使用两类钩子:socket operations、socket send/recv,来监、控所有Cilium管理的端点(包括L7代理)的TCP连接 socket operations钩子否则识别候选的、可加速的套接字。这些可加速套接字包括所有本地端点之间的连接、任何发往Cilium代理的连接。可加速套接字的所有封包都会被socket send/recv钩子处理 —— 通过BPF sockmap进行快速重定向 |
| L7 Policy | 该对象将代理流量重定向给Cilium的用户空间代理,也就是Envoy。Envoy随后要么转发流量,要么根据配置的L7策略生成适当的reject消息 |
Cilium使用了大量的BPF Maps,这些Map创建的时候都进行了容量限制。超过限制后,无法插入数据,因此限制了数据路径的扩容能力。下表显示了默认容量:
| Map类别 | 作用域 | 默认限制 | 扩容影响 |
| Connection Tracking | node endpoint |
1M TCP 256k UDP |
Max 1M concurrent TCP connections, max 256k expected UDP answers |
| NAT | node | 512k | Max 512k NAT entries |
| Neighbor Table | node | 512k | Max 512k neighbor entries |
| Endpoints | node | 64k | Max 64k local endpoints + host IPs per node |
| IP cache | node | 512k | Max 256k endpoints (IPv4+IPv6), max 512k endpoints (IPv4 or IPv6) across all clusters |
| Load Balancer | node | 64k | Max 64k cumulative backends across all services across all clusters |
| Policy | endpoint | 16k | Max 16k allowed identity + port + protocol pairs for specific endpoint |
| Proxy Map | node | 512k | Max 512k concurrent redirected TCP connections to proxy |
| Tunnel | node | 64k | Max 32k nodes (IPv4+IPv6) or 64k nodes (IPv4 or IPv6) across all clusters |
| IPv4 Fragmentation | node | 8k | Max 8k fragmented datagrams in flight simultaneously on the node |
| Session Affinity | node | 64k | Max 64k affinities from different clients |
| IP Masq | node | 16k | Max 16k IPv4 cidrs used by BPF-based ip-masq-agent |
| Service Source Ranges | node | 64k | Max 64k cumulative LB source ranges across all services |
| Egress Policy | endpoint | 16k | Max 16k endpoints across all destination CIDRs across all clusters |
部分BPF Map的容量上限可以通过cilium-agent的命令行选项覆盖:
--bpf-ct-global-tcp-max
--bpf-ct-global-any-max
--bpf-nat-global-max
--bpf-neigh-global-max
--bpf-policy-map-max
--bpf-fragments-map-max
--bpf-lb-map-max
如果指定了--bpf-ct-global-tcp-max或/和--bpf-ct-global-any-max,则NAT表( --bpf-nat-global-max)的大小不能超过前面两个表合计大小的2/3。
使用 --bpf-map-dynamic-size-ratio=0.0025,则cilium-agent在启动时能够动态根据总计内存来调整Map的容量。该选项取值0.0025则0.25%的系统内存用于BPF Map。 该标记会影响消耗大部分内存的Map,包括:
cilium_ct_{4,6}_global
cilium_ct_{4,6}_any
cilium_nodeport_neigh{4,6}
cilium_snat_v{4,6}_external
cilium_lb{4,6}_reverse_sk
Cilium使用自己的,基于BPF Map实现的连接跟踪表,--bpf-map-dynamic-size-ratio影响容量,但是不会小于131072。
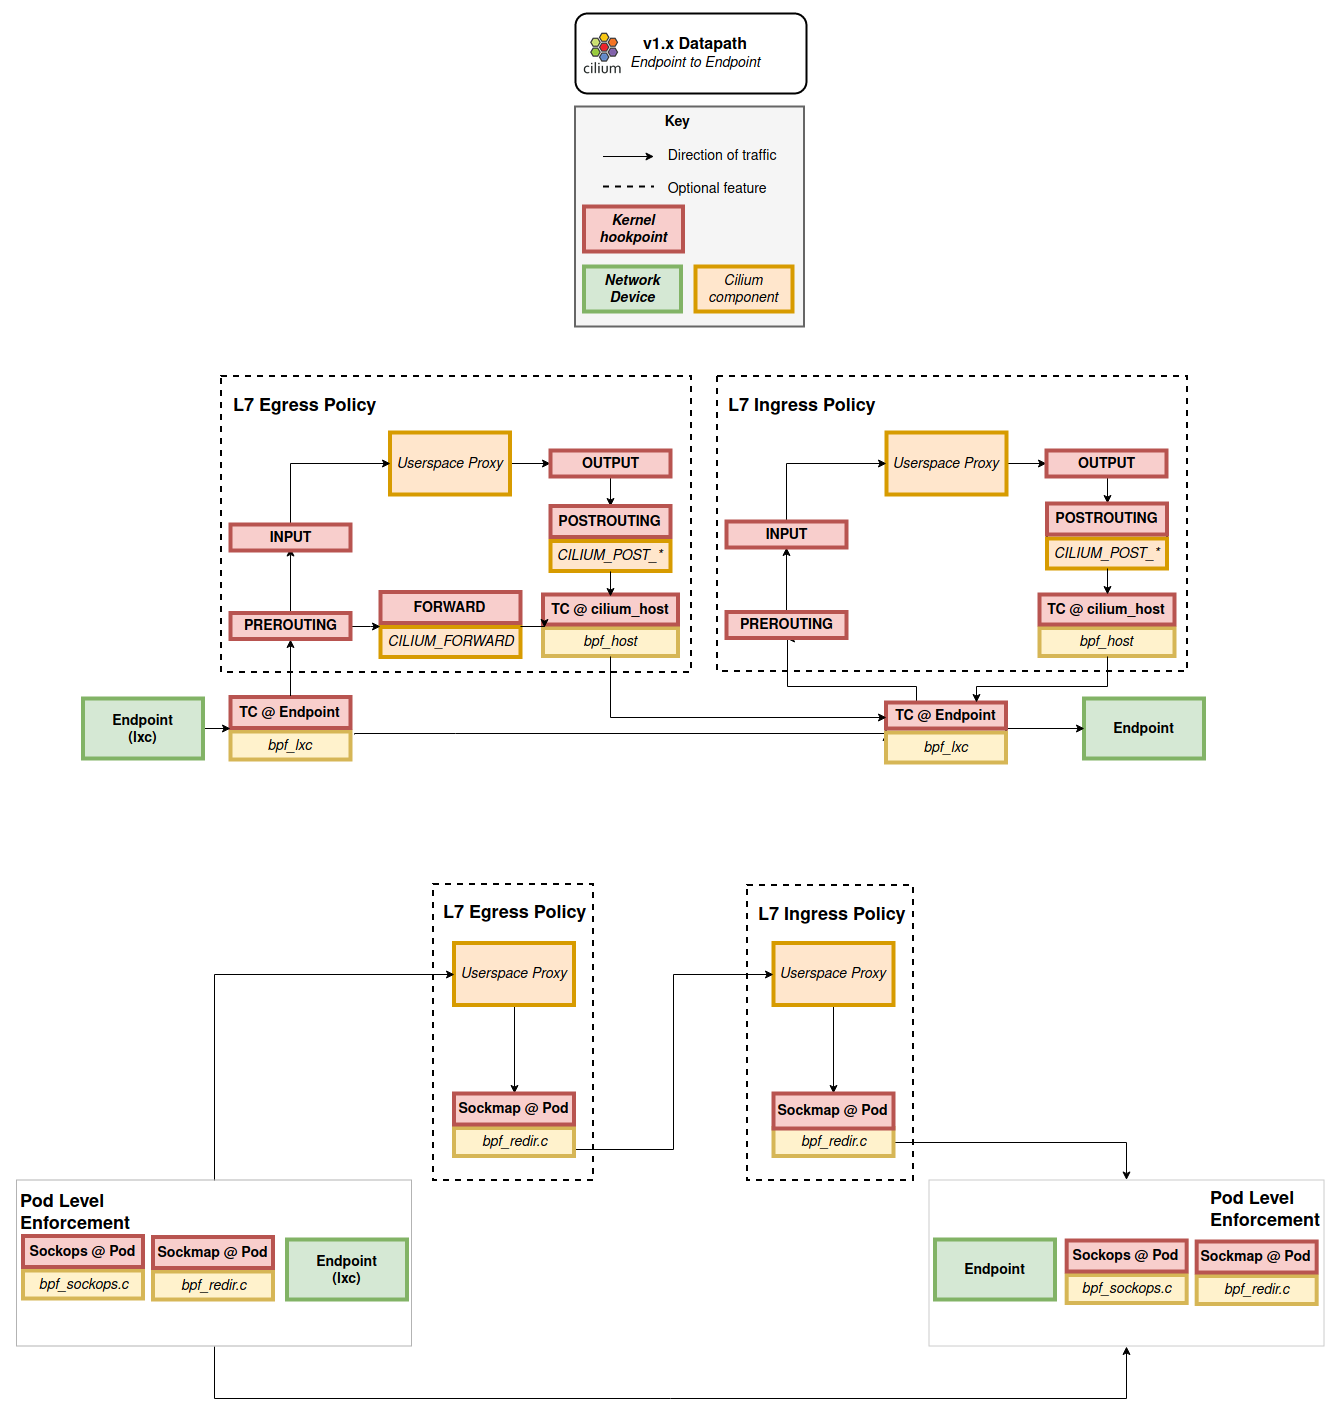
上图包含两个部分:
- 上半部分:本地端点到端点数据流图,显示了Cilium如何配合L7代理进行封包重定向的细节
- 下半部分:启用了Socket Layer Enforcement后的数据流图。这种情况下,TCP连接的握手阶段,需要遍历Endpoint Policy,直到ESTABLISHED,之后仅仅需要L7 Policy
如果启用了L7规则,则流量会被转发给用户空间代理,代理处理完后,转发给目的端点的代理,后者再转发给目的端点的Pod。转发都是由bpf_redir负责,直接修改封包。
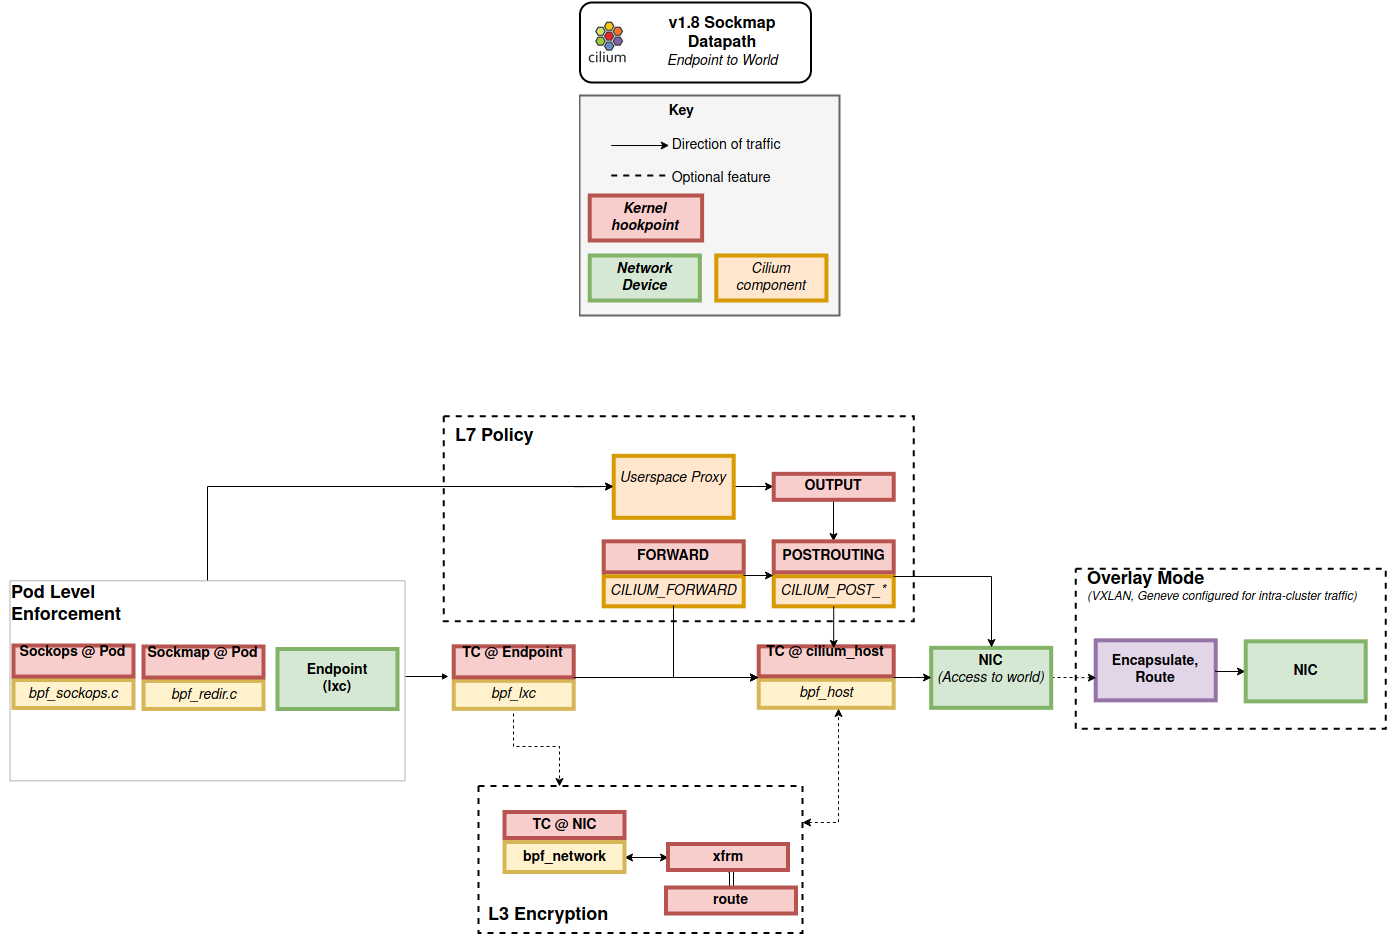
跨节点的封包流,可能牵涉到overlay,默认情况下overlay接口的名字是cilium_vxlan。
如果需要L3 Encryption,则Endpoint端的tc钩子会将其流量传递给L3 Encryption处理。需要注意tc BPF程序的da模式,能够直接对封包进行修改、转发,而不需要外部的tc action模块。
和端点到端点流量类似,当启用Socket Layer Enforcement时,并且使用L7代理,则对于TCP流量可以避免运行端点和L7代理之间的Endpoint Policy。

和端点到端点流量类似,当启用Socket Layer Enforcement时,并且使用L7代理,则对于TCP流量可以避免运行端点和L7代理之间的Endpoint Policy。
这种封包流可以被Prefilter快速处理,决定是否需要丢弃封包、是否需要进行负载均衡处理。
依赖于实际使用的Linux内核版本,Cilium能够利用eBPF datapath全部或部分特性。如果Linux内核版本较低,某些功能可能基于iptables实现。
下图显示了Cilium和kube-proxy安装的iptables规则以及相互关系:
要求内核版本4.9.17或者更高。
必须启用CNI作为网络插件。
|
1 2 3 4 |
curl -L --remote-name-all https://github.com/cilium/cilium-cli/releases/latest/download/cilium-linux-amd64.tar.gz{,.sha256sum} sha256sum --check cilium-linux-amd64.tar.gz.sha256sum sudo tar xzvfC cilium-linux-amd64.tar.gz /usr/local/bin rm cilium-linux-amd64.tar.gz{,.sha256sum} |
参考下面的命令进行安装:
|
1 2 3 4 5 6 7 8 9 10 11 12 13 14 15 16 17 18 19 20 21 22 23 24 25 26 |
# 安装到当前Kubernetes context cilium install cilium install --agent-image string # Cilium Agent镜像 --operator-image # Cilium Operator镜像 --cluster-id int # 多集群模式下唯一ID --cluster-name string # 多集群模式下此集群的名字 --config strings # 添加Cilium配置条目,对应ConfigMap中的一个键值 --context string # 使用的K8S Context --datapath-mode # 使用的datapath模式 --disable-check strings # 禁用指定的校验 --encryption string # 所有工作负载流量的加密:disabled(默认) | ipsec | wireguard --inherit-ca string # 从另外一个集群继承/导入CA --ipam string # IPAM模式 --kube-proxy-replacement string # kube-proxy replacement工作模式:disabled(默认) | probe | strict -n, --namespace # Cilium安装到什么命名空间,默认kube-system --native-routing-cidr string # 直接路由的CIDR,和PodCIDR一致 --node-encryption # 加密所有节点到节点流量 --restart-unmanaged-pods # 重启所有没有被Cilium管理的Pod,默认true,保证所有Pod获得Cilium提供的容器网络 --wait # 等待安装完毕,默认true cilium install \ --agent-image=docker.gmem.cc/cilium/cilium:v1.10.1 \ --operator-image=docker.gmem.cc/cilium/operator-generic:v1.10.1 |
如果安装失败,可以通过命令 cilium status 查看整体部署状态,查看日志。
安装完毕后,使用下面的命令来检查状态、进行连通性测试:
|
1 2 3 |
cilium status --wait cilium connectivity test |
|
1 2 3 4 5 6 7 8 9 10 11 12 13 14 15 16 17 18 19 20 21 22 23 24 25 26 27 28 29 30 31 32 33 34 35 36 37 38 39 40 41 42 43 44 45 46 47 48 49 50 51 52 53 54 55 56 57 58 59 60 61 62 63 64 65 66 67 68 69 70 71 72 73 74 75 76 77 78 79 80 81 82 83 84 85 86 87 88 89 90 91 92 93 94 95 96 97 98 99 100 101 102 103 104 105 106 107 108 109 110 111 112 113 114 115 116 117 118 119 120 121 122 123 124 125 126 127 128 129 130 131 132 133 134 135 136 137 138 139 140 141 142 143 144 145 146 147 148 149 |
helm repo add cilium https://helm.cilium.io/ helm install cilium cilium/cilium --version 1.10.1 \ --namespace kube-system # 是否启用调试日志 --set debug.enabled=true # 集群ID,整数,范围1-255,网格中所有集群都必须有唯一ID --set cluster.id=1 # 集群的名字,仅对于集群网格需要 --set cluster.name=gmem # 容器网络路径选项,veth或者ipvlan --set datapathMode=veth # 禁用隧道,使用直接路由 --set tunnel=disabled # 如果所有节点位于L2网络中,下面的选项用于自动在工作节点之间同步PodCIDR的路由 # 如果不指定该选项,节点之间的路由不会同步,会出现节点A无法访问B上Pod IP的问题 --set autoDirectNodeRoutes=true # 指定可以直接进行路由(访问时不需要进行IP遮掩)的CIDR,对应K8S配置的cluster-cidr(PodCIDR) # 禁用隧道后必须手工设置,否则报错 --set nativeRoutingCIDR=172.27.0.0/16 # 当ConfigMap改变时,滚动更新cilium-agent --set rollOutCiliumPods=false # 为cilium-config这个ConfigMap配置额外的键值 --set extraConfig={} # 传递cilium-agent的额外命令行选项 --set extraArgs=[] # 传递cilium-agent的额外环境变量 --set extraEnv={} # 是否在Cilium中启用内置BGP支持 --set bgp.enabled=false # 是否分配、宣告LoadBalancer服务的IP地址 --set bgp.announce.loadbalancerIP=false # 强制cilium-agent在init容器中等待eBPF文件系统已挂载 --set bpf.waitForMount=false # 是否预先分配eBPF Map的键值,会增加内存消耗并降低延迟 --set bpf.preallocateMaps=false # TCP连接跟踪表的最大条目数量 --set bpf.ctTcpMax=524288 # 非TCP连接跟踪表的最大条目数量 --set bpf.ctAnyMax=262144 # 负载均衡表中最大服务条目 --set bpf.lbMapMax=65536 # NAT表最大条目数量 --set bpf.natMax=524288 # neighbor表最大条目数量 --set bpf.neighMax=524288 # 端点策略映射最大条目数量 --set bpf.policyMapMax=16384 # 配置所有BPF Map的自动sizing,根据可用内存 --set bpf.mapDynamicSizeRatio=0.0025 # 监控通知(monitor notifications)的聚合级别 none, low, medium, maximum --set bpf.monitorAggregation=medium # 活动连接的监控通知的间隔 --set bpf.monitorInterval=5s # 哪些TCP flag第一次出现在某个连接中,会触发通知 --set bpf.monitorFlags=all # 允许从外部访问集群的ClusterIP --set bpf.lbExternalClusterIP=false # 即用基于eBPF的IP遮掩支持 --set bpf.masquerade=true # 直接路由模式,是通过宿主机网络栈进行(true),还是(如果内核支持)使用更直接的、高效的eBPF(false) # 后者的副作用是,跳过宿主机的netfilter --set bpf.hostRouting=true # 是否启用基于eBPF的TPROXY,以便在实现L7策略时减少对iptables的依赖 --set bpf.tproxy=true # NodePort反向NAT处理时,是否跳过FIB查找 --set bpf.lbBypassFIBLookup=true # 每当cilium-agnet重启时,清空BPF状态 --set cleanBpfState=false # 每当cilium-agnet重启时,清空所有状态 --set cleanState=false # 和其它CNI插件组成链,可选值none generic-veth portmap --set cni.chainingMode=none # 让Cilium管理/etc/cni/net.d目录,将其它CNI插件的配置改为*.cilium_bak --set cni.exclusive=true # 如果你希望通过外部机制将CNI配置写入,则设置为true --set cni.customConf=false --set cni.confPath: /etc/cni/net.d --set cni.binPath: /opt/cni/bin # 配置容器运行时集成 containerd crio docker none auto --set containerRuntime.integration=none # 支持对自定义BPF程序的尾调用 --set customCalls.enabled=false # IPAM模式 --set ipam.mode=cluster-pool # IPv4 CIDR --set ipam.operator.clusterPoolIPv4PodCIDR=0.0.0.0/8 --set ipam.operator.clusterPoolIPv4MaskSize=24 # IPv6 CIDR --set ipam.operator.clusterPoolIPv6PodCIDR=fd00::/104 --set ipam.operator.clusterPoolIPv6MaskSize=120 # 配置基于eBPF的ip-masq-agent --set ipMasqAgent.enabled=false # IP协议版本支持 --set ipv4.enabled=true --set ipv6.enabled=false # 如果启用,这重定向、SNAT离开集群的流量 --set egressGateway.enabled=false # 启用监控sidecar --set monitor.enabled=false # 配置Service负载均衡 # 是否启用独立的、不连接到kube-apiserver的L4负载均衡器 --set loadBalancer.standalone=false # 负载均衡算法 random或者maglev --set loadBalancer.algorithm=random # 对于远程后端,LB操作模式 snat, dsr, hybrid --set loadBalancer.mode=snat # 是否基于XDP来加速服务处理 --set loadBalancer.acceleration=disabled # 是否利用IP选项/IPIP封装,来将Service的IP/端口信息传递到远程后端 --set loadBalancer.dsrDispatch=opt # 是否对从端点离开节点的流量进行IP遮掩 --set enableIPv4Masquerade=true --set enableIPv6Masquerade=true # 支持L7网络策略 --set l7Proxy=true # 镜像 --set image.repository=docker.gmem.cc/cilium/cilium --set image.useDigest=false --set operator.image.repository=docker.gmem.cc/cilium/operator --set operator.image.useDigest=false # 重启所有被有被cilium管理的Pod kubectl get pods --all-namespaces -o custom-columns=NAMESPACE:.metadata.namespace,NAME:.metadata.name,HOSTNETWORK:.spec.hostNetwork --no-headers=true | grep '<none>' | awk '{print "-n "$1" "$2}' | xargs -L 1 -r kubectl delete pod |
使用独立的外部Etcd(而非K8S自带的)可以提供更好的性能适用于更大的部署环境。
选用外部Etcd的时机可能是:
- 超过250节点,5000个Pod。或者,在通过Kubernetes evnets进行状态传播时,出现了很高的overhead
- 你不希望利用CRD来存储Cilium状态
|
1 2 3 4 5 6 7 8 9 10 11 12 13 14 15 16 17 18 19 20 21 22 23 |
helm install cilium cilium/cilium --version 1.10.1 \ --namespace kube-system \ --set etcd.enabled=true \ --set "etcd.endpoints[0]=http://etcd-endpoint1:2379" \ --set "etcd.endpoints[1]=http://etcd-endpoint2:2379" \ --set "etcd.endpoints[2]=http://etcd-endpoint3:2379" \ # 不使用CRD来存储状态 --set identityAllocationMode=kvstore # 使用SSL kubectl create secret generic -n kube-system cilium-etcd-secrets \ --from-file=etcd-client-ca.crt=ca.crt \ --from-file=etcd-client.key=client.key \ --from-file=etcd-client.crt=client.crt helm install cilium cilium/cilium --version 1.10.1 \ --namespace kube-system \ --set etcd.enabled=true \ --set etcd.ssl=true \ --set "etcd.endpoints[0]=https://etcd-endpoint1:2379" \ --set "etcd.endpoints[1]=https://etcd-endpoint2:2379" \ --set "etcd.endpoints[2]=https://etcd-endpoint3:2379" |
CNI Chaining允许联用Cilium和其它CNI插件。联用时某些Cilium高级特性不可用,包括:
你需要创建一个CNI配置,使用plugin list:
|
1 2 3 4 5 6 7 8 9 10 11 12 13 14 15 16 17 18 19 20 21 22 23 24 25 26 27 28 29 30 31 32 33 34 35 36 |
apiVersion: v1 kind: ConfigMap metadata: name: cni-configuration namespace: kube-system data: cni-config: |- { "name": "generic-veth", "cniVersion": "0.3.1", "plugins": [ { "type": "calico", "log_level": "info", "datastore_type": "kubernetes", "mtu": 1440, "ipam": { "type": "calico-ipam" }, "policy": { "type": "k8s" }, "kubernetes": { "kubeconfig": "/etc/cni/net.d/calico-kubeconfig" } }, { "type": "portmap", "snat": true, "capabilities": {"portMappings": true} }, { "type": "cilium-cni" } ] } |
|
1 2 3 4 5 6 7 8 |
helm install cilium cilium/cilium --version 1.10.1 \ --namespace=kube-system \ --set cni.chainingMode=generic-veth \ --set cni.customConf=true \ --set cni.configMap=cni-configuration \ --set tunnel=disabled \ --set enableIPv4Masquerade=false \ --set enableIdentityMark=false |
Cilium能够为K8S带来:
- 基于CNI的容器网络支持
- 基于身份标识实现的NetworkPolicy,用于隔离L3/L4连接性
- CRD形式的NetworkPolicy扩展,支持:
- L7策略,目前支持HTTP、Kafka等协议
- Egress策略支持CIDR
- ClusterIP实现,提供分布式的负载均衡。完全兼容kube-proxy模型
支持的K8S版本为1.16+,内核版本4.9+。
K8S能够自动分配per-node的CIDR,通过kube-controller-manager的命令行选项 --allocate-node-cidrs启用此特性。Cilium会自动使用分配的CIDR。
Cilium使用名为cilium-config的ConfigMap:
|
1 2 3 4 5 6 7 8 9 10 11 12 13 14 15 16 17 18 19 20 21 22 23 24 25 26 27 28 29 30 31 32 33 34 35 36 37 38 39 |
apiVersion: v1 kind: ConfigMap metadata: name: cilium-config namespace: kube-system data: # The kvstore configuration is used to enable use of a kvstore for state # storage. kvstore: etcd kvstore-opt: '{"etcd.config": "/var/lib/etcd-config/etcd.config"}' # Etcd配置 etcd-config: |- --- endpoints: - https://node-1:31079 - https://node-2:31079 trusted-ca-file: '/var/lib/etcd-secrets/etcd-client-ca.crt' key-file: '/var/lib/etcd-secrets/etcd-client.key' cert-file: '/var/lib/etcd-secrets/etcd-client.crt' # 是否让Cilium运行在调试模式下 debug: "false" # 是否启用IPv4地址支持 enable-ipv4: "true" # 是否启用IPv6地址支持 enable-ipv6: "true" # 在启动cilium-agent时,从文件系统中移除所有eBPF状态。这会导致进行中的连接中断、负载均衡决策丢失 # 所有的eBPF状态将从源(例如K8S或kvstore)重新构造 # 该选项用于缓和严重的eBPF maps有关的问题,并且在打开、重启cilium-agent后,立即关闭 clean-cilium-bpf-state: "false" # 清除所有Cilium状态,包括钉在文件系统中的eBPF状态、CNI配置文件、端点状态 # 当前被Cilium管理的Pod可能继续正常工作,但是可能在没有警告的情况下不再工作 clean-cilium-state: "false" # 该选项启用在cilium monitor中的追踪事件的聚合 monitor-aggregation: none, low, medium, maximum # 启用Map条目的预分配,这样可以降低per-packet的延迟,代价是提前的为Map中条目分配内存 # 如果此选项改变,则cilium-agnet下次重启会导致具有活动连接的端点临时性中断 preallocate-bpf-maps: "true" |
修改此ConfigMap后,你需要重新启动cilium-agent才能生效。需要注意,K8S的ConfigMap变更可能需要2分钟才能传播到所有节点。
K8S标准的NetworkPolicy,可以用来指定L3/L4 ingress策略,以及受限的egress策略。详细参考Kubernetes学习笔记。
功能类似于标准的NetworkPolicy,但是提供丰富的多的特性,能够配置L3/L4/L7策略。
L3策略用于提供端点之间基本的连接性。支持通过以下方式来指定:
- 基于标签:当通信双方端点都被Cilium管理(因而被提取了标签)时,使用此方式。此方式的优点是IP地址之类的易变信息不会编码在策略中
- 基于服务:自动提取、维护编排系统的服务的后端IP列表(对于K8S就是Service的Endpoint的IP地址列表)。即使端点不会Cilium管理,这种方式也可以避免硬编码IP到策略中
- 基于实体:实体用于描述那些被归类的、不需要知道其IP地址的端点。例如具有reserved:身份标识的那些端点
- 基于IP/CIDR:当外部服务不是一个端点时使用
- 基于DNS:先进行DNS查找,然后转换为IP
|
1 2 3 4 5 6 7 8 9 10 11 12 13 14 15 16 17 18 19 20 21 22 23 24 25 26 27 28 29 30 31 32 33 34 35 36 37 38 39 40 41 42 43 44 45 46 47 48 49 50 51 52 53 54 55 56 57 58 59 60 61 62 63 64 65 66 67 68 69 70 |
## ingress示例 # 允许frontend访问backend apiVersion: "cilium.io/v2" kind: CiliumNetworkPolicy metadata: name: "l3-rule" spec: endpointSelector: matchLabels: role: backend ingress: - fromEndpoints: - matchLabels: role: frontend # 允许所有端点访问victim kind: CiliumNetworkPolicy metadata: name: "allow-all-to-victim" spec: endpointSelector: matchLabels: role: victim ingress: - fromEndpoints: - {} ## egress示例 # 允许frontend访问backend apiVersion: "cilium.io/v2" kind: CiliumNetworkPolicy metadata: name: "l3-egress-rule" spec: endpointSelector: matchLabels: role: frontend egress: - toEndpoints: - matchLabels: role: backend # 允许frontend访问所有端点 apiVersion: "cilium.io/v2" kind: CiliumNetworkPolicy metadata: name: "allow-all-from-frontend" spec: endpointSelector: matchLabels: role: frontend egress: - toEndpoints: - {} # 禁止restricted访问任何端点 apiVersion: "cilium.io/v2" kind: CiliumNetworkPolicy metadata: name: "deny-all-egress" spec: endpointSelector: matchLabels: role: restricted egress: - {} |
在设计策略时,通常遵循关注点分离原则。CiliumNetworkPolicy支持设置任何连接性发生所需要的“前提条件”。字段fromRequires用于为任何fromEndpoints指定前提条件。类似的还有toRequires。
|
1 2 3 4 5 6 7 8 9 10 11 12 13 14 |
apiVersion: "cilium.io/v2" kind: CiliumNetworkPolicy metadata: name: "requires-rule" specs: # 对于生产环境下的Pod,允许访问它的端点,必须也在生产环境中(前提条件) - description: "For endpoints with env=prod, only allow if source also has label env=prod" endpointSelector: matchLabels: env: prod ingress: - fromRequires: - matchLabels: env: prod |
上面这个 fromRequires规则本身不会允许任何流量,它必须和fromEndpoints规则进行“与”才能允许特定流量:
|
1 2 3 4 5 6 7 8 9 10 11 12 13 14 |
apiVersion: "cilium.io/v2" kind: CiliumNetworkPolicy metadata: name: "l3-rule" specs: # 配合上面的规则,效果就是,生产环境下的前端组件,可以访问生产环境下的端点 - description: "For endpoints with env=prod, allow if source also has label role=frontend" endpointSelector: matchLabels: env: prod ingress: - fromEndpoints: - matchLabels: role: frontend |
运行在集群中的服务,可以在Egress规则的白名单中列出:
|
1 2 3 4 5 6 7 8 9 10 11 12 13 14 15 16 17 18 19 20 21 22 23 24 25 26 27 28 29 30 31 32 33 |
# 使用服务名 apiVersion: "cilium.io/v2" kind: CiliumNetworkPolicy metadata: name: "service-rule" spec: # 策略控制的目标端点,总是通过标签选择 endpointSelector: matchLabels: id: app2 egress: # 允许访问特定服务 - toServices: - k8sService: serviceName: myservice namespace: default # 使用服务选择器 apiVersion: "cilium.io/v2" kind: CiliumNetworkPolicy metadata: name: "service-labels-rule" spec: endpointSelector: matchLabels: id: app2 egress: - toServices: - k8sServiceSelector: selector: matchLabels: head: none |
fromEntities用于描述哪些实体可以访问选择的端点; toEntities则用于描述选择的端点能够访问哪些实体。
支持的实体参考前文描述的具有reserved:前缀的特殊身份标识。
|
1 2 3 4 5 6 7 8 9 10 11 12 13 14 15 16 17 18 19 20 21 22 23 24 25 26 27 28 29 30 31 32 33 34 35 36 37 38 39 40 41 42 |
apiVersion: "cilium.io/v2" kind: CiliumNetworkPolicy metadata: name: "dev-to-host" spec: endpointSelector: matchLabels: env: dev # 允许开发环境端点访问其本机上的实体 egress: - toEntities: - host apiVersion: "cilium.io/v2" kind: CiliumNetworkPolicy metadata: name: "to-dev-from-nodes-in-cluster" spec: endpointSelector: matchLabels: env: dev # 允许本机、集群远程机器访问开发环境端点 # 注意,K8S默认允许从宿主机访问任何本地端点,cilium-agnet选项 --allow-localhost=policy可以禁用这默认行为 ingress: - fromEntities: - host - remote-node apiVersion: "cilium.io/v2" kind: CiliumNetworkPolicy metadata: name: "from-world-to-role-public" spec: endpointSelector: matchLabels: role: public # 允许集群外部访问role:public的端点 ingress: - fromEntities: - world |
不被Cilium管理的实体,没有标签,不属于端点。这些实体通常是运行在特定子网中的外部服务、VM、裸金属机器。这类实体在策略中,可以用CIDR规则来描述。
CIDR规则不能用在通信两端都是以下之一的场景:
- 被Cilium管理的端点
- 使用属于集群节点的IP的实体,包括使用host networking的Pod
|
1 2 3 4 5 6 7 8 9 10 11 12 13 14 15 16 |
apiVersion: "cilium.io/v2" kind: CiliumNetworkPolicy metadata: name: "cidr-rule" spec: endpointSelector: matchLabels: app: myService # 允许访问外部CIDR egress: - toCIDR: - 20.1.1.1/32 - toCIDRSet: - cidr: 10.0.0.0/8 except: - 10.96.0.0/12 |
使用DNS名称来指定不被Cilium管理的实体也是支持的,由matchName/matchPattern规则给出的DNS信息,会被cilium-agent收集为IP地址。
|
1 2 3 4 5 6 7 8 9 10 11 12 13 14 15 16 17 18 19 20 21 22 23 24 25 26 27 28 29 30 |
apiVersion: "cilium.io/v2" kind: CiliumNetworkPolicy metadata: name: "to-fqdn" spec: endpointSelector: matchLabels: app: test-app egress: # 通过DNS Proxy拦截DNS请求,这样,当应用程序发起对my-remote-service.com的DNS查询时 # Cilium能够学习到域名对应的IP地址 - toEndpoints: - matchLabels: "k8s:io.kubernetes.pod.namespace": kube-system "k8s:k8s-app": kube-dns toPorts: - ports: - port: "53" protocol: ANY # DNS代理允许查询的域名 rules: dns: - matchPattern: "*" - toFQDNs: # 将精确匹配此名称的IP地址插入到网路策略中 - matchName: "my-remote-service.com" # 将匹配此模式的所有名称对应的IP地址插入到网络策略中 # * 匹配所有域名,导致所有缓存的DNS IPs插入到规则 # *.gmem.cc 匹配子域名,不匹配gmem.cc - matchPattern: "*" |
很多情况下,应用程序打开的长连接,生存期大于DNS的TTL,如果没有发生后续、针对此长连接域名的查询,则DNS缓存会过期。这种情况下,已经建立的长连接会继续运行。DNS缓存的TTL可以通过 --tofqdns-min-ttl配置。
相反的,对于短连接场景,可能由于反复的DNS查询(服务backed by大量主机)导致FQDN映射的IP地址很快增加,到达默认 --tofqdns-max-ip-per-hostname=50的限制,并导致最旧的IP被剔除。这种情况下,已经建立的短连接也不会受到影响,直到它断开。
DNS代理能够拦截DNS请求,记录IP和域名的对应关系。为了实现拦截,必须配置一个管理DNS请求的策略规则。
某些常用的容器镜像(例如alpine/musl)将DNS的Refused应答(当DNS代理拒绝某个查询时)看作更一般性的错误,并且停止遍历/etc/resolv.conf的search list。例如,当Pod访问gmem.cc时,它会首先查询gmem.cc.svc.cluster.local.而得到DNS Proxy的Refused应答,停止遍历,不再查询gmem.cc.并且最终导致Pod认为DNS查询失败。
要解决此问题,可以配置 --tofqdns-dns-reject-response-code,默认值是refused,可以改为nameError,这样DNS代理会返回NXDomain应答。
主要是在L3的基础上,进行端口限制。
|
1 2 3 4 5 6 7 8 9 10 11 12 13 14 |
apiVersion: "cilium.io/v2" kind: CiliumNetworkPolicy metadata: name: "l4-rule" spec: endpointSelector: matchLabels: app: myService # 允许myService访问80端口 egress: - toPorts: - ports: - port: "80" protocol: TCP |
下面的例子,允许针对特定标签(所关联的端点)的端口的访问:
|
1 2 3 4 5 6 7 8 9 10 11 12 13 14 15 16 17 |
apiVersion: "cilium.io/v2" kind: CiliumNetworkPolicy metadata: name: "l4-rule" spec: endpointSelector: matchLabels: role: backend # 允许frontend服务访问backend服务的80端口 ingress: - fromEndpoints: - matchLabels: role: frontend toPorts: - ports: - port: "80" protocol: TCP |
|
1 2 3 4 5 6 7 8 9 10 11 12 13 14 15 16 |
apiVersion: "cilium.io/v2" kind: CiliumNetworkPolicy metadata: name: "cidr-l4-rule" spec: endpointSelector: matchLabels: role: crawler # 允许爬虫访问192.0.2.0/24的80端口 egress: - toCIDR: - 192.0.2.0/24 toPorts: - ports: - port: "80" protocol: TCP |
目前Cilium支持的L7协议很有限,仅仅HTTP和Kafka(beta)。
策略可以根据URL路径、HTTP方法、主机名、HTTP头来设置。
|
1 2 3 4 5 6 7 8 9 10 11 12 13 14 15 16 17 18 19 20 21 22 23 24 25 26 27 28 29 30 31 32 33 34 35 36 37 38 39 40 41 42 43 44 45 46 47 |
# 限定URL路径 apiVersion: "cilium.io/v2" kind: CiliumNetworkPolicy metadata: name: "rule1" spec: description: "Allow HTTP GET /public from env=prod to app=service" endpointSelector: matchLabels: app: service # 允许生产环境访问service的/public ingress: - fromEndpoints: - matchLabels: env: prod toPorts: - ports: - port: "80" protocol: TCP rules: http: - method: "GET" path: "/public" # 限定URL和请求头 apiVersion: "cilium.io/v2" kind: CiliumNetworkPolicy metadata: name: "l7-rule" spec: endpointSelector: matchLabels: app: myService ingress: - toPorts: - ports: - port: '80' protocol: TCP rules: http: - method: GET path: "/path1$" - method: PUT path: "/path2$" headers: - 'X-My-Header: true' |
用于明确的拒绝特定的流量,优先级比Allow策略(CiliumNetworkPolicy/CiliumClusterwideNetworkPolicy/NetworkPolicy)高,上文提及的所有策略都是Allow策略。
|
1 2 3 4 5 6 7 8 9 10 11 12 13 |
apiVersion: "cilium.io/v2" kind: CiliumClusterwideNetworkPolicy metadata: name: "external-lockdown" spec: endpointSelector: {} # 明确禁止外部访问 ingressDeny: - fromEntities: - "world" ingress: - fromEntities: - "all" |
类似于上面的CiliumNetworkPolicy,区别是:
- 不限定到某个命名空间,集群范围的
- 支持使用节点选择器
使用节点选择器,可以将策略应用到特定的一个/一组节点。主机策略仅仅应用到宿主机的初始命名空间,包括使用hostnetwork的Pod。
要支持主机策略,需要使用Helm值: --set devices='{interface}'、 --set hostFirewall=true。
|
1 2 3 4 5 6 7 8 9 10 11 12 13 14 15 16 17 18 19 20 21 22 23 24 25 26 27 28 |
apiVersion: "cilium.io/v2" kind: CiliumClusterwideNetworkPolicy metadata: name: "lock-down-ingress-worker-node" spec: # 允许据表标签type=ingress-worker的宿主机的所有指定端口的入站流量 description: "Allow a minimum set of required ports on ingress of worker nodes" nodeSelector: matchLabels: type: ingress-worker ingress: - fromEntities: - remote-node - health - toPorts: - ports: - port: "6443" protocol: TCP - port: "22" protocol: TCP - port: "2379" protocol: TCP - port: "4240" protocol: TCP - port: "8472" protocol: UDP - port: "REMOVE_ME_AFTER_DOUBLE_CHECKING_PORTS" protocol: TCP |
管理K8S中的Pod的过程中,Cilium会自动创建CiliumEndpoint对象,和对应Pod具有相同的namespace+name。
CiliumEndpoint和 cilium endpoint get命令得到的 .status字段有相同的信息:
|
1 2 3 4 5 6 7 8 9 10 11 12 13 14 15 16 17 18 19 20 21 22 23 24 25 26 27 28 29 30 31 32 33 34 35 |
kubectl get ciliumendpoints.cilium.io nginx-0 -o jsonpath="{.status}" | jq { // 通信加密设置 "encryption": {}, "external-identifiers": { "container-id": "eac9972f57187a7afe7bb3edf97c4e70eff8edff26b6923dda8f398d7e622ec9", "k8s-namespace": "default", "k8s-pod-name": "nginx-0", "pod-name": "default/nginx" }, // 端点ID,每个端点都有唯一的ID "id": 2318, "identity": { // 身份标识 "id": 34796, // 具有相同标签的Pod,共享同一身份标识 "labels": [ "k8s:app=nginx", "k8s:io.cilium.k8s.policy.cluster=default", "k8s:io.cilium.k8s.policy.serviceaccount=default", "k8s:io.kubernetes.pod.namespace=default" ] }, "networking": { "addressing": [ { "ipv4": "172.27.2.23" } ], "node": "10.0.3.1" }, "state": "ready" } kubectl -n kube-system exec -it cilium-skvr6 -- cilium endpoint get 2318 |
每个cilium-agent会创建一个名为 cilium-health-<node-name>的CiliumEndpoint,表示inter-agent健康检查端点。
Cilium和Istio都使用Envoy作为七层代理。
集成Cilium和Istio,可以为启用了mTLS的Istio流量提供L7网络策略。如果不进行集成,则可以在Istio Sidecar之外应用应用L7策略,且不能识别mTLS流量。
Cilium增强的Istio版本,可以通过cilium-istioctl安装,当前版本1.8.2:
|
1 |
curl -L https://github.com/cilium/istio/releases/download/1.8.2/cilium-istioctl-1.8.2-linux-amd64.tar.gz | tar xz |
运行下面的命令安装Istio:
|
1 2 |
# 使用默认的Istio配置安装 cilium-istioctl install -y |
启用Istio自动的Envoy Sidecar注入:
|
1 |
kubectl label namespace default istio-injection=enabled |
我们在default命名空间下,创建以下Pod,用于测试Cilium的功能:
|
1 2 3 4 5 6 7 8 9 10 11 12 13 14 15 16 17 18 19 20 21 22 23 24 25 26 27 28 29 30 31 32 33 34 35 36 37 38 39 40 41 42 43 44 45 46 47 48 49 50 51 52 53 54 55 56 57 58 59 60 61 62 63 64 65 66 67 68 69 70 71 72 73 74 75 76 77 78 79 |
apiVersion: v1 kind: Pod metadata: labels: app: nginx name: nginx-0 spec: containers: - args: - -g - daemon off; command: - nginx-debug image: docker.gmem.cc/library/nginx:1.19.3 imagePullPolicy: Always name: nginx ports: - containerPort: 80 protocol: TCP --- apiVersion: v1 kind: Pod metadata: labels: app: nginx name: nginx-1 spec: containers: - args: - -g - daemon off; command: - nginx-debug image: docker.gmem.cc/library/nginx:1.19.3 imagePullPolicy: Always name: nginx ports: - containerPort: 80 protocol: TCP --- apiVersion: v1 kind: Pod metadata: labels: app: alpine name: alpine spec: containers: - args: - -c - sleep 365d command: - /bin/sh image: docker.gmem.cc/alpine:3.11 imagePullPolicy: Always name: apline --- apiVersion: v1 kind: Pod metadata: name: ubuntu labels: app: ubuntu spec: containers: - args: - -c - sleep 365d command: - /bin/sh image: docker.gmem.cc/ubuntu:16.04 imagePullPolicy: Always name: ubuntu |
当Pod就绪后,查看端点状态:
|
1 2 3 4 5 6 7 8 9 |
# 在端点所在节点的cilium-agent中执行cilium endpoint list # kubectl -n kube-system exec -it cilium-skvr6 -- cilium endpoint list | grep -E 'ubuntu|alpine|nginx' ENDPOINT POLICY (ingress) POLICY (egress) IDENTITY LABELS (source:key[=value]) IPv6 IPv4 STATUS ENFORCEMENT ENFORCEMENT 888 Disabled Disabled 5371 k8s:app=alpine 172.27.2.118 ready 931 Disabled Disabled 34796 k8s:app=nginx 172.27.2.97 ready 1781 Disabled Disabled 34796 k8s:app=nginx 172.27.2.148 ready 2363 Disabled Disabled 42034 k8s:app=ubuntu 172.27.2.162 ready |
可以看到两个Nginx的Pod具有相同的身份标识,这是因为它们的标签一样。由于没有应用任何策略,因此ingress/egress policy为Disabled。
在为两个Nginx端点创建一个服务:
|
1 |
kubectl create service clusterip nginx --tcp=80:80 |
确认客户端可以访问服务:
|
1 2 3 4 |
kubectl exec alpine -- curl -s -o /dev/null -I -w "%{http_code}\n" nginx # 200 kubectl exec ubuntu -- curl -s -o /dev/null -I -w "%{http_code}\n" nginx # 200 |
下面我们增加一个策略,允许app=alpine访问app=nginx:
|
1 2 3 4 5 6 7 8 9 10 11 12 13 14 15 16 |
apiVersion: "cilium.io/v2" kind: CiliumNetworkPolicy metadata: name: "nginx-ingress" spec: endpointSelector: matchLabels: app: nginx ingress: - fromEndpoints: - matchLabels: app: alpine toPorts: - ports: - port: "80" protocol: TCP |
应用上述策略后,通过cilium endpoint list可以看到,两个Nginx的ingress policy为Enabled。
现在,在alpine中还能够访问nginx:
|
1 2 |
kubectl exec alpine -- curl -s -o /dev/null -I -w "%{http_code}\n" nginx # 200 |
在ubuntu中不能访问:
|
1 2 3 4 |
kubectl exec ubuntu -- curl -s -o /dev/null -I -w "%{http_code}\n" nginx # 000 # 超时 # command terminated with exit code 7 |
这说明策略生效,并且是白名单 —— 如果对某个identity应用了(accept)ingress policy,则只有明确声明的fromEndpoints才具有访问权限。
现在alpine能够访问nginx,假设我们向限制它仅仅能访问/welcome这个URL路径,就需要用到Cilium的L7策略:
|
1 2 3 4 5 6 7 8 9 10 11 12 13 14 15 16 17 18 19 20 21 22 23 |
# kubectl edit cnp nginx-ingress apiVersion: "cilium.io/v2" kind: CiliumNetworkPolicy metadata: name: "nginx-ingress" spec: endpointSelector: matchLabels: app: nginx ingress: - fromEndpoints: - matchLabels: app: alpine toPorts: - ports: - port: "80" protocol: TCP # 在L4策略的基础上,添加以下内容 rules: http: - method: "GET" # 支持正则式,例如/welcome/.* path: "/welcome" |
现在,alpine访问index.html时会得到403(禁止访问)错误,而GET /welcome则正常访问:
|
1 2 3 4 5 |
kubectl exec alpine -- curl -s -o /dev/null -I -w "%{http_code}\n" nginx # 403 kubectl exec alpine -- curl -s -o /dev/null -I -w "%{http_code}\n" -X GET http://nginx/welcome # 200 |
你可以通过下面的命令对流量进行监控:
|
1 2 3 4 5 6 7 8 9 10 11 12 |
kubectl -n kube-system exec -it cilium-skvr6 -- cilium monitor -v --type l7 <- Request http from 0 ([k8s:app=alpine k8s:io.cilium.k8s.policy.cluster=default k8s:io.cilium.k8s.policy.serviceaccount=default k8s:io.kubernetes.pod.namespace=default]) to 931 ([k8s:io.cilium.k8s.policy.cluster=default k8s:app=nginx k8s:io.kubernetes.pod.namespace=default k8s:io.cilium.k8s.policy.serviceaccount=default]), identity 5371->34796, verdict Denied HEAD http://nginx/welcome => 403 <- Request http from 0 ([k8s:io.cilium.k8s.policy.serviceaccount=default k8s:io.kubernetes.pod.namespace=default k8s:app=alpine k8s:io.cilium.k8s.policy.cluster=default]) to 931 ([k8s:io.cilium.k8s.policy.cluster=default k8s:app=nginx k8s:io.kubernetes.pod.namespace=default k8s:io.cilium.k8s.policy.serviceaccount=default]), identity 5371->34796, verdict Forwarded GET http://nginx/welcome => 0 <- Response http to 0 ([k8s:io.kubernetes.pod.namespace=default k8s:app=alpine k8s:io.cilium.k8s.policy.cluster=default k8s:io.cilium.k8s.policy.serviceaccount=default]) from 931 ([k8s:io.cilium.k8s.policy.serviceaccount=default k8s:io.cilium.k8s.policy.cluster=default k8s:app=nginx k8s:io.kubernetes.pod.namespace=default]), identity 5371->34796, verdict Forwarded GET http://nginx/welcome => 200 |
假设我们想仅允许nginx访问docker.gmem.cc,可以使用下面的策略:
|
1 2 3 4 5 6 7 8 9 10 11 12 13 14 15 16 17 18 19 20 21 22 23 24 25 26 27 |
apiVersion: "cilium.io/v2" kind: CiliumNetworkPolicy metadata: name: nginx-egress spec: endpointSelector: matchLabels: app: nginx egress: # 两个规则 # 第一个规则:允许访问域名docker.gmem.cc - toFQDNs: # 支持使用通配符,例如 *.gmem.cc - matchName: "docker.gmem.cc" # 第二个规则:允许访问kube-dns - toEndpoints: - matchLabels: "k8s:io.kubernetes.pod.namespace": kube-system "k8s:k8s-app": kube-dns toPorts: - ports: - port: "53" protocol: ANY # 这个规则提示Cilium检查匹配pattern的DNS查询,并将结果缓存 rules: dns: - matchPattern: "*" |
第二个规则的作用在于,允许nginx访问kube-dns服务,进行域名查询。同时,让Cilium的DNS Proxy能够记录nginx执行的所有DNS查询,并且记录域名和IP地址的对应关系。
Cilium缓存的DNS查询结果中的IP地址,才是真正放到BPF Map中的、允许访问的白名单。
应用上述策略后,nginx将无法访问任何集群内部服务,除了kube-dns,除非你配置额外的策略。测试一下效果:
|
1 2 3 4 5 6 7 8 |
kubectl exec nginx-0 -- curl -s -o /dev/null -I -w "%{http_code}\n" --insecure https://docker.gmem.cc # 200 kubectl exec nginx-0 -- curl -s -o /dev/null -I -w "%{http_code}\n" --insecure https://blog.gmem.cc # 000 # command terminated with exit code 7 kubectl exec nginx-0 -- curl -s -o /dev/null -I -w "%{http_code}\n" --insecure http://nginx # 000 # command terminated with exit code 7 |
可以联合使用toFQDNs和toPorts,以限制访问外部服务使用的端口、通信协议:
|
1 2 3 4 5 6 7 8 |
# ... egress: - toFQDNs: - matchPattern: "*.gmem.cc" toPorts: - ports: - port: "443" protocol: TCP |
Cilium支持透明的探查TLS加密连接的内容。 基于这个能力,即使是HTTPS流量,Cilium也能做到API感知并应用L7策略。这种能力完全基于软件实现,并且是策略驱动的,仅仅探测策略选中的网络连接。
我们需要以下步骤,以实现TLS拦截/探查:
- 创建一个内部使用的CA,并基于此CA创建办法证书,以实现TLS拦截。端点访问外部TLS服务时,请求被Cilium拦截,并使用此内部CA颁发的证书为端点提供TLS服务
- 使用Cilium网络策略的DNS规则,选择需要拦截的流量
- 进行TLS探查,例如:
- 利用cilium monitor来探查HTTP请求的详细内容
- 使用L7策略过滤/修改HTTP请求
- 通过Hubble进行观察
|
1 2 3 4 5 6 7 8 9 10 11 12 13 14 |
# 自签名CA证书 openssl genrsa -des3 -out ca.key 2048 openssl req -x509 -new -nodes -key ca.key -sha256 -days 1825 -out ca.crt # 生成被探查目标服务,这里是docker.gmem.cc的证书,注意填写正确的Common Name openssl genrsa -out gmem.cc.key 2048 openssl req -new -key gmem.cc.key -out gmem.cc.csr # 签名证书 openssl x509 -req -days 360 -in gmem.cc.csr -CA ca.crt -CAkey ca.key -CAcreateserial \ -out gmem.cc.crt -sha256 # 将证书和密钥写入为secret备用 kubectl create secret tls gmem-tls-data -n kube-system --cert=gmem.cc.crt --key=gmem.cc.key |
上面的自签名CA,需要加到源端点(客户端Pod)的受信任根证书列表:
|
1 2 |
kubectl cp ca.crt default/ubuntu:/usr/local/share/ca-certificates/ca.crt kubectl exec ubuntu -- update-ca-certificates |
目标服务的CA证书,则需要写入secret备用。最简单办法是,将系统所有受信任证书的列表,一起写入:
|
1 2 |
kubectl cp default/ubuntu:/etc/ssl/certs/ca-certificates.crt ca-certificates.crt kubectl -n kube-system create secret generic tls-orig-data --from-file=ca.crt=./ca-certificates.crt |
|
1 2 3 4 5 6 7 8 9 10 11 12 13 14 15 16 17 18 19 20 21 22 23 24 25 26 27 28 29 30 31 32 33 34 35 36 37 |
apiVersion: "cilium.io/v2" kind: CiliumNetworkPolicy metadata: name: "l7-visibility-tls" spec: endpointSelector: matchLabels: app: ubuntu egress: - toFQDNs: - matchName: "docker.gmem.cc" toPorts: - ports: - port: "443" protocol: "TCP" # 第一个TLS连接,也就是Cilium扮演服务端的连接,使用的证书(和密钥) terminatingTLS: secret: namespace: "kube-system" name: "gmem-tls-data" # 第二个TLS连接,也就是Cilium扮演客户端的连接,使用的受信任证书列表 originatingTLS: secret: namespace: "kube-system" name: "tls-orig-data" # 启用L7策略 rules: http: # 允许所有HTTP流量 - {} - toPorts: - ports: - port: "53" protocol: ANY rules: dns: - matchPattern: "*" |
应用上述策略后,尝试从ubuntu访问docker.gmem.cc,然后通过cilium monitor -v --type l7探查发生的流量。
gRPC是基于HTTP2协议的,Cilium不支持gRPC的原语,但是gRPC服务/方法是映射到特定URL路径的POST方法的:
|
1 2 3 4 5 6 7 8 9 10 11 12 13 14 15 16 17 18 19 20 21 |
apiVersion: "cilium.io/v2" kind: CiliumNetworkPolicy metadata: name: "rule1" spec: endpointSelector: matchLabels: app: nginx ingress: - fromEndpoints: - matchLabels: app: alpine toPorts: - ports: - port: "80" protocol: TCP rules: http: - method: "POST" # gRPC服务 gRPC方法 path: "/gmem.UserManager/GetName" |
|
1 2 3 4 5 6 7 8 9 10 11 12 13 14 15 16 17 18 19 20 21 22 |
apiVersion: "cilium.io/v2" kind: CiliumNetworkPolicy metadata: name: "rule2" spec: endpointSelector: matchLabels: app: kafka ingress: - fromEndpoints: - matchLabels: # 允许alpine访问kafka app: alpine toPorts: - ports: - port: "9092" protocol: TCP rules: kafka: # 允许消费msgs主题 - role: "consume" topic: "msgs" |
目前Cilium提供了对Apache Cassanadra的Beta支持。
Apache Cassanadra是一种NoSQL数据库,专注于提供高性能的(特别是写)事务能力,同时不以牺牲可用性和可扩容性为代价。Cassanadra以集群方式运行,客户端通过Cassanadra协议与集群通信。
Cilium能理解Cassanadra协议,从而控制客户端可以访问哪些表,可以对表进行哪些操作。
|
1 2 3 4 5 6 7 8 9 10 11 12 13 14 15 16 17 18 19 20 21 22 23 24 25 26 27 28 |
apiVersion: "cilium.io/v2" kind: CiliumNetworkPolicy metadata: name: "secure-empire-cassandra" specs: endpointSelector: matchLabels: app: cass-server ingress: - fromEndpoints: - matchLabels: app: alpine toPorts: - ports: - port: "9042" protocol: TCP rules: # Cassanadra协议 l7proto: cassandra l7: # 允许的操作 - query_action: "select" # 操作针对的表,正则式。指定表需要<keyspace>.<table>形式 query_table: "system\\..*" - query_action: "select" query_table: "system_schema\\..*" - query_action: "insert" query_table: "attendance.daily_records" |
所谓本地重定向,是指Pod发向IP地址/Service的流量,被重定向到本机Pod的情况。本地重定向策略管理这种流量 —— 它可以将匹配策略的流量重定向到本机。
该特性需要4.19+内核。使用选项 --set localRedirectPolicy=true 开启该特性。
本地重定向策略对应自定义资源 CiliumLocalRedirectPolicy。以下配置字段:
- ServiceMatcher:用于被重定向的ClusterIP类型的服务
- AddressMatcher:用于目的地是IP地址,不属于任何服务的情况
当启用本地重定向策略后,非backend Pod访问frontend时,Cilium BPF数据路径会将frontend地址转换为一个本地backend Pod地址。如果流量从backend Pod发往frontend地址,则不会进行进行转换(导致的结果是访问frontend的原始端点),否则就导致循环。Cilium通过调用sk_lookup_助手函数实现这一逻辑。
下面这个例子,将发往169.254.169.254:8080的TCP流量,重定向到本机的app=proxy端点的80端口:
|
1 2 3 4 5 6 7 8 9 10 11 12 13 14 15 16 17 18 |
apiVersion: "cilium.io/v2" kind: CiliumLocalRedirectPolicy metadata: name: "lrp-addr" spec: redirectFrontend: addressMatcher: ip: "169.254.169.254" toPorts: - port: "8080" protocol: TCP redirectBackend: localEndpointSelector: matchLabels: app: proxy toPorts: - port: "80" protocol: TCP |
下面的例子,如果访问default/my-service,则重定向到本机的app=proxy端点的80端口:
|
1 2 3 4 5 6 7 8 9 10 11 12 13 14 15 16 |
apiVersion: "cilium.io/v2" kind: CiliumLocalRedirectPolicy metadata: name: "lrp-svc" spec: redirectFrontend: serviceMatcher: serviceName: my-service namespace: default redirectBackend: localEndpointSelector: matchLabels: app: proxy toPorts: - port: "80" protocol: TCP |
- 策略应用之前,匹配策略的已经存在的连接,不受策略影响
- 此策略不支持更新,只能删除重建
本地重定向策略的一个应用场景是节点本地DNS缓存。
节点本地DNS缓存在一个静态的IP地址上监听,配合本地重定向策略,可以拦截来自应用程序Pod的、发往kubed-dns ClusterIP的流量。
策略定义示例:
|
1 2 3 4 5 6 7 8 9 10 11 12 13 14 15 16 17 18 19 20 21 22 23 24 |
apiVersion: "cilium.io/v2" kind: CiliumLocalRedirectPolicy metadata: name: "node-local-dns" namespace: kube-system spec: # 如果访问kube-dns redirectFrontend: serviceMatcher: serviceName: kube-dns namespace: kube-system redirectBackend: # 那么重定向到Node local DNS localEndpointSelector: matchLabels: k8s-app: node-local-dns # TCP和UDP都支持 toPorts: - port: "53" name: dns protocol: UDP - port: "53" name: dns-tcp protocol: TCP |
如果不提供任何配置,Cilium自动运行在overlay(encapsulation)模式下,这种模式对底层网络的要求最小。overlay模式下所有节点组成基于UDP封装的网格。支持的封装协议包括:
- VxLAN:默认封装模式,占用8472/UDP端口
- Geneve:占用6081/UDP端口
所有Cilium节点之间的流量都被封装。
overlay模式的优点:
- 简单:集群节点所在的网络,不需要对PodCIDR有任何感知。只要底层网络支持IP/UDP,即可构建出overlay网络
- 地址空间:由于不依赖底层网络,因而可以使用很大的IP地址范围,支持很大规模的Pod数量
- 自动配置:在编排系统中,每个节点可以被分配一个IP前缀,并独立进行IPAM
- 身份标识上下文:利用封装协议,可以为网络封包附带元数据。Cilium利用这种能力,来传输源节点的安全标识信息,让目标节点不必查询封包所属的实体
overlay模式的缺点:
- MTU overhead:由于额外的封装头,导致有效MTU比native-routing小。对于VxLAN每个封包的有效MTU减少50字节。这会导致单个特定网络连接的最大吞吐率减小。使用Jumbo frames则实际影响大大减小
配置 tunnel: disabled可以启用此datapath,这种模式下,目的地不是本机的封包,被委托给Linux的路由子系统处理。这要求连接节点的网络能够正确处理路由:
- 要么所有节点直接位于L2网络中,可以配置 auto-direct-node-routes: true
- 要么连接它们的路由器能够处理路由:
- 在云环境下,VPC需要和Cilium进行集成,以获得路由信息。目前主流云厂商已经支持
- 在支持BGP的路由器的配合下,基于BGP协议分发路由。可以通过kube-router来运行BGP守护程序
配置 native-routing-cidr: x.x.x.x/y指定可以进行native-routing的CIDR。
IPAM负责分配和管理网络端点(容器或其它)的IP地址。Cilium支持多种IPAM模式。
使用Kubernetes自带的host-scope IPAM。地址分配委托给每个节点进行,per-node的Pod CIDR存放在v1.Node中。
这是默认的IPAM mode,它分配per-node的Pod CIDR,并在每个节点上使用host-scope的分配器来分配IP地址。
此模式和kubernetes类似,区别在于后者在v1.Node资源中存储per-node的Pod CIDR,而Cilium在 v2.CiliumNode中存储此信息。
此模式下,cilium-agent在启动时会等待v2.CiliumNode中的 Spec.IPAM.PodCIDRs字段可用。
通过Helm安装时,使用下面的值来启用此模式:
|
1 2 3 4 5 6 7 8 9 |
helm install ... --set ipam.mode=cluster-pool --set ipam.operator.clusterPoolIPv4PodCIDR=<IPv4CIDR> # 调整每个节点的CIDR规模 --set ipam.operator.clusterPoolIPv4MaskSize=<IPv4MaskSize> --set ipam.operator.clusterPoolIPv6PodCIDR=<IPv6CIDR> --set ipam.operator.clusterPoolIPv6MaskSize=<IPv6MaskSize> |
在运行时,使用下面的命令查询IP分配错误:
|
1 |
kubectl get ciliumnodes -o jsonpath='{range .items[*]}{.metadata.name}{"\t"}{.status.operator.error}{"\n"}{end}' |
使用下面的命令查看IP分配情况:
|
1 |
cilium status --all-addresses |
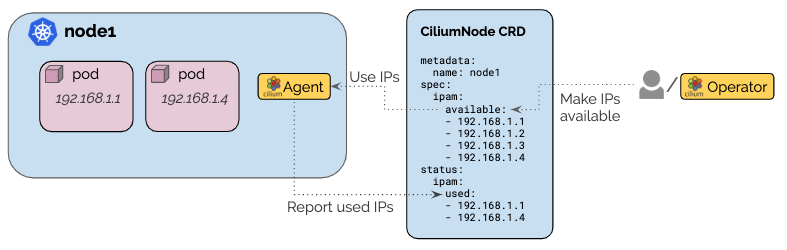
此模式下,cilium-agent会监听当前节点同名的v2.CiliumNode资源,每当CiliumNode被更新,cilium-agent会利用列在 spec.ipam.available的IP地址来更新本节点的IP池。如果已经分配的IP地址从spec.ipam.available中移除,仍然可以正常使用,但是释放后不能重新分配。
当IP被分配出去之后,会记录到 status.ipam.inuse字段。
你需要开发一个Operator,将IP地址分配给特定节点,此模式提供了很大的灵活性。
对于IPv4,容器访问外部流量时Cilium会自动进行SNAT,替换源地址为节点的IP地址。对于IPv6,IP遮掩仅在iptables模式下被支持。
使用选项 enable-ipv4-masquerade: false和 enable-ipv6-masquerade: false可以改变上述默认行为。
如果Pod IP在节点网络中可以路由,可以配置 native-routing-cidr,如果目的地址在此CIDR中,则不进行IP遮掩。
Cilium支持多种IP遮掩的实现模式。
最高效的实现,要求内核版本4.19+,默认启用。对应Helm值 bpf.masquerade=true。当前版本此特性依赖BPF NodePort特性。
基于eBPF的IP遮掩,只能发生在挂钩了eBPF masquerading程序的节点出口设备上。哪些出口设备进行挂钩,可以通过Helm值 devices指定,如果不指定则基于BPF NodePort device detection metchanism自动选择。
使用cilium status命令可以检查哪些设备挂钩了:
|
1 2 3 |
kubectl exec -it -n kube-system cilium-xxxxx -- cilium status | grep Masquerading # 已挂钩设备 不遮掩的CIDR # Masquerading: BPF (ip-masq-agent) [eth0, eth1] 10.0.0.0/16 |
该模式支持TCP/UDP/ICMP这三类IPv4的L4协议,其中ICMP仅仅支持Echo请求/应答。
除了配置native-routing-cidr,你还可以配置Helm值 ipMasqAgent.enabled=true,更细粒度的控制,访问哪些目的IP时不需要进行遮掩。这个能力是依靠Cilium开发的eBPF版本的ip-masq-agent来实现的。
遗留模式,支持在所有版本的内核上运行。
默认情况下,Cilium配置eBPF数据路径,进行IP分片跟踪,以允许不支持分段的协议能透明的通过网络传输大报文。
IP分片跟踪在eBPF中通过LRU Map实现,要求4.10+内核。该特性通过以下选项启用:
- enable-ipv4-fragment-tracking:启用或禁用IPv4分片跟踪,默认启用
- bpf-fragments-map-max:控制使用IP分配的活动并发连接的数量
UDP这样的协议,它没有TCP那种分段和重组的能力,大报文只能依赖于IP层的分片机制。由于IP分片缺乏重传机制,因此大UDP报文一旦丢失一个片段,就需要整个报文的重传。
BIRD是一个开源软件,支持BGP协议。利用BIRD可以将Cilium管理的端点暴露到集群外部。
通过下面的命令安装bird2:
|
1 2 3 4 5 6 7 |
# Ubuntu sudo apt install bird2 # CentOS yum install -y bird2 sudo systemctl enable bird sudo systemctl restart bird |
节点配置文件示例:
|
1 2 3 4 5 6 7 8 9 10 11 12 13 14 15 16 17 18 19 20 21 22 23 24 25 26 27 28 29 30 31 32 33 34 35 36 37 38 39 40 41 42 43 44 45 46 47 |
# 其它节点只是ID不同 router id 10.0.3.1; debug protocols all; # 如果使用直接路由模式 filter cnionly { if net ~ 172.27.0.0/16 && ifname != "cilium_host" then accept; else reject; } protocol kernel { learn; scan time 10; ipv4 { import none; # 如果使用隧道模式 import filter cnionly; # 如果使用直接路由模式 export none; }; } protocol device { scan time 5; } # 直接添加到BIRD的路由表 protocol static { ipv4; # 宣告Pod CIDR route 172.27.0.0/16 via "cilium_host"; # 如果使用隧道模式 # 宣告ClusterIP CIDR。不能和kube-proxy replacement联用,因为后者不允许集群外访问ClusterIP route 10.96.0.0/24 via "eth0"; # 宣告LoadBalancer CIRD route 10.0.10.0/24 via "eth0"; } # 连接到上游路由器,并宣告上面的静态路由 protocol bgp k8s { local as 65000; neighbor 10.0.0.1 as 65000; direct; ipv4 { export all; }; } # 查看路由 birdc show route # 查看BGP状态 birdc show protocols all k8s |
上游路由(反射器)配置示例:
|
1 2 3 4 5 6 7 8 9 10 11 12 13 14 15 16 17 18 19 20 21 22 23 24 25 26 27 28 |
log syslog all; router id 10.0.0.1; debug protocols all; protocol kernel { scan time 10; ipv4 { import none; export all; }; } protocol device { scan time 5; } protocol bgp k8s { local as 65000; neighbor range 10.0.3.0/24 as 65000; direct; rr client; ipv4 { import all; export all; }; } |
可以启用双向转发检测(Bidirectional Forwarding Detection,BFD),以加入路径故障检测(path failure detection)。BFD由一系列几乎独立的BFD会话组成,每个会话在双方都启用了BFD的路由器之间进行双向单播路径的监控。监控方式是周期性的、双向发送控制封包。
BFD不会进行邻居发现,BFD会话是按需(例如被BGP协议请求)创建的。
|
1 2 3 4 5 6 7 8 9 10 11 12 13 14 15 16 |
protocol bfd { interface "eth*" { min rx interval 100 ms; min tx interval 100 ms; idle tx interval 300 ms; multiplier 10; }; # 不需要按需创建,直接初始化和这些邻居的BFD会话 neighbor 10.0.3.2; neighbor 10.0.3.3; } protocol bgp k8s { # BGP支持使用BFD来发现邻居是否存活 bfd on; } |
下面的命令查看BFD会话状态:
|
1 2 3 4 5 6 7 |
birdc show bfd sessions bfd1: IP address Interface State Since Interval Timeout 10.0.3.2 virbr0 Up 11:56:01.055 0.100 1.000 10.0.3.1 virbr0 Up 11:56:00.094 0.100 1.000 10.0.3.3 virbr0 Up 11:56:00.389 0.100 1.000 |
为了某些特殊目的,例如L4负载均衡,你需要在多个节点上配置Pod CIDR的静态路由,并且在Bird中配置ECMP(Equal-cost multi-path)路由。
|
1 2 3 |
protocol kernel { merge paths yes limit 3; } |
Cilium可以原生支持,将LoadBalancer服务分配IP地址、并通过BGP协议将地址宣告出去。是否宣告LoadBalancer服务的IP,取决于服务的externalTrafficPolicy设置。
使用下面的Helm值启用该特性: --set bgp.enabled=true --set bgp.announce.loadbalancerIP=true。该特性依赖于MetalLB。
添加bgp-config这个ConfigMap,参考:
|
1 2 3 4 5 6 7 8 9 10 11 12 13 14 15 16 |
apiVersion: v1 kind: ConfigMap metadata: name: bgp-config namespace: kube-system data: config.yaml: | peers: - peer-address: 10.0.0.1 peer-asn: 65000 my-asn: 65000 address-pools: - name: default protocol: bgp addresses: - 10.0.10.0/24 |
容器通常都使用虚拟设备,例如veth对,作为连接初始命名空间的桥梁。通过在宿主机端veth挂钩tc ingress钩子,Cilium能够监控容器的任何流量。
veth对处理流量时,需要两次通过网络栈,相比起ipvlan有性能上的劣势。对于两个在同一节点上的容器veth端点,一个封包需要4次通过网络栈。
Cilium CNI也支持L3/L3S的ipvlan,这种模式下,宿主机物理设备作为ipvlan master,而容器端的ipvlan虚拟设备是slave。使用ipvlan时将封包从其它网络命名空间推入ipvlan slave设备时消耗更少的资源,因而可能改善网络延迟。使用ipvlan时Cilium在容器命名空间中挂钩BPF程序到ipvlan slave设备的egress钩子,以便应用L3/L4策略(因为初始命名空间下所有容器共享单个设备)。同时挂钩到ipvlan master的tc ingress钩子,可以对节点的所有入站流量应用网络策略。
为了支持老版本的不支持ipvlan hairpin模式的内核,Cilium在ipvlan slave设备(位于容器网络命名空间)的tc gress上挂钩了BPF程序。
当前版本的ipvlan支持有以下限制:
- NAT64不被支持
- 基于Envoy的L7 Policy不被支持
- 容器到host-local的通信不被支持
- Service不支持LB到本地端点
Cilium默认使用veth提供容器网络连接。你可以选用Beta支持的IPVLAN,目前尚未提供的特性包括:
- IPVLAN L2模式
- L7策略支持
- FQDN策略支持
- NAT64
- IPVLAN+隧道
- 基于eBPF的IP遮掩
这些特性将在未来版本提供。
由于使用IPVLAN L3模式,需要4.12+的内核。如果使用L3S模式(流量经过宿主机网络栈因而被netfilter处理),这需要修复d5256083f62e(4.19.20)的稳定版内核。
参考下面的方式进行安装:
|
1 2 3 4 5 6 7 8 9 10 11 12 13 14 15 16 17 |
helm install cilium cilium/cilium --version 1.10.1 \ --namespace kube-system \ # 启用IPVLAN --set datapathMode=ipvlan \ # 选择IPVLAN主设备,要求所有节点主设备名字相同 --set ipvlan.masterDevice=eth0 \ # IPVLAN数据路径目前仅支持直接路由,因此必须禁用tunnel --set tunnel=disabled \ # 要让IPVLAN跨节点工作,每个主机都必须安装正确的路由 # 路由要么手工设置,要么由Cilium自动安装。对于后者,设置: --set autoDirectNodeRoutes="true" \ # 下面的选项,用于控制是否安装iptables规则,这些规则主要用于和kube-proxy交互 # 如果设置为false,则不安装,并且IPVLAN工作在L3模式 # 默认值为true,IPVLAN工作在L3S模式,初始命名空间的netfilter会对容器封包进行过滤 --set installIptablesRules="true" \ # 对所有离开IPVLAN master设备的流量进行IP遮掩 --set masquerade="true" |
IPVLAN L3模式中宿主机的netfilters钩子被绕过,因此无法进行IP遮掩,必须使用L3S模式(会降低性能)。
Cilium支持使用IPsec/WireGuard透明的加密:
- Cilium管理的宿主机之间
- Cilium管理的端点之间
的流量。
为了确定某个连接是否可以被加密,Cilium需要明确封包目的地址是否是受管理的端点。在明确之前,流量可能不被加密。
同一主机内部的流量不会被加密。
如果在其它CNI插件之上链接Cilium,则目前无法支持透明加密特性。
|
1 2 |
kubectl create -n kube-system secret generic cilium-ipsec-keys \ --from-literal=keys="3 rfc4106(gcm(aes)) $(echo $(dd if=/dev/urandom count=20 bs=1 2> /dev/null | xxd -p -c 64)) 128" |
|
1 2 3 4 5 6 7 8 9 10 |
helm install cilium cilium/cilium --version 1.10.1 \ --namespace kube-system \ # 启用Pod之间流量的加密 --set encryption.enabled=true \ # 启用节点流量加密(Beta) --set encryption.nodeEncryption=false \ # 算法,默认ipsec --set encryption.type=ipsec \ # 如果启用直接路由(不使用隧道),则不指定下面选项的时候,会查询路由表,选择默认路由对应的网络接口 --set encryption.ipsec.interface=ethX |
通过本节的配置,可以让服务从初始命名空间无需NAT的访问。
此特性要求4.19.57, 5.1.16, 5.2.0等版本以上的内核。如果仅要支持TCP(不支持UDP)则需要4.17.0。
|
1 2 3 4 5 6 |
helm install cilium cilium/cilium --version 1.10.1 \ --namespace kube-system \ # 启用此特性 --set hostServices.enabled=true \ # 仅仅支持TCP --set hostServices.protocols=tcp |
此特性的工作原理:在connect系统调用(TCP, connected UDP),或者 sendmsg/recvmsg系统调用(UDP)时,Cilium会检查目的地址,如果它是一个Service IP,则直接将目的地址更换为一个后端的地址。这样,套接字实际上会直接连接真实后端,不会在更低层次的数据路径上发生NAT,也就是对数据路径的更低层次透明。
宿主机可达服务,允许从宿主机/Pod中,以多种IP:NODE_PORT访问到NodePort服务。这些IP包括:环回地址、服务ClusterIP、节点本地接口(除了docker*)地址。
Cilium能够完全代替kube-proxy。此特性依赖“宿主机可达服务”,因此对内核有着相同的要求。Cilium还利用5.3/5.8添加的额外特性,进行了更进一步的优化。
基于kubeadm安装K8S时,可以用下面的命令跳过kube-proxy:
|
1 |
kubeadm init --skip-phases=addon/kube-proxy |
需要注意:如果节点有多网卡,确保kubelet的 --node-ip设置正确,否则Cilium可能无法正常工作。
如果集群已经安装了kube-proxy,可以使用下面的命令移除:
|
1 2 3 |
kubectl -n kube-system delete ds kube-proxy # 删除cm,可以防止升级K8S(1.19+)时候重新安装kube-proxy kubectl -n kube-system delete cm kube-proxy |
|
1 2 3 4 5 6 7 8 9 |
helm install cilium cilium/cilium --version 1.10.1 \ --namespace kube-system \ # 代替kube-proxy,取值: # strict,如果内核不支持,则导致cilium-agent退出 # probe,探测内核特性,自动禁用不支持的特性子集。该取值假设kube-proxy不被删除,作为可能的fallback --set kubeProxyReplacement=strict \ # 替换为API Server的地址和端口 --set k8sServiceHost=10.0.3.1 \ --set k8sServicePort=6443 |
使用如上命令安装的Cilium,可以作为ClisterIP、NodePort、LoadBalancer,以及具有externalIP的服务的控制器。在此之上,eBPF kube-proxy replacement还能够支持容器的hostPort,从而不再需要portmap。
kube-proxy replacement同时支持直接路由和隧道模式。
使用下面的命令可以验证kube-proxy replacement已经正常安装:
|
1 2 3 4 5 6 7 8 9 10 11 12 13 14 15 16 17 18 |
# kubectl exec -it -n kube-system cilium-ch5qk -- cilium status --verbose # ... KubeProxyReplacement: Strict [eth0 10.0.3.2 (Direct Routing)] # ... KubeProxyReplacement Details: Status: Strict Socket LB Protocols: TCP, UDP Devices: eth0 10.0.3.2 (Direct Routing) Mode: SNAT Backend Selection: Random Session Affinity: Enabled XDP Acceleration: Disabled Services: - ClusterIP: Enabled - NodePort: Enabled (Range: 30000-32767) - LoadBalancer: Enabled - externalIPs: Enabled - HostPort: Enabled |
kube-proxy replacement支持磁悬浮(Maglev)一致性哈希算法的变体,作为负载均衡算法。一致性哈希是一类算法,它将后端(RS)计算哈希值后,分布在一个环上。进行负载均衡时,对5元组计算哈希,然后看落在环上哪两个RS之间,取哈希值较小的RS作为LB目标。磁悬浮算法通过将每个RS在环上映射多次,减少当RS数量增加/减少时,必须映射到其它RS的五元组的数量。自然,减少一个RS之后,原先映射到其上的5元组必然需要重新映射,磁悬浮的目标是尽量减少除此之外的重新映射
该算法增强了故障时的弹性。新增节点后,在不需要和其它节点同步的前提下,能够对任意指定5元组能够保持相同的、一致性的后端选择;移除节点后,除了那些后端对应被移除节点的5元组,不超过1% difference in reassignments
通过 --set loadBalancer.algorithm=maglev启用
需要注意,该LB算法仅用于外部(南北向)流量。对于集群内部(东西向)流量,套接字直接分配到服务的后端,也就是说在TCP connect的时候,目的地址被修改为后端,不会使用该算法
Cilium XDP加速支持磁悬浮一致性哈希算法。
该算法有两个专用的配置项:
- maglev.tableSize:每单个服务的Maglev查找表的大小。理想值M,应当大大大于期望后端数N的质数。最好大于100*N,以确保当后端发生变化时最多1% difference in reassignments。支持的取值包括251 509 1021 2039 4093 8191 16381 32749 65521 131071。取值16381用于大概160个后端的服务
- maglev.hashSeed:用于避免受限于Cilium内置的固定的seed,seed是base64编码的16byte随机数。所有节点必须具有相同的seed
Cilium基于eBPF的kube-proxy replacement实现了保留客户端源IP的能力。
Service的 externalTrafficPolicy选项决定Cilium的行为:
- Local:集群内的服务可以相互访问,也可以从没有该服务后端的节点上访问。集群内的端点,不需要SNAT就能实现访问服务时的负载均衡
- Cluster:默认值。有多种途径保留客户端源IP。如果仅TCP服务需要暴露到集群外部,可以让kube-proxy replacement运行在DSR/Hybrid模式
默认情况下,Cilium的eBPF NodePort实现,在SNAT模式下运作。也就是说,当来自外部的、访问集群服务的流量到达时,如果入群节点判断出服务(LoadBalancer/NodePort/其它具有ExternalIP的服务)的后端位于其它节点,它就需要将请求重定向到远程节点。这个重定向时需要SNAT,将外部流量的源地址换成入群节点的地址
这个SNAT的代价是,访问链路多了一跳,同时丢失了源IP信息。为了进行reverse SNAT,返回报文还必须经过入群节点,然后传回给外部客户端
设置 loadBalancer.mode=dsr,可以让Cilium的eBPF NodePort实现切换到DSR模式。这种模式下,后端直接应答外部客户端,不经过入群节点。这一特性必须和Direct Routing一起使用,也就是不能使用隧道。
DSR模式的另外一个优势是,源IP地址被保留,因此,运行在服务后端节点上的Cilium策略,可以正确的根据依据源IP进行过滤。
由于一个后端可能被多个Service引用,后端(所在节点的cilium-agent)需要知道生成(直接回复给原始客户端的)应答报文时,使用什么Service IP/Port(作为源地址)。Cilium的解决办法是,使用IPv4选项或IPv6 Destination选项扩展,将Service IP/Port信息编码到IP头中,代价是MTU变小。对于TCP服务,仅仅SYN封包需要编码Service IP/Port信息,因此MTU变小不会有影响。
需要注意,在某些公有云环境下,DSR模式可能无法工作。原因可能是:
- 底层Fabric可能丢弃掉Cilium的IP选项
- 某些云实现了源/目的地址检查,你需要禁用此特性DSR才能正常工作
为了避免UDP的MTU变小问题,可以设置 loadBalancer.mode=hybrid,这样对于UDP协议,会工作在SNAT模式,对于TCP则工作在DSR模式
对于LoadBalancer/NodePort/其它具有ExternalIP的服务,如果外部流量入群节点上没有服务后端,则入群节点需要将请求转发给其它节点。Cilium 1.8+支持基于XDP进行加速这一转发行为。XDP工作在驱动层,大部分支持10G+bps的驱动都支持native XDP。云上环境中大多数具有SR-IOV变体的驱动也支持native XDP。在裸金属环境下,XDP加速可以和MetalLB这样的LoadBalancer控制器联用
要启用XDP加速,需要设置 loadBalancer.acceleration=native,默认值 disabled。对于大规模环境,可以考虑调优Map的容量: config.bpfMapDynamicSizeRatio
XDP加速可以和loadBalancer.mode:DSR/SNAT/hybrid一起使用。
启用Cilium的eBPF kube-proxy replacement时,默认情况下,LoadBalancer/NodePort/其它具有ExternalIP的服务,可以通过这样的网络接口访问:
- 具有默认路由的接口
- 被分配的K8S节点的InternalIP / ExternalIP的接口
要改变设备,可以配置devices选项,例如 devices='{eth0,eth1,eth2}'。需要注意每个节点的名字必须一致,如果不一致,可以考虑用通配符 devices=eth+
如果使用多个网络接口,仅其中单个可用于Cilium节点之间的直接路由。Cilium会选择具有InternalIP / ExternalIP的接口,InternalIP优先。你也可以手工指定直接路由设备 nodePort.directRoutingDevice=eth1,如果该选项中的设备,不在 devices中,Cilium会自动加入
直接路由设备也用于NodePort XDP加速,也就是说该设备的驱动应该支持native XDP
如果kube-apiserver使用了非默认的NodePort范围,则相同的配置必须传递给Cilium,例如 nodePort.range="10000\,32767"
如果NodePort返回和内核临时端口范围(net.ipv4.ip_local_port_range)重叠,则Cilium会将NodePort范围附加到保留端口范围(net.ipv4.ip_local_reserved_ports)。这可以避免NodePort服务劫持宿主机本地应用程序发起的(源端口在和NodePort冲突的)连接。要禁用这种端口范围保护的行为,设置 nodePort.autoProtectPortRanges=false
默认情况下,NodePort实现禁止应用程序对NodePort服务端口的bind系统调用,应用程序会接收到bind: Operation not permitted 错误。对于5.7+内核,在Pod内部bind不会报此错误。如果需要完全允许(包括老版本内核、5.7+在初始命名空间)bind,可以设置 nodePort.bindProtection=false
尽管不是kube-proxy的一部分,Cilium的eBPF kube-proxy replacement也原生实现了hostPort,因此不需要使用CNI chaining: cni.chainingMode=portmap
如果启用了eBPF kube-proxy replacement,hostPort就自动支持,不需要额外配置。其它情况下,可以使用 hostPort.enabled=true启用此特性
如果指定hostPort时没有额外指定hostIP,则Pod的端口将通过宿主机用于暴露NodePort服务的那些IP地址,对外暴露出去。包括K8S的InternalIP/ExternalIP、环回地址。如果指定了hostIP则仅仅从该IP暴露,hostIP指定为0.0.0.0效果等于未指定。
除了完全代替kube-proxy,Cilium的eBPF kube-proxy replacement还可以与自共存,成为混合模式。混合模式的目的是解决某些内核版本不足以实现完全的kube-proxy replacement的问题。
kubeProxyReplacement取值:
- strict:严格完全替代或者失败
- probe:混合模式。自动探测内核,并尽量替代
- partial:混合模式。手工指定需要启用哪些eBPF kube-proxy replacement组件。取该值时必须设置
enableHealthCheckNodeport=false,以确保cilium-agent不会启动NodePort健康检查服务器。可以手工开启的特性如下,默认全部false:
- hostServices.enabled
- nodePort.enabled
- externalIPs.enabled
- hostPort.enabled
Cilium的eBPF kube-proxy replacement支持K8S服务的会话绑定设置。对于 sessionAffinity: ClientIP,它会确保同一个Pod/宿主机总是被LB到同一个服务后端。会话绑定的默认超时为3h,可通过K8S的 sessionAffinityConfig改变。
会话绑定的依据,取决于请求的来源:
- 对于集群外部发送给服务的请求,源IP地址用于会话绑定
- 对于集群内部发起的请求,则客户端网络命名空间的cookie用于会话绑定。这个特性5.7+内核支持,用于在socket layer实现会话绑定(此时源IP尚不可用,封包结构还没被内核创建)
如果启用了eBPF kube-proxy replacement,则会话绑定默认启用。要启用,设置 config.sessionAffinity=false
如果用户内核版本比较老,不支持网络命名空间cookie。则可以使用fallback的in-cluster模式,该模式使用一个固定的cookie,导致同一主机上,所有端点会绑定到某个服务的同一个后端。
eBPF kube-proxy replacement包含一个health check server。要启用,需要设置 kubeProxyReplacementHealthzBindAddr。例如 kubeProxyReplacementHealthzBindAddr='0.0.0.0:10256'。/healthz端点用于访问健康状态。
如果LoadBalancer服务指定了spec.loadBalancerSourceRanges。则eBPF kube-proxy replacement会限制外部流量对服务的访问。仅仅允许spec.loadBalancerSourceRanges指定的CIDR白名单。从集群内部访问时,忽略此字段。
此特性默认启用,要禁用,设置 config.svcSourceRangeCheck=false。
和kube-proxy类似,eBPF kube-proxy replacement遵从服务的 service.kubernetes.io/service-proxy-name注解。此注解声明什么服务代理(kube-proxy / replacement...)应该管理此服务。
eBPF kube-proxy replacement的服务代理名通过 k8s.serviceProxyName设置。默认值为空,意味着仅仅没有设置service.kubernetes.io/service-proxy-name的服务可以被replacement管理。
使用Cilium的eBPF kube-proxy replacement时,有很多限制条件需要注意:
- 不能和透明加密一起使用
- 依赖宿主机可达服务这一特性。该特性需要依赖于eBPF cgroup hooks来实现服务转换。而eBPF中的getpeername需要5.8+内核才能支持。这意味着replacement无法和libceph一起工作
- XDP加速仅支持单个设备的hairpin LB场景。如果具有多个网卡,并且cilium自动检测并选择多个网卡,则必须通过devices选项指定一个
- DSR NodePort模式目前不能很好的在启用了TCP Fast Open(TFO)的环境下使用,建议切换到SNAT模式
- 不支持SCTP协议
- 不支持Pod配置的hostPort和NodePort范围冲突。这种情况下hostPort被忽略,并且cilium-agent会打印警告日志
- 不允许从集群外部访问ClusterIP
- 不支持ping ClusterIP,不像IPVS
利用Cilium的带宽管理器,可以有效的在EDT(Earliest Departure Time)、eBPF的帮助下,管理每个Pod的带宽占用。
Cilium的带宽管理器,不依赖于CNI chaining,而是在Cilium内部实现的,它不使用bandwidth CNI这个插件。出于可扩容性考虑(特别是对于多队列的网卡),不建议使用bandwith CNI插件,因为它基于qdisc TBF而非EDT。
Cilium带宽管理器支持Pod注解 kubernetes.io/egress-bandwidth,它在“原生宿主网络设备”上控制egress流量带宽。不管是直接路由还是隧道,都可以进行流量限制。
Pod注解 kubernetes.io/ingress-bandwidth不被支持,也不推荐使用。
带宽限制天然应该发生在egress以降低/整平在网线上的带宽使用。如果在ingress段进行带宽限制,会额外的、通过ifb设备,在节点的关键fast-path增加一层缓冲队列,这种情况下,流量需要被重定向到ifb设备的egress端以实现塑形。这本质上没有意义,因为流量已经占用了网线山的带宽,节点也已经消耗了资源处理它,唯一的作用就是引入ifb让上层应用遭受带宽限制的痛苦。
带宽管理器需要Linux 5.1+内核。
带宽管理器默认启用,不需要在安装时指定特殊的选项。如果想禁用,设置 bandwidthManager=false。
所谓“原生宿主网络设备”是指具有默认路由的网络接口,或者分配了InternalIP/ExternalIP的接口,分配InternalIP的接口优先。如果要手工指定设置,设置 devices选项。
对Pod进行带宽限制的例子:
|
1 2 3 4 5 6 7 8 9 10 11 12 13 14 15 16 17 18 19 20 21 22 |
apiVersion: apps/v1 kind: Deployment metadata: name: netperf spec: selector: matchLabels: run: netperf replicas: 1 template: metadata: labels: run: netperf annotations: kubernetes.io/egress-bandwidth: "10M" spec: nodeName: foobar containers: - name: netperf image: cilium/netperf ports: - containerPort: 12865 |
目前带宽管理器不能和L7策略联用。如果L7策略选择了Pod,则Pod上设置的注解被忽略,不进行带宽限制。
Cilium可以和Kata联用,后者提供计算层安全性。根据你使用的容器运行时,配置Cilium:
- 如果使用CRI-O: --set containerRuntime.integration=crio
- 如果使用CRI-containerd: --set containerRuntime.integration=containerd
Kata containers不支持宿主机可达服务特性,因而也不支持kube-proxy replacement的strict模式。
出口网关允许将Pod的出口流量重定向到特定的网关节点,功能类似于Istio的出口网关。参考下面的选项启用该特性:
|
1 2 3 4 5 6 |
helm upgrade cilium cilium/cilium --namespace kube-system \ --reuse-values \ --set egressGateway.enabled=true \ --set bpf.masquerade=true \ --set kubeProxyReplacement=strict |
你需要配置 CiliumEgressNATPolicy才能让Egress网关对特定端点生效:
|
1 2 3 4 5 6 7 8 9 10 11 12 13 14 15 16 17 18 19 20 21 |
apiVersion: cilium.io/v2alpha1 kind: CiliumEgressNATPolicy metadata: name: egress-sample spec: egress: - podSelector: matchLabels: # 如果端点是运行在default命名空间的app=alpine app: alpine io.kubernetes.pod.namespace: default # 也可以用命名空间选择器,匹配多个命名空间(中的所有Pod) # namespaceSelector: # matchLabels: # ns: default # 并且尝试访问下面的CIDR(集群外部服务) destinationCIDRs: - 192.168.33.13/32 # 那么将流量转发给Egress网关,该网关(节点)配置了IP地址192.168.33.100 # 出集群封包将SNAT为192.168.33.100 egressSourceIP: "192.168.33.100" |
作为Egress网关的节点,需要在网络接口上配置额外的IP(对应上面的 egressSourceIP)。
Cluster Mesh将网络数据路径延伸到多个集群,支持以下特性:
- 实现所有集群的Pod之间相互连通,不管使用直接路由还是隧道模式。不需要额外的网关节点或代理
- 支持全局服务,可以在所有集群访问
- 支持全局性的安全策略
- 支持跨集群边界通信的透明加密
两个(位于不同Region或AZ的)集群组成高可用,当一个集群的后端服务(不是整个AZ不可用)出现故障时,可以failover到另外一个集群的对等物。

最初的K8S用法是,倾向于创建巨大的、多租户的集群。而现在,更场景的用法是为每个租户创建独立的集群,甚至为不同类型的服务(例如安全级别不同)创建独立的集群。尽管如此,仍然有一些服务具有共享特征,不适合在每个集群中都部署一份。这类服务包括:日志、监控、DNS、密钥管理,等等。
使用集群网格,可以将共享服务独立部署在一个集群中,租户集群可以访问其中的全局服务。

Cilium Clustermesh和Istio Multicluster可以相互补充。典型的用法是,Cilium提供跨集群的Pod IP可路由性,而这是Istio Multiplecluster所需要的前置条件。
- 所有集群的Pod CIDR不冲突
- 所有节点的IP地址不冲突
- 所有集群的节点,都具有IP层的相互连接性。可能需要创建对等/VPN隧道
- 集群之间的网络必须允许跨集群通信,到底需要哪些端口本章后续会详述
每个集群都需要唯一的名字和ID:
|
1 2 3 4 |
helm upgrade cilium cilium/cilium \ --namespace kube-system \ --reuse-values \ --set cluster.name=k8s --set cluster.id=27 |
注意,如果改变正在运行的集群的ID/名字,其中所有工作负载都需要重新启动。因为ID用于生成安全标识(security identity),安全标识需要重新创建才能创建跨集群的通信。
|
1 2 3 4 5 6 7 8 9 10 11 12 13 14 15 16 17 18 19 20 21 22 23 24 25 26 27 28 29 30 31 32 33 34 35 36 37 38 39 40 41 42 43 |
helm --kube-context tke install cilium cilium/cilium --version 1.10.1 \ --namespace kube-system \ --set debug.enabled=true \ --set cluster.id=28 \ --set rollOutCiliumPods=true \ --set cluster.name=tke \ --set image.repository=docker.gmem.cc/cilium/cilium \ --set preflight.image.repository=docker.gmem.cc/cilium/cilium \ --set image.useDigest=false \ --set operator.image.repository=docker.gmem.cc/cilium/operator \ --set operator.image.useDigest=false \ --set certgen.image.repository=docker.gmem.cc/cilium/certgen \ --set hubble.relay.image.repository=docker.gmem.cc/cilium/hubble-relay \ --set hubble.relay.image.useDigest=false \ --set hubble.ui.backend.image.repository=docker.gmem.cc/cilium/hubble-ui-backend \ --set hubble.ui.backend.image.tag=v0.7.9 \ --set hubble.ui.frontend.image.repository=docker.gmem.cc/cilium/hubble-ui \ --set hubble.ui.frontend.image.tag=v0.7.9 \ --set hubble.ui.proxy.image.repository=docker.gmem.cc/envoyproxy/envoy \ --set hubble.ui.proxy.image.tag=v1.18.2 \ --set etcd.image.repository=docker.gmem.cc/cilium/cilium-etcd-operator \ --set etcd.image.tag=v2.0.7 \ --set nodeinit.image.repository=docker.gmem.cc/cilium/startup-script \ --set nodeinit.image.tag=62bfbe88c17778aad7bef9fa57ff9e2d4a9ba0d8 \ --set clustermesh.apiserver.image.repository=docker.gmem.cc/cilium/clustermesh-apiserver \ --set clustermesh.apiserver.image.useDigest=false \ --set clustermesh.apiserver.etcd.image.repository=docker.gmem.cc/coreos/etcd \ --set tunnel=disabled \ --set autoDirectNodeRoutes=true \ --set nativeRoutingCIDR=172.28.0.0/16 \ --set bpf.hostRouting=true \ --set ipam.mode=cluster-pool \ --set ipam.operator.clusterPoolIPv4PodCIDR=172.28.0.0/16 \ --set ipam.operator.clusterPoolIPv4MaskSize=24 \ --set fragmentTracking=true \ --set bpf.masquerade=true \ --set hostServices.enabled=true \ --set kubeProxyReplacement=strict \ --set k8sServiceHost=10.2.0.61 \ --set k8sServicePort=6443 \ --set loadBalancer.algorithm=maglev \ --set loadBalancer.mode=hybrid \ --set bandwidthManager=true |
集群网格会基于此CA创建其API Server的数字证书:
|
1 |
kubectl -n kube-system create secret generic --from-file=ca.key=ca.key --from-file=ca.crt=ca.crt cilium-ca |
需要在组成网格的两个集群中都执行cilium clustermesh enable命令:
|
1 2 3 4 |
cilium clustermesh enable --context k8s --service-type LoadBalancer \ --apiserver-image docker.gmem.cc/cilium/clustermesh-apiserver:v1.10.1 cilium clustermesh enable --context tke --service-type LoadBalancer \ --apiserver-image docker.gmem.cc/cilium/clustermesh-apiserver:v1.10.1 |
上述命令会:
- 部署clustermesh-apiserver到集群
- 生成所有必须的数字证书、保存为Secret
- 自动检测最佳的service类型,以暴露集群网格的控制平面给其它集群。某些时候,service类型不能自动检测,你可手工通过 --service-type指定
通过下面的命令等待集群网格组件就绪: cilium clustermesh status --wait,如果服务类型选择LoadBalancer,该命令也会等待LoadBalancer IP就绪。
最后一步是连接集群,只需要在网格的一端进行连接即可。对向连接会自动创建:
|
1 |
cilium clustermesh connect --context k8s --destination-context tke |
通过下面的命令等待连接成功: cilium clustermesh status --wait
|
1 |
cilium connectivity test --context k8s --multi-cluster tke |
注意:两个集群的Pod网络会被打通,你可以从一个集群直接访问另外一个集群的Pod。默认情况下,Cilium不允许从集群外部访问PodCIDR,可以ping但是访问端口会RST。
|
1 2 |
cilium clustermesh status --context k8s cilium clustermesh status --context tke |
目前最多支持相互连接在一起的集群数量为255,未来此限制会放开,当:
- 运行在直接路由模式时
- 运行在隧道模式,且启用加密时
Cilium的集群网格,支持跨集群的服务发现和负载均衡。
跨集群的负载均衡,依赖于全局服务。所谓全局服务:
- 在所有集群中具有相同的namespace和name
- 设置了注解 io.cilium/global-service: "true",注意,所有集群的服务都要添加此注解
Cilium会自动跨越多个集群进行负载均衡。A集群中的Pod可能访问到B集群的后端。
|
1 2 3 4 5 6 7 8 9 10 11 12 13 14 |
apiVersion: v1 kind: Service metadata: name: nginx annotations: io.cilium/global-service: "true" # 下面这个注解是隐含的 io.cilium/shared-service: "true" spec: type: ClusterIP ports: - port: 80 selector: app: nginx |
如果设置 io.cilium/shared-service: "false",则该服务的端点,仅由远程集群提供。
CiliumNetworkPolicy、NetworkPolicy自然就能跨集群生效,这是因为Cilium解耦了网络安全和网络连接性。但是这些对象不会自动复制到各集群,你需要手工处理。
下面的网络策略,允许特定端点跨集群的访问服务:
|
1 2 3 4 5 6 7 8 9 10 11 12 13 14 15 |
# 允许k8s中的alpine访问tke中的nginx apiVersion: "cilium.io/v2" kind: CiliumNetworkPolicy metadata: name: "allow-cross-cluster" spec: endpointSelector: matchLabels: app: alpine io.cilium.k8s.policy.cluster: k8s egress: - toEndpoints: - matchLabels: app: nginx io.cilium.k8s.policy.cluster: tke |
L7策略仅仅在以下条件下可以跨集群生效:
- 启用直接路由模式,也就是禁用隧道
- 节点安装了路由,允许路由所有集群的Pod IP
第2点,如果节点L2互联,可以通过设置--auto-direct-node-routes=true满足。
你可以将外部工作负载(例如VM)加入到K8S集群,并且应用安全策略。
- 必须配置基于K8S进行身份标识(identity)分配,即 identityAllocationMode=crd(默认值)
- 外部工作负载必须基于4.17+的内核,这样它才能访问K8S服务
- 外部工作负载必须和集群节点IP层互联。如果在同一VPC中运行虚拟机和K8S,通常可以满足。否则,可能需要在K8S集群网络和外部工作负载网络之间进行对等/VPN连接
- 外部工作负载必须具有唯一的IP地址,和集群内节点不冲突
- 目前此特性仅在VXLAN隧道模式下测试过
|
1 2 |
cilium install --config tunnel=vxlan ... cilium clustermesh enable |
必须创建 CiliumExternalWorkload来通知集群,外部工作负载的存在。该自定义资源:
- 为外部工作负载指定命名空间和身份标识标签
- 名字必须和外部工作负载的主机名(hostname命令输出)一致
- 为外部工作负载分配一个很小的CIDR
可以通过命令创建CiliumExternalWorkload:
|
1 2 3 4 5 |
# vm是子命令external-workload的别名 # 工作负载名字 # 加入的命名空间 # 分配的CIDR cilium clustermesh vm create zircon -n default --ipv4-alloc-cidr 10.0.0.1/32 |
下面的命令可以查看现有外部工作负载的状态:
|
1 |
cilium clustermesh vm status |
此时,可以看到 zircon 的 IP状态为 N/A,这提示工作负责尚未加入集群。
下面的命令会生成一个安装脚本:
|
1 |
cilium clustermesh vm install install-external-workload.sh |
该脚本从集群中抽取了TLS证书、其它访问信息 ,可用于在外部工作负责中安装Cilium并连接到你的K8S集群。脚本中嵌入了clustermesh-apiserver服务的IP地址,如果你没有使用LoadBalancer类型而是使用NodePort,则IP是第一个K8S节点的地址。
拷贝install-external-workload.sh到外部工作负载节点,然后执行,该脚本会:
- 创建并运行一个名为cilium的容器
- 拷贝cilium CLI到文件系统
- 等待节点连接到集群,集群服务可用。然后修改/etc/resolv.conf,将kube-dns地址设置到其中
注意,如果外部工作负载有多个网络接口,在运行脚本之前你需要设置环境变量 HOST_IP。
在外部工作负载执行命令 cilium status检查连接性。
每个cilium-agnet节点的各种状态信息,可以通过cilium status命令获得:
|
1 2 3 4 5 6 7 8 9 10 11 12 13 14 15 16 17 18 19 20 21 22 23 24 25 26 27 28 29 |
# kubectl -n kube-system exec cilium-m8wf2 -- cilium status # 是否启用外部的KV存储 KVStore: Ok Disabled # K8S状态 Kubernetes: Ok 1.20 (v1.20.5) [linux/amd64] Kubernetes APIs: ["cilium/v2::CiliumClusterwideNetworkPolicy", "cilium/v2::CiliumEndpoint", "cilium/v2::CiliumNetworkPolicy", "cilium/v2::CiliumNode", "core/v1::Namespace", "core/v1::Node", "core/v1::Pods", "core/v1::Service", "discovery/v1beta1::EndpointSlice", "networking.k8s.io/v1::NetworkPolicy"] # kube-proxy replacement工作模式 KubeProxyReplacement: Strict [eth0 10.0.3.1 (Direct Routing)] # cilium-agnet状态 Cilium: Ok 1.10.1 (v1.10.1-e6f34c3) NodeMonitor: Listening for events on 8 CPUs with 64x4096 of shared memory Cilium health daemon: Ok # 本节点IP池信息 已分配/总计 分配的节点CIDR IPAM: IPv4: 9/254 allocated from 172.27.2.0/24, # 集群网格状态 ClusterMesh: 0/0 clusters ready, 0 global-services # 带宽管理器 这里提示基于qdisc EDT实现,在eth0上进行带宽管理 BandwidthManager: EDT with BPF [eth0] # 直接路由需要通过宿主机的网络栈 Host Routing: Legacy # 基于BPF实现IP遮掩 不进行遮掩的CIDR Masquerading: BPF [eth0] 172.27.0.0/16 [IPv4: Enabled, IPv6: Disabled] Controller Status: 55/55 healthy Proxy Status: OK, ip 172.27.2.122, 0 redirects active on ports 10000-20000 Hubble: Ok Current/Max Flows: 4095/4095 (100.00%), Flows/s: 67.08 Metrics: Disabled # 流量加密已禁用 Encryption: Disabled # 集群节点/端点状态。如果存在不健康的对象,这里可以看到 Cluster health: 3/3 reachable (2021-07-02T07:09:23Z) |
迁出项目后,在项目根目录下执行命令进行开发环境检查: make dev-doctor 。
为了运行单元测试,需要docker;为了在虚拟机中运行Cilium,需要Vagrant和VirtualBox。建议在虚拟机中进行开发、构建、运行。
通过下面的命令启动包含Cilium依赖的Vagrant虚拟机:
|
1 2 |
# 基于base系统cilium/ubuntu contrib/vagrant/start.sh [vm_name] |
可选的vm_name用于添加新的虚拟机到现有集群中:
|
1 2 3 4 5 6 7 8 9 10 11 12 13 14 15 16 17 18 19 20 21 22 23 24 25 26 27 28 29 30 31 |
# 在节点上构建并安装K8S,主节点k8s1 # 创建一个从节点k8s2 # 使用net-next内核 K8S=1 NWORKERS=1 NETNEXT=1 ./contrib/vagrant/start.sh k8s2+ # 其它环境变量 # 执行vagrant reload而非vagrant up,用于恢复挂起的虚拟机 RELOAD=1 # 不在虚拟机中构建Cilium,用于快速重启(不去完全重新构建Cilium) NO_PROVISION=1 # 启用Cilium的IPv4支持 IPV4=1 # 选择容器运行时:docker, containerd, crio RUNTIME=docker # 设置代理 VM_SET_PROXY=http://10.0.0.1:8088 # 重新安装Cilium、K8S等,如果安装过程被打断有用 INSTALL=1 # 在虚拟机中构建Cilium前执行make clean MAKECLEAN=1 # 不在虚拟机中进行构建,假设开发者先前已经在虚拟机中执行过make build NO_BUILD=1 # 定义额外的挂载点 # USER_MOUNTS=foo 将宿主机的~/foo挂载为虚拟机的/home/vagrant/foo # USER_MOUNTS=foo,/tmp/bar=/tmp/bar 额外挂载宿主机的/tmp/bar为虚拟机的/tmp/bar USER_MOUNTS= # 设置虚拟机内存,单位MB VM_MEMORY=4096 # 设置虚拟机CPU数量 VM_CPUS=2 |
Vagrantfile会在项目根目录寻找文件 .devvmrc,如果文件存在且可执行,则VM启动时会执行它。你可以用该文件定制VM。
宿主机上的Cilium代码树不需要手工同步到虚拟机中,该目录默认已经通过VirtualBox NFS共享给虚拟机。
你也可以不使用start.sh脚本,手工启动虚拟机并构建Cilium:
|
1 2 3 4 5 6 7 8 9 10 11 12 13 14 15 16 17 18 19 20 21 22 23 24 25 26 27 |
vagrant init cilium/ubuntu vagrant up vagrant ssh [...] go get github.com/cilium/cilium cd go/src/github.com/cilium/cilium/ # 修改代码后,构建Cilium make # 重新安装Cilium make install mkdir -p /etc/sysconfig/ cp contrib/systemd/cilium.service /etc/systemd/system/ cp contrib/systemd/cilium-docker.service /etc/systemd/system/ cp contrib/systemd/cilium-consul.service /etc/systemd/system/ cp contrib/systemd/cilium /etc/sysconfig/cilium usermod -a -G cilium vagrant systemctl enable cilium-docker systemctl restart cilium-docker systemctl enable cilium-consul systemctl restart cilium-consul systemctl enable cilium # 重新启动新安装的Cilium systemctl restart cilium # 冒烟测试,确保Cilium正确启动,和Envoy的集成正常工作 tests/envoy-smoke-test.sh |
使用下面的命令,依据本地修改,构建cilium-agnet的镜像:
|
1 |
ARCH=amd64 DOCKER_REGISTRY=docker.gmem.cc DOCKER_DEV_ACCOUNT=cilium DOCKER_IMAGE_TAG=1.10.1 make dev-docker-image |
使用下面的命令,依据本地修改,构建cilium-operator的镜像:
|
1 2 3 4 |
make docker-operator-generic-image # 类似,针对特定云平台的Operator镜像 make docker-operator-aws-image make docker-operator-azure-image |
无法单步跟踪,主要依靠 cilium monitor。当cilium-agent或者某个特定的端点在debug模式下运行的话,Cilium会发送调试信息。
要让cilium-agent运行在debug模式,使用 --debug选项或在在运行时执行 cilium config debug=true。
要让特定端点进入debug模式,执行命令 cilium endpoint config ID debug=true。
使用 cilium monitor -v -v可以显示更多调试信息。
开发eBPF时,常遇到的问题是代码无法载入内核,此时,通过 cilium endpoint list会看到 not-ready状态的端点。你可以利用命令 cilium endpoint get来获取端点的eBPF校验日志。
目录 /var/run/cilium/state下的文件说明Cilium如何建立和管理BPF数据路径。.h文件包含了用于BPF程序编译的头文件配置,以数字为名的目录对应特定端点的状态,包括头文件和BPF二进制文件。
eBPF Map状态存放在/sys/fs/bpf/下,工具bpf-map可以用于查看其中的内容。
K8S中cilium-agent启动时的命令行为:
|
1 |
/usr/bin/cilium-agent --config-dir=/tmp/cilium/config-map |
/tmp/cilium/config-map是一个目录, 每个文件对应ConfigMap cilium-config中的一项。我们在本地调试cilium-agent时,可以将配置项写在YAML中:
|
1 2 3 4 5 6 7 8 9 10 11 12 13 14 15 16 17 18 19 20 21 22 23 24 25 26 27 28 29 30 31 32 33 34 35 36 37 38 39 40 41 42 43 44 45 46 47 48 49 50 51 52 53 54 55 56 |
auto-direct-node-routes: "true" bpf-lb-map-max: "65536" bpf-map-dynamic-size-ratio: "0.0025" bpf-policy-map-max: "16384" cilium-endpoint-gc-interval: 5m0s cluster-id: "27" cluster-name: k8s cluster-pool-ipv4-cidr: 172.27.0.0/16 cluster-pool-ipv4-mask-size: "24" custom-cni-conf: "false" debug: "true" disable-cnp-status-updates: "true" enable-auto-protect-node-port-range: "true" enable-bandwidth-manager: "true" enable-bpf-clock-probe: "true" enable-bpf-masquerade: "true" enable-endpoint-health-checking: "true" enable-health-check-nodeport: "true" enable-health-checking: "true" enable-host-legacy-routing: "false" enable-host-reachable-services: "true" enable-hubble: "true" enable-ipv4: "true" enable-ipv4-fragment-tracking: "true" enable-ipv4-masquerade: "true" enable-ipv6: "false" enable-ipv6-masquerade: "true" enable-l7-proxy: "true" enable-local-redirect-policy: "false" enable-policy: default enable-remote-node-identity: "true" enable-session-affinity: "true" enable-well-known-identities: "false" enable-xt-socket-fallback: "true" hubble-disable-tls: "false" hubble-listen-address: :4244 hubble-socket-path: /var/run/cilium/hubble.sock hubble-tls-cert-file: /var/lib/cilium/tls/hubble/server.crt hubble-tls-client-ca-files: /var/lib/cilium/tls/hubble/client-ca.crt hubble-tls-key-file: /var/lib/cilium/tls/hubble/server.key identity-allocation-mode: crd install-iptables-rules: "true" install-no-conntrack-iptables-rules: "false" ipam: cluster-pool kube-proxy-replacement: strict kube-proxy-replacement-healthz-bind-address: "" monitor-aggregation: medium monitor-aggregation-flags: all monitor-aggregation-interval: 5s native-routing-cidr: 172.27.0.0/16 node-port-bind-protection: "true" operator-api-serve-addr: 127.0.0.1:9234 preallocate-bpf-maps: "false" sidecar-istio-proxy-image: cilium/istio_proxy tunnel: disabled wait-bpf-mount: "false" |
然后使用 --config=ciliumd.yaml启动cilium-agent。
端点表示一个容器或者类似的,能够在L3独立寻址(具有独立IP地址)的网络实体。端点由端点管理器管理。
Cilium中的端点,仅仅在当前节点的视角下考虑。
|
1 2 3 4 5 6 7 8 9 10 11 12 13 14 15 16 17 18 19 20 21 22 23 24 25 26 27 28 29 30 31 32 33 34 35 36 37 38 39 40 41 42 43 44 45 46 47 48 49 50 51 52 53 54 55 56 57 58 59 60 61 62 63 64 65 66 67 68 69 70 71 72 73 74 75 76 77 78 79 80 81 82 83 84 85 86 87 88 89 90 91 92 93 94 95 96 97 98 99 100 101 102 103 104 105 106 107 108 109 110 111 112 113 114 115 116 117 118 119 120 121 122 123 124 125 126 127 128 129 130 131 132 133 134 135 136 137 138 139 140 141 142 143 144 145 146 147 148 149 150 151 152 153 154 155 156 157 158 159 160 161 162 163 164 165 166 167 168 169 170 171 172 173 174 175 176 177 178 179 180 181 182 183 184 185 186 187 188 189 190 191 192 193 194 195 196 197 198 199 200 201 202 203 204 |
type Endpoint struct { owner regeneration.Owner // 节点范围内唯一的ID ID uint16 // 端点创建时间 createdAt time.Time // 保护端点状态写入操作 mutex lock.RWMutex // 端点对应容器的名字 containerName string // 端点对应容器的ID containerID string // 如果端点由Docker管理,该字段填写libnetwork网络ID dockerNetworkID string // 如果端点由Docker管理,该字段填写libnetwork端点ID dockerEndpointID string // IPVLAN数据路径下,对应的用于尾调用的BPF Map标识符 datapathMapID int // 宿主机端的,连接到端点的网络接口名。通常是veth ifName string // 宿主机段网络接口索引 ifIndex int // 端点标签配置 // FIXME: 该字段应该命名为Label OpLabels labels.OpLabels // 身份标识版本号,该版本号在端点的身份标识标签变化后会递增 identityRevision int // 端点的出口速率 bps uint64 // 端点的MAC地址 mac mac.MAC // 端点的IPv6地址 IPv6 addressing.CiliumIPv6 // 端点的IPv4地址 IPv4 addressing.CiliumIPv4 // 宿主节点的MAC地址,对于每个端点不一样 nodeMAC mac.MAC // 根据端点标签计算的安全标识 SecurityIdentity *identity.Identity `json:"SecLabel"` // 提示端点是否被Istio注入了Cilium兼容的sidecar proxy: // 1. 如果是,该sidecar用于应用L7策略规则 // 2. 如果否,则节点级别的Cilium Envoy用于应用L7策略规则 // // 目前仅针对HTTP L7规则,Kafka只能在节点级别Enovy中应用 hasSidecarProxy bool // 数据路径的策略相关的Map,包含对所有策略相关的BPF的引用 policyMap *policymap.PolicyMap // 跟踪policyMap压力的指标 policyMapPressureGauge *metrics.GaugeWithThreshold // 端点的数据路径配置 Options *option.IntOptions // 最后N次端点的状态转换信息 status *EndpointStatus // 当前端点特定的DNS代理规则的集合。cilium-agent重启时能够恢复 DNSRules restore.DNSRules // 为此端点拦截的,依然有效的DNS响应缓存 DNSHistory *fqdn.DNSCache // 已经过期或者从DNSHistory中驱除的DNS IPs,在确认没有连接时用这些IP后会自动删除 DNSZombies *fqdn.DNSZombieMappings // dnsHistoryTrigger is the trigger to write down the ep_config.h to make // sure that restores when DNS policy is in there are correct dnsHistoryTrigger *trigger.Trigger // 端点状态 state State // 最后一次编译和安装的BPF头文件的哈希 bpfHeaderfileHash string // 端点对应的K8S Pod名 K8sPodName string // 端点对应的K8S Namespace K8sNamespace string // 端点对应的Pod pod *slim_corev1.Pod // 关联到Pod 的容器端口。基于端口名应用K8S网络策略时需要 k8sPorts policy.NamedPortMap // 限制重复的警告日志 logLimiter logging.Limiter // 跟踪k8sPorts被设置至少一次的情况 hasK8sMetadata bool // 端点当前使用的策略的版本 policyRevision uint64 // policyRevisionSignals contains a map of PolicyRevision signals that // should be triggered once the policyRevision reaches the wanted wantedRev. policyRevisionSignals map[*policySignal]bool // 应用到代理的策略修订版 proxyPolicyRevision uint64 // 写proxyStatistics用的锁 proxyStatisticsMutex lock.RWMutex proxy EndpointProxy // 代理重定向的统计信息,键是 policy.ProxyIDs proxyStatistics map[string]*models.ProxyStatistics // 端点已经更新的、下一次regenerate时使用的策略修订版 nextPolicyRevision uint64 // 当端点选项变化后,是否强制重新计算端点的策略 forcePolicyCompute bool // buildMutex synchronizes builds of individual endpoints and locks out // deletion during builds buildMutex lock.Mutex // logger is a logrus object with fields set to report an endpoints information. // This must only be accessed with atomic.LoadPointer/StorePointer. // 'mutex' must be Lock()ed to synchronize stores. No lock needs to be held // when loading this pointer. logger unsafe.Pointer // policyLogger is a logrus object with fields set to report an endpoints information. // This must only be accessed with atomic LoadPointer/StorePointer. // 'mutex' must be Lock()ed to synchronize stores. No lock needs to be held // when loading this pointer. policyLogger unsafe.Pointer // controllers is the list of async controllers syncing the endpoint to // other resources controllers *controller.Manager // realizedRedirects maps the ID of each proxy redirect that has been // successfully added into a proxy for this endpoint, to the redirect's // proxy port number. // You must hold Endpoint.mutex to read or write it. realizedRedirects map[string]uint16 // ctCleaned indicates whether the conntrack table has already been // cleaned when this endpoint was first created ctCleaned bool hasBPFProgram chan struct{} // selectorPolicy represents a reference to the shared SelectorPolicy // for all endpoints that have the same Identity. selectorPolicy policy.SelectorPolicy desiredPolicy *policy.EndpointPolicy realizedPolicy *policy.EndpointPolicy visibilityPolicy *policy.VisibilityPolicy eventQueue *eventqueue.EventQueue // skippedRegenerationLevel is the DatapathRegenerationLevel of the regeneration event that // was skipped due to another regeneration event already being queued, as indicated by // state. A lower-level current regeneration is bumped to this level to cover for the // skipped regeneration levels. skippedRegenerationLevel regeneration.DatapathRegenerationLevel // DatapathConfiguration is the endpoint's datapath configuration as // passed in via the plugin that created the endpoint, e.g. the CNI // plugin which performed the plumbing will enable certain datapath // features according to the mode selected. DatapathConfiguration models.EndpointDatapathConfiguration aliveCtx context.Context aliveCancel context.CancelFunc regenFailedChan chan struct{} allocator cache.IdentityAllocator isHost bool noTrackPort uint16 } |
程序入口点位于daemon/cmd/daemon_main.go文件的RootCmd中:
|
1 2 3 4 5 6 7 8 9 10 11 12 13 14 15 16 17 18 19 20 21 22 23 24 25 26 27 28 29 30 31 32 33 34 35 36 37 38 |
var ( log = logging.DefaultLogger.WithField(logfields.LogSubsys, daemonSubsys) bootstrapTimestamp = time.Now() // RootCmd represents the base command when called without any subcommands RootCmd = &cobra.Command{ Use: "cilium-agent", Short: "Run the cilium agent", Run: func(cmd *cobra.Command, args []string) { cmdRefDir := viper.GetString(option.CMDRef) if cmdRefDir != "" { genMarkdown(cmd, cmdRefDir) os.Exit(0) } // gops监听套接字,gops能够获取Go进程的网络连接、调用栈等诊断信息 addr := fmt.Sprintf("127.0.0.1:%d", viper.GetInt(option.GopsPort)) addrField := logrus.Fields{"address": addr} if err := gops.Listen(gops.Options{ Addr: addr, ReuseSocketAddrAndPort: true, }); err != nil { log.WithError(err).WithFields(addrField).Fatal("Cannot start gops server") } log.WithFields(addrField).Info("Started gops server") bootstrapStats.earlyInit.Start() // 环境初始化 initEnv(cmd) bootstrapStats.earlyInit.End(true) // 运行cilium-agent runDaemon() }, } bootstrapStats = bootstrapStatistics{} ) |
该部分的整体逻辑包括:
- 初始化配置option.Config
- 初始化Map尺寸(sizeof***Element)相关配置
- 利用viper读取命令行选项、配置文件中的的选项
- 配置K8S API Server客户端参数
- 各种调试选项:flow/envoy/datapath/policy
- 其它选项处理
- 打印Logo和版本信息
- 确然当前用户具有root权限
- 检查PATH下cilium-envoy文件的版本
- 如果identity-allocation-mode=crd,断言启用了K8S集成
- 如果必要,启用PProf端口
- 如果必要,打开自动BPF Map分配开关
- 检查目录:
- LibDir: "/var/lib/cilium"
- RunDir: "/var/run/cilium"
- BpfDir: "/var/lib/cilium/bpf"
- StateDir: "/var/run/cilium/state"
- 检查数据路径最小要求
- Linux版本最低4.8.0
- 需要启用策略路由支持,检查内核配置CONFIG_IP_MULTIPLE_TABLES
- 如果Cilium启用了IPv6,断言路径/proc/net/if_inet6存在
- 断言clang、llc存在且版本满足需求。需要在运行时编译BPF源码
- 如果BpfDir不存在,提示make install-bpf拷贝BPF源码
- 启动probes.NewProbeManager()探测系统的BPF特性,检查内核参数。断言包linux-tools-generic已经安装
- 检查或挂载BPF文件系统
- 检查或挂载Cgroups2文件系统
直接要求当前用户为root:
|
1 2 3 4 5 6 |
func RequireRootPrivilege(cmd string) { if os.Getuid() != 0 { fmt.Fprintf(os.Stderr, "Please run %q command(s) with root privileges.\n", cmd) os.Exit(1) } } |
解析内核版本major.minor.patch的代码:
|
1 2 3 4 5 6 7 8 9 10 11 12 13 14 15 16 17 18 19 20 21 22 23 24 25 26 27 28 29 30 |
func parseKernelVersion(ver string) (semver.Version, error) { verStrs := strings.Split(ver, ".") switch { case len(verStrs) < 2: return semver.Version{}, fmt.Errorf("unable to get kernel version from %q", ver) case len(verStrs) < 3: verStrs = append(verStrs, "0") } // We are assuming the kernel version will be something as: // 4.9.17-040917-generic // If verStrs is []string{ "4", "9", "17-040917-generic" } // then we need to retrieve patch number. patch := regexp.MustCompilePOSIX(`^[0-9]+`).FindString(verStrs[2]) if patch == "" { verStrs[2] = "0" } else { verStrs[2] = patch } return versioncheck.Version(strings.Join(verStrs[:3], ".")) } // GetKernelVersion returns the version of the Linux kernel running on this host. func GetKernelVersion() (semver.Version, error) { var unameBuf unix.Utsname if err := unix.Uname(&unameBuf); err != nil { return semver.Version{}, err } return parseKernelVersion(string(unameBuf.Release[:])) } |
比较版本时使用库 github.com/blang/semver/v4:
|
1 2 3 4 5 6 7 8 9 10 11 12 13 14 |
type Range func(Version) bool; // 这是一个函数,调用后直接判断版本是否符合要求 func MustCompile(constraint string) semver.Range { verCheck, err := Compile(constraint) if err != nil { panic(fmt.Errorf("cannot compile go-version constraint '%s' %s", constraint, err)) } return verCheck } minKernelVer = "4.8.0" isMinKernelVer = versioncheck.MustCompile(">=" + minKernelVer) if !isMinKernelVer(kernelVersion) { } |
检查是否支持策略路由:
|
1 2 3 4 5 6 |
_, err = netlink.RuleList(netlink.FAMILY_V4) // 该errno表示地址族不支持? https://man7.org/linux/man-pages/man3/errno.3.html if errors.Is(err, unix.EAFNOSUPPORT) { log.WithError(err).Error("Policy routing:NOT OK. " + "Please enable kernel configuration item CONFIG_IP_MULTIPLE_TABLES") } |
检查是否支持IPv6:
|
1 2 3 4 5 |
if option.Config.EnableIPv6 { if _, err := os.Stat("/proc/net/if_inet6"); os.IsNotExist(err) { log.Fatalf("kernel: ipv6 is enabled in agent but ipv6 is either disabled or not compiled in the kernel") } } |
查找clang二进制文件:
|
1 |
if filePath, err := exec.LookPath("clang"); err != nil {} |
调用bpftool进行特性探测:
|
1 2 3 4 5 6 7 8 9 10 11 12 13 14 15 16 17 18 19 20 21 22 23 24 25 26 27 28 29 30 31 32 33 34 35 36 37 38 39 40 41 42 43 44 45 46 47 48 49 50 51 52 53 54 55 56 57 58 59 60 61 62 63 64 65 66 67 68 69 70 71 72 73 74 75 76 77 78 79 80 81 82 83 84 85 86 87 88 89 90 91 92 93 94 95 96 97 98 99 100 101 102 103 104 105 106 107 108 109 110 111 112 113 114 |
probeManager := probes.NewProbeManager() func NewProbeManager() *ProbeManager { newProbeManager := func() { probeManager = &ProbeManager{} // 调用bpftool -j feature probe探测内核配置 probeManager.features = probeManager.Probe() } // Do只会调用一次,这保证了全局变量probeManager不会被重复初始化 once.Do(newProbeManager) return probeManager } // 判断Cilium必须的、可选的内核配置是否满足 if err := probeManager.SystemConfigProbes(); err != nil { errMsg := "BPF system config check: NOT OK." // TODO(brb) warn after GH#14314 has been resolved if !errors.Is(err, probes.ErrKernelConfigNotFound) { log.WithError(err).Warn(errMsg) } } func (p *ProbeManager) SystemConfigProbes() error { if !p.KernelConfigAvailable() { return ErrKernelConfigNotFound } requiredParams := p.GetRequiredConfig() for param, kernelOption := range requiredParams { if !kernelOption.Enabled { // err } } optionalParams := p.GetOptionalConfig() for param, kernelOption := range optionalParams { if !kernelOption.Enabled { // warn } } return nil } // 必须内核配置列表,大部分取决于cilium-agent的选项 func (p *ProbeManager) GetRequiredConfig() map[KernelParam]kernelOption { config := p.features.SystemConfig coreInfraDescription := "Essential eBPF infrastructure" kernelParams := make(map[KernelParam]kernelOption) kernelParams["CONFIG_BPF"] = kernelOption{ Enabled: config.ConfigBpf.Enabled(), Description: coreInfraDescription, CanBeModule: false, } kernelParams["CONFIG_BPF_SYSCALL"] = kernelOption{ Enabled: config.ConfigBpfSyscall.Enabled(), Description: coreInfraDescription, CanBeModule: false, } kernelParams["CONFIG_NET_SCH_INGRESS"] = kernelOption{ Enabled: config.ConfigNetSchIngress.Enabled() || config.ConfigNetSchIngress.Module(), Description: coreInfraDescription, CanBeModule: true, } kernelParams["CONFIG_NET_CLS_BPF"] = kernelOption{ Enabled: config.ConfigNetClsBpf.Enabled() || config.ConfigNetClsBpf.Module(), Description: coreInfraDescription, CanBeModule: true, } kernelParams["CONFIG_NET_CLS_ACT"] = kernelOption{ Enabled: config.ConfigNetClsAct.Enabled(), Description: coreInfraDescription, CanBeModule: false, } kernelParams["CONFIG_BPF_JIT"] = kernelOption{ Enabled: config.ConfigBpfJit.Enabled(), Description: coreInfraDescription, CanBeModule: false, } kernelParams["CONFIG_HAVE_EBPF_JIT"] = kernelOption{ Enabled: config.ConfigHaveEbpfJit.Enabled(), Description: coreInfraDescription, CanBeModule: false, } return kernelParams } // 可选内核配置列表 func (p *ProbeManager) GetOptionalConfig() map[KernelParam]kernelOption { config := p.features.SystemConfig kernelParams := make(map[KernelParam]kernelOption) kernelParams["CONFIG_CGROUP_BPF"] = kernelOption{ Enabled: config.ConfigCgroupBpf.Enabled(), Description: "Host Reachable Services and Sockmap optimization", CanBeModule: false, } kernelParams["CONFIG_LWTUNNEL_BPF"] = kernelOption{ Enabled: config.ConfigLwtunnelBpf.Enabled(), Description: "Lightweight Tunnel hook for IP-in-IP encapsulation", CanBeModule: false, } kernelParams["CONFIG_BPF_EVENTS"] = kernelOption{ Enabled: config.ConfigBpfEvents.Enabled(), Description: "Visibility and congestion management with datapath", CanBeModule: false, } return kernelParams } // 创建一个头文件 /var/run/cilium/state/globals/bpf_features.h 包含描述内核特性的宏 if err := probeManager.CreateHeadersFile(); err != nil { log.WithError(err).Fatal("BPF check: NOT OK.") } func (p *ProbeManager) CreateHeadersFile() error { // ... return p.writeHeaders(featuresFile); } |
Cilium可能不在初始命名空间下运行,并且初始命名空间下的/sys/fs/bpf已经被挂载到命名空间的特定位置(option.Config.BPFRoot)。下面的调用检查BPF文件系统是否已经挂载,如果没有则挂载之:
|
1 2 3 4 5 6 7 8 9 10 11 12 13 14 15 16 17 18 19 20 21 22 23 24 25 26 27 28 29 30 31 32 33 34 35 36 37 38 39 40 41 42 43 44 45 46 47 48 49 50 51 52 53 54 55 56 57 58 59 60 61 62 63 64 65 66 67 68 69 70 71 72 73 74 75 76 77 78 79 80 81 82 83 84 85 86 87 88 89 90 91 92 93 94 95 96 97 98 99 100 101 102 |
func checkOrMountFS(bpfRoot string, printWarning bool) error { // 如果必要,进行挂载 if bpfRoot == "" { checkOrMountDefaultLocations(printWarning) } else { checkOrMountCustomLocation(bpfRoot, printWarning) } // 确保没有重复挂载 multipleMounts, err := hasMultipleMounts() if multipleMounts { return fmt.Errorf("multiple mount points detected at %s", mapRoot) } return nil } func checkOrMountDefaultLocations(printWarning bool) error { // 首先检查 /sys/fs/bpf 是否挂载了BPFFS mounted, bpffsInstance, err := mountinfo.IsMountFS(mountinfo.FilesystemTypeBPFFS, mapRoot) // 不是挂载点,则这里进行挂载 if !mounted { mountFS(printWarning) return nil } // 挂载了,但是不是BPFFS。这意味着Cilium在容器中运行且宿主机/sys/fs/bpf没有挂载 (要避免这种情况!) // 这种情况下使用备用挂载点 /run/cilium/bpffs。此备用挂载点能够被Cilium使用 // 但是会在Pod重启的时候导致umount,进而导致BPF Map(例如ct表)不可用,后果是 // 所有到本地容器的连接被丢弃 // // if !bpffsInstance { setMapRoot(defaults.DefaultMapRootFallback) cMounted, cBpffsInstance, err := mountinfo.IsMountFS(mountinfo.FilesystemTypeBPFFS, mapRoot) if !cMounted { if err := mountFS(printWarning); err != nil { return err } } else if !cBpffsInstance { log.Fatalf("%s is mounted but has a different filesystem than BPFFS", defaults.DefaultMapRootFallback) } } log.Infof("Detected mounted BPF filesystem at %s", mapRoot) return nil } func IsMountFS(mntType int64, path string) (bool, bool, error) { var st, pst unix.Stat_t // 类似于stat,但当path是符号连接的时候,查看的是链接自身(而非目标)的信息 err := unix.Lstat(path, &st) if err != nil { if errors.Is(err, unix.ENOENT) { // non-existent path can't be a mount point return false, false, nil } return false, false, &os.PathError{Op: "lstat", Path: path, Err: err} } parent := filepath.Dir(path) err = unix.Lstat(parent, &pst) if err != nil { return false, false, &os.PathError{Op: "lstat", Path: parent, Err: err} } if st.Dev == pst.Dev { // 如果路径和父目录的设备一样,意味着它不是挂载点 return false, false, nil } // 否则,获取文件系统信息 fst := unix.Statfs_t{} err = unix.Statfs(path, &fst) if err != nil { return true, false, &os.PathError{Op: "statfs", Path: path, Err: err} } // 文件系统类型 return true, fst.Type == mntType, nil } func mountFS(printWarning bool) error { // ... if err := unix.Mount(mapRoot, mapRoot, "bpf", 0, ""); err != nil { return fmt.Errorf("failed to mount %s: %s", mapRoot, err) } return nil } func hasMultipleMounts() (bool, error) { num := 0 mountInfos, err := mountinfo.GetMountInfo() for _, mountInfo := range mountInfos { // 什么时候两个条目具有相同挂载点 if mountInfo.Root == "/" && mountInfo.MountPoint == mapRoot { num++ } } return num > 1, nil } // 读取/proc/self/mountinfo获取所有挂载信息 func GetMountInfo() ([]*MountInfo, error) { fMounts, err := os.Open(mountInfoFilepath) defer fMounts.Close() return parseMountInfoFile(fMounts) } |
除了bpf,还需要检查/挂载cgroup2。和bpf不一样的是,存在多个cgroupv2的root mount是无害的,因此不会作重复挂载检查。
|
1 2 3 4 5 6 7 8 9 10 11 12 13 14 15 16 17 18 19 20 21 |
func CheckOrMountCgrpFS(mapRoot string) { cgrpMountOnce.Do(func() { if mapRoot == "" { mapRoot = cgroupRoot } cgrpCheckOrMountLocation(mapRoot) }) } func cgrpCheckOrMountLocation(cgroupRoot string) error { setCgroupRoot(cgroupRoot) mounted, cgroupInstance, err := mountinfo.IsMountFS(mountinfo.FilesystemTypeCgroup2, cgroupRoot) if !mounted { return mountCgroup() } else if !cgroupInstance { return fmt.Errorf("Mount in the custom directory %s has a different filesystem than cgroup2", cgroupRoot) } return nil } func mountCgroup() error { unix.Mount("none", cgroupRoot, "cgroup2", 0, "") //... } |
initEnv阶段会进行大量的选项校验、处理。这里列出一些比较重要的。
至少启用IPv4/IPv6之一:
|
1 2 3 |
if !option.Config.EnableIPv4 && !option.Config.EnableIPv6 { log.Fatal("Either IPv4 or IPv6 addressing must be enabled") } |
和数据路径模式相关的判断逻辑:
|
1 2 3 4 5 6 7 8 9 10 11 12 13 14 15 16 17 18 19 20 21 22 23 24 25 26 27 28 29 30 31 32 33 34 35 36 37 38 39 40 41 42 43 44 45 46 47 48 49 50 51 52 53 54 55 56 57 58 59 60 61 62 63 64 65 66 67 |
switch option.Config.DatapathMode { case datapathOption.DatapathModeVeth: // 使用VETH数据路径时,不能配置IPVLAN master设备名,默认使用隧道模式,隧道默认使用VXLAN技术 if name := viper.GetString(option.IpvlanMasterDevice); name != "undefined" { log.WithField(logfields.IpvlanMasterDevice, name). Fatal("ipvlan master device cannot be set in the 'veth' datapath mode") } if option.Config.Tunnel == "" { option.Config.Tunnel = option.TunnelVXLAN } case datapathOption.DatapathModeIpvlan: // 使用IPVLAN数据路径时,必须禁用隧道,不支持IPSec if option.Config.Tunnel != "" && option.Config.Tunnel != option.TunnelDisabled { log.WithField(logfields.Tunnel, option.Config.Tunnel). Fatal("tunnel cannot be set in the 'ipvlan' datapath mode") } if len(option.Config.Devices) != 0 { log.WithField(logfields.Devices, option.Config.Devices). Fatal("device cannot be set in the 'ipvlan' datapath mode") } if option.Config.EnableIPSec { log.Fatal("Currently ipsec cannot be used in the 'ipvlan' datapath mode.") } option.Config.Tunnel = option.TunnelDisabled // 尽管IPVLAN模式不允许指定--device,但是后续逻辑都是通过option.Config.Devices保存设备名的,因此这里 // 读取--ipvlan-master-device并存放在option.Config.Devices iface := viper.GetString(option.IpvlanMasterDevice) if iface == "undefined" { // 必须指定Master设备名 log.WithField(logfields.IpvlanMasterDevice, option.Config.Devices[0]). Fatal("ipvlan master device must be specified in the 'ipvlan' datapath mode") } option.Config.Devices = []string{iface} link, err := netlink.LinkByName(option.Config.Devices[0]) if err != nil { log.WithError(err).WithField(logfields.IpvlanMasterDevice, option.Config.Devices[0]). Fatal("Cannot find device interface") } option.Config.Ipvlan.MasterDeviceIndex = link.Attrs().Index option.Config.Ipvlan.OperationMode = connector.OperationModeL3 if option.Config.InstallIptRules { option.Config.Ipvlan.OperationMode = connector.OperationModeL3S } else { log.WithFields(logrus.Fields{ logfields.URL: "https://github.com/cilium/cilium/issues/12879", }).Warn("IPtables rule configuration has been disabled. This may affect policy and forwarding, see the URL for more details.") } case datapathOption.DatapathModeLBOnly: // 仅LB模式 log.Info("Running in LB-only mode") option.Config.LoadBalancerPMTUDiscovery = option.Config.NodePortAcceleration != option.NodePortAccelerationDisabled option.Config.KubeProxyReplacement = option.KubeProxyReplacementPartial option.Config.EnableHostReachableServices = true option.Config.EnableHostPort = false option.Config.EnableNodePort = true option.Config.EnableExternalIPs = true option.Config.Tunnel = option.TunnelDisabled option.Config.EnableHealthChecking = false option.Config.EnableIPv4Masquerade = false option.Config.EnableIPv6Masquerade = false option.Config.InstallIptRules = false option.Config.EnableL7Proxy = false default: log.WithField(logfields.DatapathMode, option.Config.DatapathMode).Fatal("Invalid datapath mode") } |
要支持L7策略,必须允许安装iptables规则:
|
1 2 3 |
if option.Config.EnableL7Proxy && !option.Config.InstallIptRules { log.Fatal("L7 proxy requires iptables rules (--install-iptables-rules=\"true\")") } |
IPSec + 隧道组合,需要4.19+内核:
|
1 2 3 4 5 |
if option.Config.EnableIPSec && option.Config.Tunnel != option.TunnelDisabled { if err := ipsec.ProbeXfrmStateOutputMask(); err != nil { log.WithError(err).Fatal("IPSec with tunneling requires support for xfrm state output masks (Linux 4.19 or later).") } } |
如果要求Cilium安装iptables规则install-no-conntrack-iptables-rules,让所有Pod流量跳过netfilter的conntrack,则必须使用直接路由模式。因为隧道模式下,外层封包已经自动跳过conntrack:
|
1 2 3 4 5 6 7 8 9 10 11 |
if option.Config.InstallNoConntrackIptRules { if option.Config.Tunnel != option.TunnelDisabled { log.Fatalf("%s requires the agent to run in direct routing mode.", option.InstallNoConntrackIptRules) } // 此外,跳过conntrack必须和IPv4一起使用,原因是用于匹配PodCIDR的是native routing CIDR // 此CIDR目前仅支持IPv4 if !option.Config.EnableIPv4 { log.Fatalf("%s requires IPv4 support.", option.InstallNoConntrackIptRules) } } |
使用隧道时,不能使用直接路由相关的选项。
auto-direct-node-routes:(L2模式下)将直接路由通过给其它节点
|
1 2 3 |
if option.Config.Tunnel != option.TunnelDisabled && option.Config.EnableAutoDirectRouting { log.Fatalf("%s cannot be used with tunneling. Packets must be routed through the tunnel device.", option.EnableAutoDirectRoutingName) } |
runDaemon
enableIPForwarding 启用IPv4/IPv6转发
iptablesManager.Init 初始化iptables管理器,检查相关内核模块是否可用
k8s.Init 初始化各种K8S客户端对象
NewDaemon 创建新的cilium-agent守护进程实例
WithDefaultEndpointManager 创建端点管理器,负责从底层数据源同步端点信息
|
1 2 3 4 |
func runDaemon() { datapathConfig := linuxdatapath.DatapathConfiguration{ HostDevice: option.Config.HostDevice, } |
使用veth数据路径时,默认使用的宿主机设备是cilium_host,它是一个veth,对端也在初始命名空间中,是cilium_net。
直接路由模式下,从路由上看,发往PodCIDR的流量都是从cilium_host出去:
|
1 2 |
172.27.2.0 172.27.2.122 255.255.255.0 UG 0 0 0 cilium_host 172.27.2.122 0.0.0.0 255.255.255.255 UH 0 0 0 cilium_host |
但是却找不到什么规则将其发送给Pod的veth(位于初始命名空间的一端)也就是lxc***网卡。
实际上,转发操作是通过挂钩在cilium_host中的BPF程序进行redirect实现的。类似的难以用传统Linux网络拓扑思维难以理解的地方会有很多。
|
1 2 3 4 5 6 7 8 9 10 11 12 13 14 15 16 17 18 19 |
if err := enableIPForwarding(); err != nil { log.WithError(err).Fatal("Error when enabling sysctl parameters") } // ... func enableIPForwarding() error { if err := sysctl.Enable("net.ipv4.ip_forward"); err != nil { return err } if err := sysctl.Enable("net.ipv4.conf.all.forwarding"); err != nil { return err } if option.Config.EnableIPv6 { if err := sysctl.Enable("net.ipv6.conf.all.forwarding"); err != nil { return err } } return nil } |
|
1 2 3 4 5 6 7 8 9 10 11 12 13 14 15 16 17 18 19 20 21 22 23 24 25 26 27 28 29 30 31 32 33 34 35 36 37 38 39 40 41 42 43 44 45 46 47 48 49 50 51 52 53 54 55 56 57 58 59 60 61 62 63 64 65 |
iptablesManager := &iptables.IptablesManager{} iptablesManager.Init() // ... unc (m *IptablesManager) Init() { modulesManager := &modules.ModulesManager{} haveIp6tables := true // 内核模块管理器,读取/proc/modules中的模块信息 modulesManager.Init() // 确保模块加载 modulesManager.FindOrLoadModules( "ip_tables", "iptable_nat", "iptable_mangle", "iptable_raw", "iptable_filter"); modulesManager.FindOrLoadModules( "ip6_tables", "ip6table_mangle", "ip6table_raw", "ip6table_filter") if err := modulesManager.FindOrLoadModules("xt_socket"); err != nil { if option.Config.Tunnel == option.TunnelDisabled { // xt_socket执行一个local socket match(根据封包进行套接字查找,匹配应该本地处理的封包),并且 // 设置skb mark,这样封包将被Cilium的策略路由导向本地网络栈,不会被ip_forward()处理 // // 如果xt_socket模块不存在,那么可以禁用ip_early_demux,避免在ip_forward()中明确的drop // 在隧道模式下可以不需要ip_early_demux,因为我们可以在BPF逻辑中设置skb mark,这个BPF也是 // 早于策略路由阶段的,可以保证封包被导向本地网络栈,不会ip_forward()转发 // // 如果对于任何场景,我们都能保证在封包到达策略路由之前,被设置好“to proxy” 这个skb mark // 则可以不需要xt_socket模块。目前对于endpoint routing mode,无法满足这一点 log.WithError(err).Warning("xt_socket kernel module could not be loaded") if option.Config.EnableXTSocketFallback { v4disabled := true v6disabled := true if option.Config.EnableIPv4 { v4disabled = sysctl.Disable("net.ipv4.ip_early_demux") == nil } if option.Config.EnableIPv6 { v6disabled = sysctl.Disable("net.ipv6.ip_early_demux") == nil } if v4disabled && v6disabled { m.ipEarlyDemuxDisabled = true log.Warning("Disabled ip_early_demux to allow proxy redirection with original source/destination address without xt_socket support also in non-tunneled datapath modes.") } else { log.WithError(err).Warning("Could not disable ip_early_demux, traffic redirected due to an HTTP policy or visibility may be dropped unexpectedly") } } } } else { m.haveSocketMatch = true } m.haveBPFSocketAssign = option.Config.EnableBPFTProxy v, err := ip4tables.getVersion() if err == nil { switch { case isWaitSecondsMinVersion(v): m.waitArgs = []string{waitString, fmt.Sprintf("%d", option.Config.IPTablesLockTimeout/time.Second)} case isWaitMinVersion(v): m.waitArgs = []string{waitString} } } } |
封包到达内核之后,内核需要知道如何路由它。为了避免反复查找路由表,Linux出现过很多路由缓存机制。从3.6开始,Linux废弃了全局路由缓存,由各子系统(例如TCP协议栈)负责维护路由缓存。
在套接字级别,有一个dst字段作为路由缓存。当一个TCP连接最初建立时,此字段为空,随后dst被填充,该套接字的生命周期内,后续到来的skb都不再需要查找路由。
ip_early_demux是一个内核特性。它向(网络栈的)下优化某些类型的本地套接字(目前是已建立的TCP套接字)输入封包的处理,它的工作原理是:
- 内核接收到封包后,需要查找skb对应的路由,然后查找skb对应的socket
- 这里存在一种浪费,对应已建立的连接,属于同一socket的skb的路由是一致的
- 如果能将路由信息缓存到套接字上,那么就可以避免为每个skb查找路由
问题在于,对于主要(60%+流量)作为路由器使用的Linux系统,它会引入不必要的吞吐量下降,可以禁用。
回到Cilium的场景,使用HTTP策略时,需要将流量重定向给Envoy,同时保持源、目的IP地址不变。这个重定向是依赖于xt_socket模块的。如果xt_socket不可用则需要禁用ip_early_demux,否则会导致原本应该发给Envoy的流量被转发走。
|
1 2 3 4 5 6 7 8 9 10 11 12 13 14 15 16 17 18 19 20 21 22 23 24 25 26 27 28 29 30 31 32 33 34 35 36 37 38 39 40 41 42 43 44 45 46 47 48 49 50 51 52 53 54 55 56 57 58 59 60 61 62 63 64 65 66 67 68 69 70 71 72 73 74 75 76 77 78 79 80 |
func Init(conf k8sconfig.Configuration) error { // 创建K8S核心API客户端 k8sRestClient, closeAllDefaultClientConns, err := createDefaultClient() if err != nil { return fmt.Errorf("unable to create k8s client: %s", err) } // 创建Cilium客户端 closeAllCiliumClientConns, err := createDefaultCiliumClient() if err != nil { return fmt.Errorf("unable to create cilium k8s client: %s", err) } // 创建API Extensions客户端 if err := createAPIExtensionsClient(); err != nil { return fmt.Errorf("unable to create k8s apiextensions client: %s", err) } // 心跳函数 heartBeat := func(ctx context.Context) error { // Kubernetes默认的心跳是获取所在节点的信息 // [0] https://github.com/kubernetes/kubernetes/blob/v1.17.3/pkg/kubelet/kubelet_node_status.go#L423 // 这对于Cilium来说太重,因此这里的心跳采用检查/healthz端点的方式 res := k8sRestClient.Get().Resource("healthz").Do(ctx) return res.Error() } // 对K8S进行心跳检测 if option.Config.K8sHeartbeatTimeout != 0 { controller.NewManager().UpdateController("k8s-heartbeat", controller.ControllerParams{ DoFunc: func(context.Context) error { runHeartbeat( heartBeat, // 心跳函数 option.Config.K8sHeartbeatTimeout, // 超时 // 后面的是超时后的回调,这里是关闭客户端连接 closeAllDefaultClientConns, closeAllCiliumClientConns, ) return nil }, // 心跳运行间隔 RunInterval: option.Config.K8sHeartbeatTimeout, }, ) } // 获取K8S版本进而推导具有哪些特性 if err := k8sversion.Update(Client(), conf); err != nil { return err } if !k8sversion.Capabilities().MinimalVersionMet { return fmt.Errorf("k8s version (%v) is not meeting the minimal requirement (%v)", k8sversion.Version(), k8sversion.MinimalVersionConstraint) } return nil } // 创建Cilium客户端 import clientset "github.com/cilium/cilium/pkg/k8s/client/clientset/versioned" func createDefaultCiliumClient() (func(), error) { restConfig, err := CreateConfig() closeAllConns := setDialer(restConfig) createdCiliumK8sClient, err := clientset.NewForConfig(restConfig) k8sCiliumCLI.Interface = createdCiliumK8sClient return closeAllConns, nil } // 为 rest.Config设置Dial,一个负责拨号(创建TCP连接)的函数 func setDialer(config *rest.Config) func() { if option.Config.K8sHeartbeatTimeout == 0 { return func() {} } ctx := (&net.Dialer{ Timeout: option.Config.K8sHeartbeatTimeout, KeepAlive: option.Config.K8sHeartbeatTimeout, }).DialContext dialer := connrotation.NewDialer(ctx) // 拨号器的DialContext用于创建连接,CloseAll用于关闭它创建的所有连接 // 这个关闭函数返回,并在心跳失败时调用以关闭连接 config.Dial = dialer.DialContext return dialer.CloseAll } |
禁用隧道,使用直接路由时,必须指定native-routing-cidr选项(对应Helm值nativeRoutingCIDR)。该选项必须设置为PodCIDR,也就是Kubernetes的--cluster-cidr。该选项提示Cilium直接路由的目的地址范围。
可能提示不支持XDP,禁用 --set loadBalancer.acceleration=disabled。
异常时输出示例:
|
1 2 3 4 5 6 7 |
kubectl -n kube-system exec cilium-4bsb6 -- cilium status # ... # Cluster health: 0/3 reachable (2021-07-02T04:06:04Z) # Name IP Node Endpoints # k8s/k8s-3 (localhost) 10.0.3.3 reachable unreachable # k8s/k8s-1 10.0.3.1 reachable unreachable # k8s/k8s-2 10.0.3.2 unreachable unreachable |
正常时输出示例:
|
1 |
# Cluster health: 3/3 reachable (2021-07-02T04:09:19Z) |
任何导致网络不通的故障,都会出现类似报错。
配置 --set tunnel=disabled以使用直接路由模式后,容器网络封包不再使用VXLAN包装,而是直接在集群节点之间路由。
这需要集群节点之间有正确的路由规则:
- 如果节点是L2直连的,应当设置
--set autoDirectNodeRoutes=true。这样,路由规则会直接安装到节点路由表中,例如:
123456789route -nKernel IP routing tableDestination Gateway Genmask Flags Metric Ref Use Iface# 下面的两个PodCIDR的节点CIDR,通过以太网路由给其它节点172.27.0.0 10.0.3.2 255.255.255.0 UG 0 0 0 eth0172.27.1.0 10.0.3.3 255.255.255.0 UG 0 0 0 eth0# 下面是本节点的CIDR,交给cilium_host虚拟设备处理172.27.2.0 172.27.2.122 255.255.255.0 UG 0 0 0 cilium_host172.27.2.122 0.0.0.0 255.255.255.255 UH 0 0 0 cilium_host - 如果节点是L3互联的,则路由器需要和Cilium进行某种形式的集成。例如通过BGP协议,或者使用crd这个IPAM,静态规定每个节点的CIDR,然后更新路由器的路由规则
如果节点是虚拟机,则要考虑IaaS层的网络设置。例如OpenStack可能需要为Port配置Allowed Address Pairs,将PodCIDR加入其中。
LoadBalancer服务的IP地址为:10.0.11.20,服务端点IP地址为:172.28.1.76。流量入口节点为m1,服务端点所在节点为m3。
在m1上通过tcpdump抓包:
|
1 2 3 |
# tcpdump -i any -nnn -vvv 'dst 172.28.1.76' 15:21:02.310338 IP (tos 0x10, ttl 64, id 58773, offset 0, flags [DF], proto TCP (6), length 68, options (unknown 154)) 10.2.0.1.36568 > 172.28.1.76.2379: Flags [S], cksum 0xb799 (incorrect -> 0x65e9), seq 2591998745, win 64240, options [mss 1460,sackOK,TS val 899286115 ecr 0,nop,wscale 9], length 0 |
可以看到,在入口节点m1,已经尝试将请求直接转发给位于m3的172.28.1.76.2379。携带了IP选项154。但是,在m3上抓包,没有任何相关信息。
禁用DSR后,两个节点抓包可以发现通信正常:
|
1 2 3 4 5 6 7 |
# m1 15:36:13.301471 IP (tos 0x10, ttl 64, id 47272, offset 0, flags [DF], proto TCP (6), length 57) 10.2.0.61.38732 > 172.28.1.76.2379: Flags [P.], cksum 0xb7d2 (incorrect -> 0x5309), seq 1086727409:1086727414, ack 3915217720, win 126, options [nop,nop,TS val 900197106 ecr 488619248], length 5 # m3 15:36:13.301825 IP (tos 0x10, ttl 64, id 47272, offset 0, flags [DF], proto TCP (6), length 57) 10.2.0.61.38732 > 172.28.1.76.2379: Flags [P.], cksum 0xb7d2 (incorrect -> 0x5309), seq 1086727409:1086727414, ack 3915217720, win 126, options [nop,nop,TS val 900197106 ecr 488619248], length 5 |
差别在于源地址、IP选项不同。考虑是OpenStack源地址检查的原因。增加Allowed Address Pairs:10.0.0.0/8,问题解决。
文字写赞。网络数据路径概要那部分图文都很赞。
但是对于我这样的小白还是有些晦涩。请问大神有没有推荐的相关书籍让小白可以系统学习内核已经网络相关知识 谢谢。
点赞!