By Alex
/ in

CLion是基于Intellij平台的IDE,主要用于C/C++开发。它使用CMake工程模型,你对CMakeLists.txt的任何更改都会反映到IDE中,CLion调用CMake的命令行完成工程构建。
| 设置路径 | 说明 |
| B,E,D ⇨ Toolchains | 工具链设置,可以指定CMake、GDB的路径,在Windows下你还可以指定MinGW或者Cygwin的安装位置 |
| B,E,D ⇨ CMake |
勾选Automatically Reload CMake project on editing Generation CMake Options,指定传递给cmake命令行的选项,例如通过-Dvar=name 传递变量值 展开Pass System Environment,可以覆盖系统环境变量。勾选Pass system environment variables可以传递系统环境变量到CMake的Generation阶段 |
当通过CLion创建新工程时,CMakeLists.txt会自动创建。当工程结构复杂时,你可以手工为子目录创建CMakeLists.txt文件。
当你打开不是基于CMake的工程时,CLion允许做的事情很少——不能编辑代码、不能构建或运行。这种情况下你可以使用CMake的导入功能或者手工创建CMakeLists.txt文件。
手工修改CMakeLists.txt后,需要Reload工程才能体现出修改。当需要Reload时CMake工具窗口会有提示。你还可以启用Auto-Reload。
如果需要在构建前清空CMake的缓存条目,可以定位到CMake工具窗口 ⇨ Cache选项卡,点击![]() 按钮。
按钮。
点击![]() 右侧的向下箭头,选择Edit Configurations,可以修改某个条目使用的构建配置,默认支持CMake的四种构建配置。
右侧的向下箭头,选择Edit Configurations,可以修改某个条目使用的构建配置,默认支持CMake的四种构建配置。
你可以在CMakeLists.txt中添加自定义的构建配置:
# 必须是第一个变量定义
set(CMAKE_CONFIGURATION_TYPES "CustomType1;CustomType2" CACHE STRING "" FORCE)
打开既有CMake工程或者创建新工程后,默认的CLion把CMakeLists.txt所在目录作为工程根目录(Project root directory)看待,要改变此行为,可以Tools ⇨ CMake ⇨ Change Project Root。
| 命令 | 说明 |
| include_directories |
指定头文件的搜索位置。头文件不但对编译是必须的,也可以被CLion索引,以提供代码自动完成、代码导航 依据操作系统的不同,编译器会自动搜索一些预定义的位置,你可以可以手工添加: # 可选的BEFORE/AFTER关键字用于控制搜索顺序
include_directories(BEFORE ${MY_SOURCE_DIR}/src )
|
| set | 设置一系列变量的值:
# 设置C编译器的位置
set (CMAKE_CXX_COMPILER, "C:\\MinGW\\bin\\g++")
# 启用C99标准
set (CMAKE_C_FLAGS "${CMAKE_C_FLAGS} -std=c99")
# 启用C++ 11标准
set (CMAKE_CXX_FLAGS "${CMAKE_CXX_FLAGS} -std=c++11")
# 启用警告
set (CMAKE_CXX_FLAGS "${CMAKE_CXX_FLAGS} -std=c++11 -Wall")
|
| add_executable | 添加可执行的构建目标 |
| add_library | 添加库:
add_library (my_library STATIC|SHARED|MODULE ${SOURCE_FILES})
|
| target_link_libraries | 包含链接所需的库:
# 使用BOOST库
find_package(Boost)
IF (Boost_FOUND)
    include_directories(${Boost_INCLUDE_DIR})
endif()
set (Boost_USE_STATIC_LIBS OFF) # enable dynamic linking
set (Boost_USE_MULTITHREAD ON)  # enable multithreading
find_package (Boost COMPONENTS REQUIRED chrono filesystem)
# 声明链接到BOOST库
target_link_libraries (my_target ${Boost_LIBRARIES})
|
| add_subdirectory |
用于包含子工程。 一个工程可以依赖于其它工程,CMake没有类似于VS的解决方案(Solution)的概念,但是它允许你手工定义工程之间的依赖关系 典型的,你希望在工作区中这样管理多工程(Multi-project)结构:
上面的三点需求可以通过合适的CMakeList.txt完成,你需要把上述所有工程组织到CMakeList.txt所在目录之下,形成树形结构,每个子目录对应一个子工程,并且子目录有自己的CMakeLists.txt。最后,在根目录的CMakeLists.txt中添加: add_subdirectory (project1) # 把project1包含到主工程 add_subdirectory (project2) # 把project2包含到主工程 |
点击 Run ⇨ Attach to Process... 可以调试运行中的进程。当Debug工具窗口提示Debugger attached to process ...后,点击左侧的Pause Program按钮,这时GDB窗格支持输入。
你可能需要设置源码搜索路径,否则设置断点时GDB窗格提示No source file named /home/alex/CPP/project ...要设置源码搜索路径,在GDB窗格中输入set directories命令,示例:
set directories /home/alex/CPP/projects/clion/envoy
你可以启动任意应用程序并调试,此程序不一定是CLion通过Cmake构建出来的。
点击 Run ⇨ Edit Configurations,添加一个Application类型的配置,Executable选择你需要调试的应用程序的绝对路径:
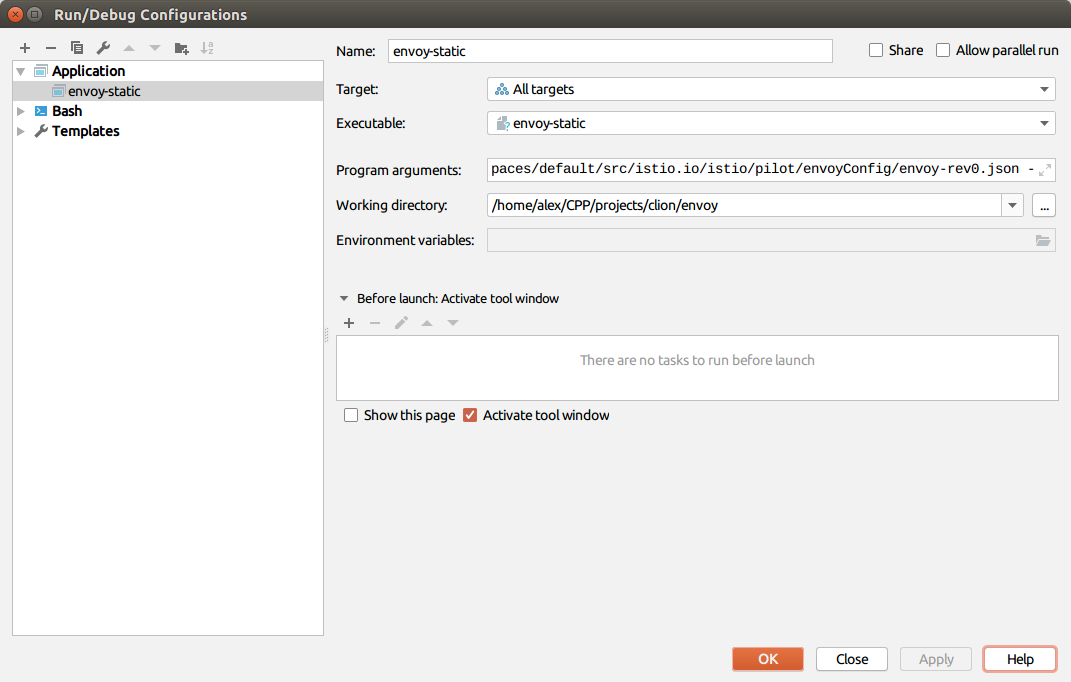
注意:把Before launch下面的Build项去掉。
然后点击调试按钮即可。
脚本示例:
#!/usr/bin/env bash
gdbserver --once localhost:2345 envoy ...
配置示例截图:
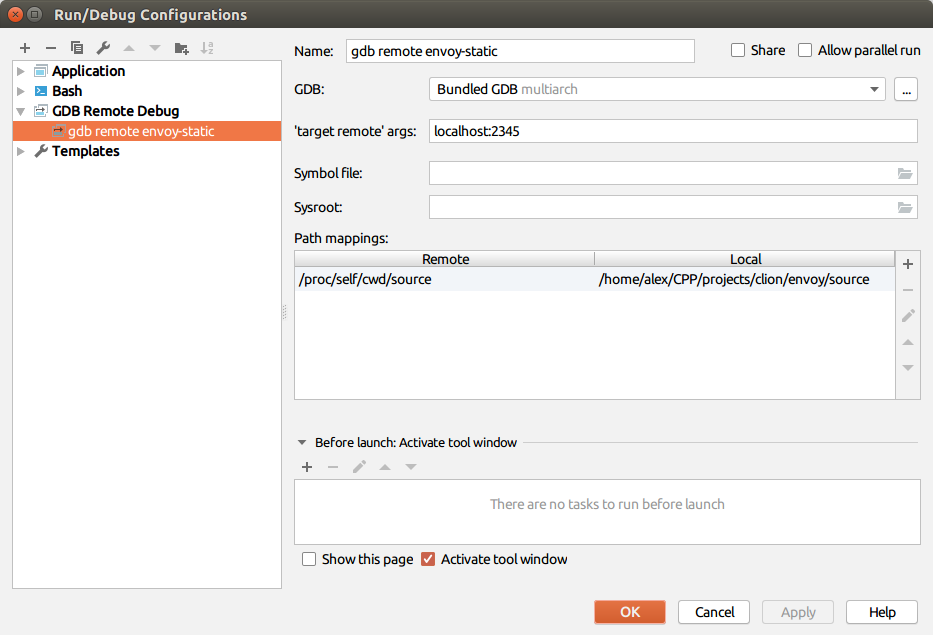
基于gdbserver进行远程调试时,特别需要注意路径映射的问题。
Remote端使用(符号表中的)相对路径貌似无效,确定决定路径,可以按照如下步骤:
(gdb) target remote localhost:2345
打印源码列表:
(gdb) info sources
/proc/self/cwd/source/exe/main_common.cc ...
/proc/self/cwd/bazel-out/k8-dbg/bin/include/envoy/common ...
/home/alex/.cache/bazel/_bazel_alex/3a80e9c345550f05d77beb52ded4f5f3/external/envoy_deps_cache_2c744dffd279d7e9e0910ce594eb4f4f/libevent.dep.build/libevent-release-2.1.8-stable/build/../ratelim-internal.h
通过打印当前栈追踪,查看符号表中的源码路径:
(gdb) where
#0  epoll_wait (epfd=<optimized out>, events=events@entry=0x2e00a80, maxevents=<optimized out>, timeout=timeout@entry=100) at ../epoll_sub.c:66
#1  0x00000000010b7709 in epoll_dispatch (base=0x2e70000, tv=<optimized out>) at ../epoll.c:462
#2  0x00000000010ad8dd in event_base_loop (base=0x2e70000, flags=0) at ../event.c:1947
#3  0x0000000000a5067c in Envoy::Event::DispatcherImpl::run (this=0x2d9d3f0, type=Envoy::Event::Dispatcher::RunType::Block) at source/common/event/dispatcher_impl.cc:165
#4  0x00000000009d74c5 in Envoy::Server::InstanceImpl::run (this=0x2e2d200) at source/server/server.cc:466
#5  0x0000000000425baa in Envoy::MainCommonBase::run (this=0x2e2c8b0) at source/exe/main_common.cc:103
#6  0x000000000040cd68 in Envoy::MainCommon::run (this=0x2e2c480) at bazel-out/k8-dbg/bin/source/exe/_virtual_includes/envoy_main_common_lib/exe/main_common.h:86
#7  0x000000000040a4bf in main (argc=19, argv=0x7fffffffd238) at source/exe/main.cc:37
可以看到source目录对应到的是/proc/self/cwd/source目录。假设Debugger端的源码路径是/home/alex/CPP/projects/clion/envoy/source,则需要建立两者的路径映射
CLion默认指定的构建树的位置,可以在Messages窗口看到,通过CLion执行一次构建,可以看到类似:
bin/cmake --build /home/alex/.CLion2016.1/system/cmake/generated/sds-1b689bf9/1b689bf9/Debug --target sds -- -j 8
的消息,你只需要CD到--build 后面跟着的目录,就可以执行make install 进行安装了,当然前提是在CMakeLists.txt中声明合适的install命令。
也无法调用对象的方法、查看其字段值。
出现此问题的原因是,目标对象在编译时没有开启调试信息。如果使用GCC,尝试添加编译参数-O0 -g3。
Leave a Reply