snmp4j学习笔记
snmp4j是Java社区首选的SNMP协议的开源实现,支持JDK1.4+版本,该框架受C++库snmp++启发,以面向对象的方式进行设计。snmp4j同时支持Manager、Agent两种角色,支持同步、异步通信方式,以及多种验证方式和加密算法。snmp4j的具体特性如下:
- 支持MD5、SHA身份验证
- 支持SNMPv3的DES、3DES、AES128、AES192、AES256加密
- 支持协议:SNMPv1、SNMPv2c、SNMPv3
- 支持全部PDU类型
- 支持多种传输层协议:UDP、TCP、TLS
- 支持同步和异步请求
- 支持基于行的(row-based)异步表格获取
下图描述了snmp4j最重要的核心类之间的关系,其中蓝色箭头代表向远程snmp实体(Target)发送的请求,红色代表远程snmp实体发送给当前snmp会话的请求。
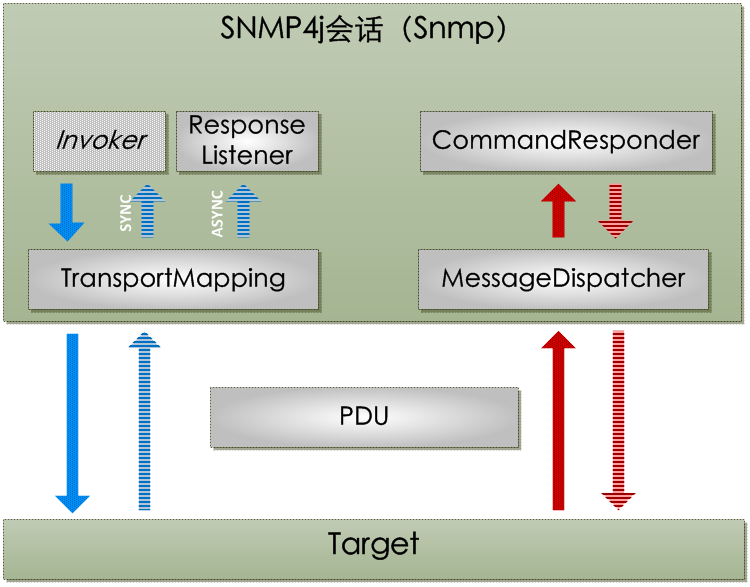
Snmp类,一般称为snmp4j会话,是整个框架的核心,用户代码主要和它进行交互。
snmp4j向外部SNMP实体发送请求的过程如下:
- 用户代码(Invoker)通过Snmp.send()方法发起请求
- TransportMapping组件通过底层的TCP或者UDP协议将请求传输出去
- 请求、应答的载体均是PDU,对应了SNMP报文
- Target代表远程SNMP实体,持有它的地址、身份、SNMP版本等信息
- 对于同步请求,应答直接返回给Invoker;对于异步请求,应答通过ResponseListener回调,ResponseListener在Invoker发送异步请求时,作为方法参数注册
snmp4j接收外部SNMP实体的请求,并进行处理的过程如下:
- snmp4j监听(通过TransportMapping)外部SNMP报文,并转为PDU类型
- MessageDispatcher负责将PDU转发给(回调)合适的CommandResponder,自定义CommandResponder可以注册到Snmp会话
- CommandResponder负责处理请求PDU,可选的,给出一个应答PDU
下表列出snmp4核心类的职责、提供的方法以及代码样例:
| 类型 | 说明 | ||||||||||||||||||
| Snmp |
SNMP会话类,该类是snmp4j的核心,提供发送/接收SNMP的PDU的功能。支持发送所有类型的PDU,支持异步、同步两种方式发送。 Snmp独立于具体的传输层协议,和传输层有关的工作由TransportMapping负责,有两种方式可以将Snmp关联到某种传输:
除了关联传输,还可以为Snmp指定消息分发器:
Snmp准备好后,需要启动监听,以便接收其它SNMP实体发送来的报文:
要发送SNMP报文,首先要构建目标(Taget),目标映射接收方SNMP实体:
然后,构建PDU,即需要发送的报文:
构建好PDU后,就可以通过同步(同步方式不支持广播消息)或者异步方式,将其发送给target了:
对于Manager角色,如果要接收来自Agent的trap,可以:
对于Agent角色,如果要接收来自Manger的请求,并做出应答,还是使用上面的CommandResponder:
最后,应当关闭会话和transport:
|
||||||||||||||||||
| PDU |
在TCP/IP协议族中,协议数据单元(Protocol Data Unit,PDU)表示使用某个协议的两个实体之间发送的报文,包括报文头和报文体。由于TCP/IP协议族是分层结构,因而下层协议PDU的载荷部分,就是上层协议的PDU。 在SNMP协议的报文头中,具有一个字段“PDU类型”,可以理解为报文的类型。 snmp4j使用该类构建SNMP协议报文。该类实现了BERSerializable接口,后者定义了如何将ASN.1数据类型串行化为BER格式的方法。 PDU类定义了以下常量,来代表SNMP报文类型:
PDU类提供以下重要方法:
PDU包含以下子类型:
注意对于SNMPv2c,直接使用PDU类 下面的代码示例了如何创建一个SNMPv3的PDU:
|
||||||||||||||||||
| Target |
目标,该接口代表远程(即对端)SNMP实体(Manager、Agent)。定义了以下方法:
该接口的缺省实现是AbstractTarget,并且包含几个子类型,这些子类型是按照安全性特征划分的:
下面是创建目标的样例代码:
|
||||||||||||||||||
| ResponseEvent |
应答事件类,该类继承了JDK的观察者模式组件。应答事件将一个请求PDU和它的响应,以及一个可选的用户对象进行关联。它提供以下方法:
下面的代码示例如何使用该类:
|
||||||||||||||||||
| ResponseListener |
这是一个回调接口,实现它可以异步的处理应答PDU:
|
||||||||||||||||||
| CommandResponderEvent |
该事件由MessageDispatcher负责分发,相应的CommandResponder会接收到并处理与该事件关联的request、report、trap/notification类型的PDU。 该类提供以下方法:
|
||||||||||||||||||
| CommandResponder |
该接口用来处理入站request、report、notification(trap)类型的PDU:
|
||||||||||||||||||
| MessageDispatcher |
消息分发器接口,处理incoming消息并将消息分发给感兴趣的CommandResponder,同时支持发送outgoing消息。 消息分发器至少需要一个TransportMapping、一个MessageProcessingModel对象,以支持处理任何消息。该接口包含两个实现类:
|
||||||||||||||||||
| Address |
该接口对SNMP协议支持的地址类型进行抽象:
|
||||||||||||||||||
| TransportMapping |
该接口定义了传输机制,传输机制是Snmp使用的某种传输层协议的支持。常用的实现为:DefaultTcpTransportMapping、DefaultUdpTransportMapping,分别代表TCP、UDP传输。该接口定义了以下重要方法:
定义传输机制时,可以指定它的监听地址和端口:
|
||||||||||||||||||
| TransportListener |
该接口定义了一个方法:processMessage(),用来处理incoming消息,该接口由Snmp4j负责回调 |
||||||||||||||||||
| MessageProcessingModel |
消息处理模型的通用方法定义:
具体实现类包括: |
||||||||||||||||||
| SecurityProtocols |
管理SNMP实体支持的所有的身份验证和隐私协议,单例。定义了以下方法:
|
||||||||||||||||||
| AuthenticationProtocol |
为所有SNMP身份验证协议定义统一接口 |
||||||||||||||||||
| PrivacyProtocol | 为所有SNMP隐私(即加解密)协议定义统一接口 | ||||||||||||||||||
| SecurityModels |
管理SNMP实体支持的所有安全模型,单例。定义了以下方法:
|
||||||||||||||||||
| SecurityModel |
该接口映射RFC3411定义的安全模型。该接口定义了以下安全模型ID常量: SECURITY_MODEL_ANY = 0 以及以下方法:
该接口包含一个实现类:USM,对应RFC3414定义的基于用户的安全模型(User Based Security Model)。下面的代码示例了该安全模型的使用方法:
|
||||||||||||||||||
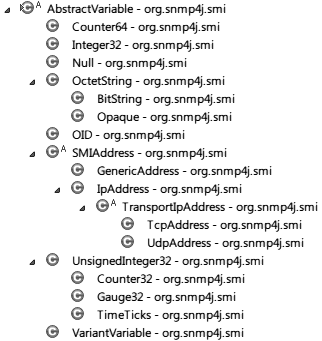
| Variable |
该接口映射SNMP管理信息结构(SMI)定义的数据类型,包含了一个实现类AbstractVariable,后者有以下子类:
|
||||||||||||||||||
| OID |
OID是一种特殊的Variable,代表对象标识符(不是实例标识符) |
||||||||||||||||||
| VariableBinding |
即变量名、值对,变量名即OID,变量值即Variable |
||||||||||||||||||
| BaseAgent |
该类定义了一个框架,用户可以扩展它、覆盖其中的抽象方法来创建SNMP代理。该类定义了以下必须扩展点(抽象方法):
该类还定义了以下可选扩展点(受保护的钩子):
|
||||||||||||||||||
| MOServer |
受管对象服务器,负责管理注册的ManagedObject,该接口定义了受管对象仓库必须提供给CommandResponder的服务。包含以下方法:
|
||||||||||||||||||
| ManagedObject | 该接口抽象“受管对象”,一个受管对象可能对应MIB中的某个分支,因而可以包含多个OID,OID的范围由MOScope指定 | ||||||||||||||||||
| MOScope | 表示一个连续的OID区域,具有OID上下限 | ||||||||||||||||||
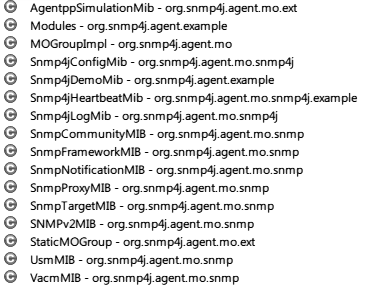
| MOGroup |
受管对象组,表示一组ManagedObject,可以通过 registerMOs(MOServer server, OctetString context) 注册到MOServer。该接口实际上对应了管理信息库(MIB)对象。包含以下实现(其中MOGroupImpl是一个简单的实现,StaticMOGroup则可以用来轻松的实现静态、只读受管对象组):
|
||||||||||||||||||
| NotificationOriginator |
通知源,实现该接口的对象负责发送notification,它定义了一个方法:
|
||||||||||||||||||
| CommandProcessor |
BaseAgent使用的一个实现了CommandResponder、NotificationOriginator的粘合剂类,负责处理请求、发送通知 |

|
1 2 3 4 5 6 7 8 9 10 11 12 13 14 15 16 17 18 19 20 21 22 23 24 25 26 27 28 29 30 31 32 33 34 35 36 37 38 39 40 41 42 43 44 45 46 47 48 49 50 51 52 53 54 55 56 57 58 59 60 61 62 63 64 65 66 67 68 69 70 71 72 73 74 75 76 77 78 79 80 81 82 83 84 85 86 87 88 89 90 91 92 93 94 95 96 97 98 99 100 101 102 103 104 105 106 107 108 109 110 111 112 113 114 115 116 117 118 119 120 121 122 123 124 125 126 127 128 129 130 131 132 133 134 135 136 137 138 139 140 141 142 143 144 145 146 147 148 149 150 151 152 153 154 155 156 157 158 159 160 161 162 163 164 165 166 167 168 169 |
package cc.gmem.study.snmp; import java.util.Vector; import java.util.concurrent.TimeUnit; import org.junit.AfterClass; import org.junit.BeforeClass; import org.junit.Test; import org.slf4j.Logger; import org.slf4j.LoggerFactory; import org.snmp4j.CommunityTarget; import org.snmp4j.PDU; import org.snmp4j.ScopedPDU; import org.snmp4j.Snmp; import org.snmp4j.Target; import org.snmp4j.TransportMapping; import org.snmp4j.UserTarget; import org.snmp4j.event.ResponseEvent; import org.snmp4j.event.ResponseListener; import org.snmp4j.mp.MPv3; import org.snmp4j.mp.SnmpConstants; import org.snmp4j.security.AuthMD5; import org.snmp4j.security.PrivDES; import org.snmp4j.security.SecurityLevel; import org.snmp4j.security.SecurityModel; import org.snmp4j.security.SecurityModels; import org.snmp4j.security.SecurityProtocols; import org.snmp4j.security.USM; import org.snmp4j.security.UsmUser; import org.snmp4j.smi.Address; import org.snmp4j.smi.GenericAddress; import org.snmp4j.smi.OID; import org.snmp4j.smi.OctetString; import org.snmp4j.smi.TimeTicks; import org.snmp4j.smi.Variable; import org.snmp4j.smi.VariableBinding; import org.snmp4j.transport.DefaultUdpTransportMapping; public class Snmp4jManagerRequestTest { private static Logger LOGGER = LoggerFactory.getLogger( Snmp4jManagerRequestTest.class ); private static Snmp session; private static TransportMapping transport; private static Address targetAddr; @BeforeClass public static void setUpBeforeClass() throws Exception { transport = new DefaultUdpTransportMapping(); session = new Snmp( transport ); targetAddr = GenericAddress.parse( "udp:192.168.0.90/161" ); transport.listen(); //需要在Manager的数据库中添加Agent用户的安全性信息 SecurityProtocols instance = SecurityProtocols.getInstance(); instance.addDefaultProtocols(); USM usm = new USM( instance, new OctetString( MPv3.createLocalEngineID() ), 0 ); SecurityModels.getInstance().addSecurityModel( usm ); //添加SNMPv3的用户 OctetString securityName = new OctetString( "snmp" ); OctetString pswd = new OctetString( "snmppswd" ); UsmUser user = new UsmUser( securityName, AuthMD5.ID, pswd, PrivDES.ID, pswd ); session.getUSM().addUser( securityName, user ); } @AfterClass public static void tearDownAfterClass() throws Exception { session.close(); transport.close(); } /** * 使用SNMPv2c协议发送一个同步GET请求,获取代理系统的已启动时间 */ @Test public void testSNMPv2cSyncGetRequest() throws Exception { Target target = new CommunityTarget( targetAddr, new OctetString( "authenticated" ) //团体名 ); target.setVersion( SnmpConstants.version2c ); PDU req = new PDU(); //SNMPv2c协议数据单元 req.setType( PDU.GET ); //注意OID必须使用实例标识,对于简单变量,实例标识就是OID.0 req.add( new VariableBinding( new OID( "1.3.6.1.2.1.1.3.0" ) ) ); //同步发送,直接获得返回值 ResponseEvent respEvent = session.send( req, target ); PDU resp = respEvent.getResponse(); //需要此判断,很多时候(例如超时)snmp4j简单的把应答PDU设置为空指针,而缺乏必要的错误信息 if ( resp != null ) { VariableBinding vb = resp.get( 0 ); TimeTicks val = (TimeTicks) vb.getVariable(); LOGGER.debug( "System Uptime: {}s", val.toLong() / 100 ); //转化为秒数 } } /** * 使用SNMPv3协议发送一个异步GET请求,获取代理系统的已启动时间 */ @Test public void testSNMPv3ASyncGetRequest() throws Exception { UserTarget target = new UserTarget(); target.setAddress( targetAddr ); target.setVersion( SnmpConstants.version3 ); target.setTimeout( 1000 ); target.setRetries( 3 ); target.setSecurityName( new OctetString( "snmp" ) ); target.setSecurityLevel( SecurityLevel.AUTH_PRIV ); target.setSecurityModel( SecurityModel.SECURITY_MODEL_USM ); ScopedPDU req = new ScopedPDU(); //SNMPv3协议数据单元 req.setType( PDU.GET ); req.add( new VariableBinding( new OID( "1.3.6.1.2.1.1.3.0" ) ) ); session.send( req, target, null, new ResponseListener() { public void onResponse( ResponseEvent event ) { ( (Snmp) event.getSource() ).cancel( event.getRequest(), this ); TimeTicks val = (TimeTicks) event.getResponse().get( 0 ).getVariable(); LOGGER.debug( "System Uptime: {}s", val.toLong() / 100 ); } } ); TimeUnit.SECONDS.sleep( 1 ); //防止JUnit过早的退出 } /** * 使用SNMPv2c协议执行GET-BULK请求,获得代理的UDP监听表格 */ @SuppressWarnings ( "unchecked" ) @Test public void testSNMPv2cGetBulkRequest() throws Exception { Target target = new CommunityTarget( targetAddr, new OctetString( "authenticated" ) ); target.setVersion( SnmpConstants.version2c ); PDU req = new PDU(); req.setType( PDU.GETBULK ); //批量请求最大重复变量个数,注意,应答PDU在这里受限于单个UDP数据报的大小,因此不能设置的过大 //单个UDP数据报的绝对限制是65535字节,此外还收到MTU的限制,可能只有1500字节 req.setMaxRepetitions( 100 ); req.setNonRepeaters( 0 ); req.add( new VariableBinding( new OID( "1.3.6.1.2.1.7.5" ) ) ); ResponseEvent respEvent = session.send( req, target ); PDU resp = respEvent.getResponse(); if ( resp != null && resp.getErrorStatus() == PDU.noError ) { Vector<? extends VariableBinding> vbs = resp.getVariableBindings(); StringBuilder buf = new StringBuilder(); for ( VariableBinding vb : vbs ) { Variable var = vb.getVariable(); String oid = vb.getOid().toString(); if ( !oid.startsWith( "1.3.6.1.2.1.7.5.1" ) ) break; //超过UDP监听表格的范围 buf.append( String.format( "%s: (%s)%s\n", vb.getOid(), var.getSyntaxString(), var ) ); } LOGGER.debug( buf.toString() ); } } } |
|
1 2 3 4 5 6 7 8 9 10 11 12 13 14 15 16 17 18 19 20 21 22 23 24 25 26 27 28 29 30 31 32 33 34 35 36 37 38 39 40 41 42 43 44 45 46 47 48 49 50 51 52 53 54 55 56 57 58 59 60 61 62 63 64 65 66 67 68 69 70 71 72 73 74 75 76 77 78 79 80 81 82 83 84 85 86 87 88 89 90 91 92 93 94 95 96 97 98 99 100 101 102 103 104 105 106 107 108 109 110 111 |
public class Snmp4jManagerTrapTest { private static Logger LOGGER = LoggerFactory.getLogger( Snmp4jManagerTrapTest.class ); private static Snmp session; private static TransportMapping transport; private static ThreadPool threadPool; private Lock exitLock = new ReentrantLock(); private Condition exitCondition = exitLock.newCondition(); @BeforeClass public static void setUpBeforeClass() throws Exception { UdpAddress localAddr = (UdpAddress) GenericAddress.parse( "udp:0.0.0.0/162" );//Manager的监听地址 transport = new DefaultUdpTransportMapping( localAddr ); threadPool = ThreadPool.create( "TrapReceiver", 16 );//创建16线程的池 //创建多线程的报文分发器 MessageDispatcher dispatcher = new MultiThreadedMessageDispatcher( threadPool, new MessageDispatcherImpl() ); dispatcher.addMessageProcessingModel( new MPv2c() ); //添加消息处理模型支持 dispatcher.addMessageProcessingModel( new MPv3() ); //添加消息处理模型支持 session = new Snmp( dispatcher, transport ); transport.listen(); SecurityProtocols instance = SecurityProtocols.getInstance(); instance.addDefaultProtocols(); USM usm = new USM( instance, new OctetString( MPv3.createLocalEngineID() ), 0 ); SecurityModels.getInstance().addSecurityModel( usm ); OctetString securityName = new OctetString( "user" ); OctetString pswd = new OctetString( "password" ); UsmUser user = new UsmUser( securityName, AuthMD5.ID, pswd, PrivDES.ID, pswd ); session.getUSM().addUser( securityName, user ); } @AfterClass public static void tearDownAfterClass() throws Exception { session.close(); transport.close(); threadPool.cancel(); } @Test public void testTrapAndNotification() throws Exception { session.addCommandResponder( new CommandResponder() { private volatile int mscCount; @SuppressWarnings ( "unchecked" ) public void processPdu( CommandResponderEvent event ) { String community = new String( event.getSecurityName() ); int secmod = event.getSecurityModel(); if ( secmod == SECURITY_MODEL_SNMPv2c ) { //基于团体名的身份验证 if ( !"public".equals( community ) ) { LOGGER.error( "Authentication failed." ); return; } } else if ( secmod == SECURITY_MODEL_USM ) { //不用管,snmp4j负责身份验证,如果失败,CommandResponder不会接收到报文 } else { LOGGER.error( "Unsupported security model: {}", secmod ); return; } PDU command = event.getPDU(); if ( command.getType() == PDU.TRAP ) { Vector<? extends VariableBinding> vbs = command.getVariableBindings(); StringBuilder buf = new StringBuilder(); for ( VariableBinding vb : vbs ) { Variable var = vb.getVariable(); buf.append( String.format( "%s: (%s)%s\n", vb.getOid(), var.getSyntaxString(), var ) ); } LOGGER.debug( buf.toString() ); event.setProcessed( true ); //设置事件的已处理状态 } else if ( command.getType() == ScopedPDU.NOTIFICATION ) { } else { return; } mscCount++; if ( mscCount == 6 ) //等待Agent发送6个报文 { exitLock.lock(); exitCondition.signalAll(); exitLock.unlock(); } } } ); exitLock.lock(); exitCondition.await(); exitLock.unlock(); } } |
|
1 2 3 4 5 6 7 8 9 10 11 12 13 14 15 16 17 18 19 20 21 22 23 24 25 26 27 28 29 30 31 32 33 34 35 36 37 38 39 40 41 42 43 44 45 46 47 48 49 50 51 52 53 54 55 56 57 58 59 60 61 62 63 64 65 66 67 68 69 70 71 72 73 74 75 76 77 78 79 80 81 82 83 84 85 86 87 88 89 90 91 92 93 94 95 |
public class Snmp4jAgentTrapTest { private static final String TRAP_OID = "1.3.6.1.4.1.3835.1.1"; private static final String MSG_OID = "1.3.6.1.4.1.3835.1.3"; private static Logger LOGGER = LoggerFactory.getLogger( Snmp4jAgentTrapTest.class ); private static Snmp session; private static Address targetAddr; private static TransportMapping transport; @BeforeClass public static void setUpBeforeClass() throws Exception { UdpAddress localAddr = (UdpAddress) GenericAddress.parse( "udp:0.0.0.0/161" );//Agent的监听地址 targetAddr = GenericAddress.parse( "udp:127.0.0.1/162" ); //Manager的监听地址 transport = new DefaultUdpTransportMapping( localAddr ); session = new Snmp( transport ); transport.listen(); SecurityProtocols instance = SecurityProtocols.getInstance(); instance.addDefaultProtocols(); USM usm = new USM( instance, new OctetString( MPv3.createLocalEngineID() ), 0 ); SecurityModels.getInstance().addSecurityModel( usm ); OctetString securityName = new OctetString( "user" ); OctetString pswd = new OctetString( "password" ); UsmUser user = new UsmUser( securityName, AuthMD5.ID, pswd, PrivDES.ID, pswd ); session.getUSM().addUser( securityName, user ); } @AfterClass public static void tearDownAfterClass() throws Exception { session.close(); transport.close(); } /** * 发送SNMPv2c的TRAP通知给Manager */ @Test public void testSNMPv2cTrap() throws Exception { CommunityTarget target = new CommunityTarget(); target.setAddress( targetAddr ); target.setCommunity( new OctetString( "public" ) ); //Manager认可的团体名 target.setVersion( SnmpConstants.version2c ); target.setTimeout( 3000 ); PDU trap = DefaultPDUFactory.createPDU( SnmpConstants.version2c ); trap.setType( PDU.TRAP ); //对于SNMPv1,需要使用PDU.V1TRAP类型 for ( int i = 0; i < 5; i++ ) { trap.clear(); trap.add( new VariableBinding( SnmpConstants.sysUpTime, new TimeTicks( 360000L ) ) ); trap.add( new VariableBinding( SnmpConstants.snmpTrapOID, new OID( TRAP_OID ) ) ); trap.add( new VariableBinding( SnmpConstants.snmpTrapAddress, new IpAddress( "192.168.0.89" ) ) ); String msg = "Trapped " + i; trap.add( new VariableBinding( new OID( MSG_OID ), new OctetString( msg ) ) ); session.send( trap, target ); LOGGER.debug( "TRAP sent: {}", msg ); TimeUnit.SECONDS.sleep( 1 ); } } /** * 发送SNMPv3的NOTIFICATION通知给Manager */ @Test public void testSNMPv3Notification() throws Exception { UserTarget target = new UserTarget(); target.setAddress( targetAddr ); target.setVersion( SnmpConstants.version3 ); target.setSecurityName( new OctetString( "user" ) ); target.setSecurityLevel( SecurityLevel.AUTH_PRIV ); target.setSecurityModel( SecurityModel.SECURITY_MODEL_USM ); ScopedPDU notify = new ScopedPDU(); notify.setType( ScopedPDU.NOTIFICATION ); //使用SNMPv2c/SNMPv3的通知方式 notify.add( new VariableBinding( SnmpConstants.sysUpTime, new TimeTicks( 360000L ) ) ); notify.add( new VariableBinding( SnmpConstants.snmpTrapOID, SnmpConstants.linkDown ) ); String msg = "Notified"; notify.add( new VariableBinding( new OID( TRAP_OID ), new OctetString( msg ) ) ); session.send( notify, target ); LOGGER.debug( "NOTIFICATION sent: {}", msg ); TimeUnit.SECONDS.sleep( 1 ); } } |
|
1 2 3 4 5 6 7 8 9 10 11 12 13 14 15 16 17 18 19 20 21 22 23 24 25 26 27 28 29 30 31 32 33 34 35 36 37 38 39 40 41 42 43 44 45 46 47 48 49 50 51 52 53 54 55 56 57 58 59 60 61 62 63 64 65 66 67 68 69 70 71 72 73 74 75 76 77 78 79 80 81 82 83 84 85 86 87 88 89 90 91 92 93 94 95 96 97 98 |
public class Snmp4jAgentResponderTest { private static Logger LOGGER = LoggerFactory.getLogger( Snmp4jAgentResponderTest.class ); private static Snmp session; private static ThreadPool threadPool; private static TransportMapping transport; private Lock exitLock = new ReentrantLock(); private Condition exitCondition = exitLock.newCondition(); @BeforeClass public static void setUpBeforeClass() throws Exception { UdpAddress localAddr = (UdpAddress) GenericAddress.parse( "udp:0.0.0.0/161" );//Agent的监听地址 transport = new DefaultUdpTransportMapping( localAddr ); threadPool = ThreadPool.create( "TrapReceiver", 16 );//创建16线程的池 //创建多线程的报文分发器 MessageDispatcher dispatcher = new MultiThreadedMessageDispatcher( threadPool, new MessageDispatcherImpl() ); dispatcher.addMessageProcessingModel( new MPv2c() ); //添加消息处理模型支持 dispatcher.addMessageProcessingModel( new MPv3() ); //添加消息处理模型支持 session = new Snmp( dispatcher, transport ); transport.listen(); } @AfterClass public static void tearDownAfterClass() throws Exception { session.close(); transport.close(); threadPool.cancel(); } /** * 处理GET请求并返回应答 */ @Test public void testSNMPv2cResponse() throws Exception { //和TRAP接收方一样,请求接收方同样使用CommandResponder回调接口 //需要注意的是,为了提升性能,一般需要使用MultiThreadedMessageDispatcher session.addCommandResponder( new CommandResponder() { public void processPdu( CommandResponderEvent event ) { //这里可以限定请求使用的安全模型,并进行身份验证 PDU command = event.getPDU(); if ( PDU.GET == command.getType() ) { VariableBinding vb = command.get( 0 ); OID oid = vb.getOid(); command.setErrorIndex( 0 ); command.setErrorStatus( 0 ); command.setType( PDU.RESPONSE ); //模拟一个应答值,正常业务逻辑中,这里可以调用某种服务获得对象的值 String val = "value.of." + oid; command.get( 0 ).setVariable( new OctetString( val ) ); try { MessageDispatcher dispatcher = event.getMessageDispatcher(); //发送应答报文 dispatcher.returnResponsePdu( event.getMessageProcessingModel(), event.getSecurityModel(), //这里我们假设使用团体名的验证方式 new OctetString( "public" ).getValue(), event.getSecurityLevel(), command, event.getMaxSizeResponsePDU(), event.getStateReference(), new StatusInformation() ); LOGGER.debug( "Responded {} to {}", val, oid ); } catch ( MessageException e ) { LOGGER.debug( "Failed to send response PDU:", e ); } finally { event.setProcessed( true ); exitLock.lock(); exitCondition.signalAll(); exitLock.unlock(); } } } } ); exitLock.lock(); exitCondition.await(); exitLock.unlock(); } } |
在Ubuntu下做测试:
|
1 2 3 |
snmpget -v 2c -c public -l authNoPriv 192.168.0.89 1.3.6.1.4.1.3835.1.3 #输出: #SNMPv2-SMI::enterprises.3835.1.3 = STRING: "value.of.1.3.6.1.4.1.3835.1.3" |
继承BaseAgent可以开发自己的Agent服务器,下面是一个简单的Agent服务器:
|
1 2 3 4 5 6 7 8 9 10 11 12 13 14 15 16 17 18 19 20 21 22 23 24 25 26 27 28 29 30 31 32 33 34 35 36 37 38 39 40 41 42 43 44 45 46 47 48 49 50 51 52 53 54 55 56 57 58 59 60 61 62 63 64 65 66 67 68 69 70 71 72 73 74 75 76 77 78 79 80 81 82 83 84 85 86 87 88 89 90 91 92 93 94 95 96 97 98 99 100 101 102 103 104 105 106 107 108 109 110 111 112 113 114 115 116 117 118 119 120 121 122 123 124 125 126 127 128 129 130 131 132 133 134 135 136 137 138 139 140 141 142 143 144 145 146 147 148 149 150 151 152 153 154 155 156 157 158 159 160 161 162 163 164 165 166 167 168 169 170 171 172 173 174 175 176 177 178 179 180 181 182 183 184 185 |
package cc.gmem.study.snmp; import java.io.File; import java.io.IOException; import org.slf4j.Logger; import org.slf4j.LoggerFactory; import org.snmp4j.TransportMapping; import org.snmp4j.agent.BaseAgent; import org.snmp4j.agent.CommandProcessor; import org.snmp4j.agent.DuplicateRegistrationException; import org.snmp4j.agent.MOGroup; import org.snmp4j.agent.ManagedObject; import org.snmp4j.agent.mo.MOTableRow; import org.snmp4j.agent.mo.snmp.RowStatus; import org.snmp4j.agent.mo.snmp.SnmpCommunityMIB; import org.snmp4j.agent.mo.snmp.SnmpNotificationMIB; import org.snmp4j.agent.mo.snmp.SnmpTargetMIB; import org.snmp4j.agent.mo.snmp.VacmMIB; import org.snmp4j.agent.security.MutableVACM; import org.snmp4j.log.Log4jLogFactory; import org.snmp4j.log.LogFactory; import org.snmp4j.mp.MPv3; import org.snmp4j.security.USM; import org.snmp4j.smi.Address; import org.snmp4j.smi.GenericAddress; import org.snmp4j.smi.Integer32; import org.snmp4j.smi.OID; import org.snmp4j.smi.OctetString; import org.snmp4j.smi.Variable; import org.snmp4j.transport.TransportMappings; import static org.snmp4j.security.SecurityLevel.*; import static org.snmp4j.agent.mo.snmp.StorageType.*; import static org.snmp4j.security.SecurityModel.*; public class SnmpAgent extends BaseAgent { private static final Logger LOGGER = LoggerFactory.getLogger( SnmpAgent.class ); private static final OctetString ENGINE_ID = new OctetString( MPv3.createLocalEngineID() ); static { //配置使用的日志系统 LogFactory.setLogFactory( new Log4jLogFactory() ); } private String address; /** * @param address 代理的监听地址,例如:udp:0.0.0.0/161 */ public SnmpAgent( String address ) throws IOException { //bootCounter.agent:存放启动计数器的文件,如果文件不存在会在代理关闭时自动创建 //conf.agent:存放代理配置信息的文件,如果文件不存在会在代理关闭时自动创建 super( new File( "bootCounter.agent" ), new File( "conf.agent" ), new CommandProcessor( ENGINE_ID ) ); this.address = address; } /** * 不注册任何额外的受管对象 */ @Override protected void registerManagedObjects() { } /** * 注册一个受管对象到服务器的默认上下文 * @param mo 受管对象 */ public void registerManagedObject( ManagedObject mo ) { try { server.register( mo, null ); } catch ( DuplicateRegistrationException ex ) { LOGGER.error( "Registration failed: ", ex ); } } public void unregisterManagedObject( MOGroup moGroup ) { moGroup.unregisterMOs( server, getContext( moGroup ) ); } @Override protected void addNotificationTargets( SnmpTargetMIB targetMIB, SnmpNotificationMIB notificationMIB ) { } /** * 配置基于视图(View)的访问控制 */ @Override protected void addViews( VacmMIB vacm ) { //把安全模型v2c和安全名称cpublic的组合添加到组 OctetString grp = new OctetString( "group" ); vacm.addGroup( SECURITY_MODEL_SNMPv2c, new OctetString( "cpublic" ), grp, nonVolatile ); //为组添加访问权限 OctetString readView = new OctetString( "fullReadView" ); OctetString writeView = new OctetString( "fullWriteView" ); OctetString notifyView = new OctetString( "fullNotifyView" ); vacm.addAccess( grp, new OctetString( "public" ), //上下文(前缀) SECURITY_MODEL_ANY, //安全模型 NOAUTH_NOPRIV, //安全级别 MutableVACM.VACM_MATCH_EXACT, //上上下文名称完全匹配,VACM_MATCH_PREFIX表示前缀匹配 readView, //用于读访问的视图名称(使用空串表示禁止访问) writeView,//用于写访问的视图名称(使用空串表示禁止访问) notifyView,//用于通知访问的视图名称(使用空串表示禁止访问) nonVolatile ); //存储类型 //添加一个视图到VACM,前两个参数一样的既有条目被静默的覆盖 vacm.addViewTreeFamily( readView, new OID( "1.3" ), //子树的OID new OctetString(), //掩码 VacmMIB.vacmViewIncluded, //表示该子树被包含在MIB View中,vacmViewExcluded表示排除 nonVolatile ); } /** * 添加SNMPv3用户 */ protected void addUsmUser( USM usm ) { } /** * 初始化传输机制 */ protected void initTransportMappings() throws IOException { transportMappings = new TransportMapping[1]; Address addr = GenericAddress.parse( address ); TransportMapping tm = TransportMappings.getInstance().createTransportMapping( addr ); transportMappings[0] = tm; } /** * 启动代码 */ public void start() throws IOException { init(); addShutdownHook(); //添加一个上下文到受管对象服务器 getServer().addContext( new OctetString( "public" ) ); finishInit(); run(); sendColdStartNotification(); } protected void unregisterManagedObjects() { } /** * 在代理的Local Configuration Datastore中添加团体名字符串的表 * 这里仅仅配置一行:public上下文中的public团体名 */ protected void addCommunities( SnmpCommunityMIB communityMIB ) { Variable[] com2sec = new Variable[] { new OctetString( "public" ), // 团体名 new OctetString( "cpublic" ), // 安全名称 getAgent().getContextEngineID(), // 上下文引擎 new OctetString( "public" ), // 默认上下文 new OctetString(), // 传输标记 new Integer32( nonVolatile ), // 存储类型 new Integer32( RowStatus.active ) // 该行数据的状态 }; MOTableRow row = communityMIB.getSnmpCommunityEntry().createRow( new OctetString( "public2public" ).toSubIndex( true ),//索引OID com2sec //列详情 ); communityMIB.getSnmpCommunityEntry().addRow( row ); } } |
下面的测试用例说明了如何注册标量、表格到Agent服务器,并通过GET/GETBULK请求进行验证:
|
1 2 3 4 5 6 7 8 9 10 11 12 13 14 15 16 17 18 19 20 21 22 23 24 25 26 27 28 29 30 31 32 33 34 35 36 37 38 39 40 41 42 43 44 45 46 47 48 49 50 51 52 53 54 55 56 57 58 59 60 61 62 63 64 65 66 67 68 69 70 71 72 73 74 75 76 77 78 79 80 81 82 83 84 85 86 87 88 89 90 91 92 93 94 95 96 97 98 99 100 101 102 103 104 105 106 107 108 109 110 111 112 113 114 115 116 117 118 119 120 121 122 123 124 125 126 127 128 129 130 131 132 133 134 135 136 137 138 139 140 141 142 143 144 145 146 147 148 149 150 151 152 153 154 155 156 157 158 159 160 161 162 163 |
@FixMethodOrder ( MethodSorters.JVM ) public class AgentTest { private static final String OID_SYS_DESCR = "1.3.6.1.2.1.1.1.0"; private static Logger LOGGER = LoggerFactory.getLogger( AgentTest.class ); private static final String AGENT_ADDR = "udp:127.0.0.1/16100"; private static final String MANAGER_ADDR = "udp:127.0.0.1/16200"; private static UdpAddress agentAddr = (UdpAddress) GenericAddress.parse( AGENT_ADDR ); private static UdpAddress mgrAddr = (UdpAddress) GenericAddress.parse( MANAGER_ADDR ); private static SnmpAgent agent; private static Snmp mgrSession; @BeforeClass public static void setUpBeforeClass() throws Exception { agent = new SnmpAgent( AGENT_ADDR ); agent.start(); TransportMapping transportMapping = new DefaultUdpTransportMapping( mgrAddr ); mgrSession = new Snmp( transportMapping ); transportMapping.listen(); } @AfterClass public static void tearDownAfterClass() throws Exception { agent.stop(); mgrSession.close(); } private Target createSNMPv2Target() { Target target = new CommunityTarget( agentAddr, new OctetString( "public" ) ); target.setVersion( SnmpConstants.version2c ); target.setAddress( agentAddr ); return target; } private PDU createSNMPv2PDU_GET( String oid ) { PDU req = new PDU(); req.setType( PDU.GET ); req.add( new VariableBinding( new OID( oid ) ) ); return req; } private PDU createSNMPv2PDU_GETBULK( String oid, int maxRepetitions ) { PDU req = new PDU(); req.setType( PDU.GETBULK ); req.setMaxRepetitions( maxRepetitions ); req.setNonRepeaters( 0 ); req.add( new VariableBinding( new OID( oid ) ) ); return req; } private String getAsString( String oid ) throws Exception { ResponseEvent respEvent = mgrSession.send( createSNMPv2PDU_GET( oid ), createSNMPv2Target() ); PDU resp = respEvent.getResponse(); return resp.get( 0 ).getVariable().toString(); } private String variableToString( Variable var ) throws UnsupportedEncodingException { if ( var instanceof OctetString ) { return new String( ( (OctetString) var ).getValue() ); } else { return var.toString(); } } /** * BaseAgent注册了一些默认的MIB,我们这里发起一个1.3.6.1.2.1.1.1请求(sysDescr)测试其是否正常工作 */ @Test public void testDefaultMIB() throws Exception { //测试BaseAgent注册的默认MIB-II assertEquals( "SNMP4J-Agent - Windows 7 - amd64 - 6.1", getAsString( OID_SYS_DESCR ) ); } /** * 创建一个标量并且注册到Agent */ @Test public void testUserDefinedScalar() throws Exception { //解除注册默认的Snmpv2 MIB agent.unregisterManagedObject( agent.getSnmpv2MIB() ); String sysDescr = "Ubuntu 14 - amd64"; MOScalar mo = new MOScalar( //创建一个标量 new OID( OID_SYS_DESCR ), //OID MOAccessImpl.ACCESS_READ_ONLY,//最高访问级别 new OctetString( sysDescr ) //值 ); agent.registerManagedObject( mo ); assertEquals( sysDescr, getAsString( OID_SYS_DESCR ) ); } /** * 创建一个表格并且注册到Agent,该用例将打印: * 1.3.6.1.4.1.8808.8.1.1: 19 * 1.3.6.1.4.1.8808.8.1.2: 20 * 1.3.6.1.4.1.8808.8.2.1: 汪震 * 1.3.6.1.4.1.8808.8.2.2: 汪静好 * 1.3.6.1.4.1.8808.8.3.1: 198609 * 1.3.6.1.4.1.8808.8.3.2: 201411 * * 可以看到SNMP表这种按列遍历的顺序以及Table中变量OID的组织方式 */ @SuppressWarnings ( "unchecked" ) @Test public void testUserDefinedTable() throws Exception { final String STAFF_TAB_OID = "1.3.6.1.4.1.8808.8"; OID staffTableOID = new OID( STAFF_TAB_OID ); //员工表 MOTableSubIndex[] subIndexes = new MOTableSubIndex[] { new MOTableSubIndex( SMIConstants.SYNTAX_INTEGER ) }; MOColumn[] columns = new MOColumn[] { new MOColumn( 1, SMIConstants.SYNTAX_INTEGER, MOAccessImpl.ACCESS_READ_ONLY ),//工号 new MOColumn( 2, SMIConstants.SYNTAX_OCTET_STRING, MOAccessImpl.ACCESS_READ_ONLY ),//姓名 new MOColumn( 3, SMIConstants.SYNTAX_INTEGER, MOAccessImpl.ACCESS_READ_ONLY ) //出生年月 }; DefaultMOTable table = new DefaultMOTable( staffTableOID, new MOTableIndex( subIndexes, false ), columns ); MOMutableTableModel model = (MOMutableTableModel) table.getModel(); model.addRow( new DefaultMOMutableRow2PC( new OID( "1" ), new Variable[] { new Integer32( 19 ), new OctetString( "汪震" ), new Integer32( 198609 ) } ) ); model.addRow( new DefaultMOMutableRow2PC( new OID( "2" ), new Variable[] { new Integer32( 20 ), new OctetString( "汪静好" ), new Integer32( 201411 ) } ) ); table.setVolatile( true ); agent.registerManagedObject( table ); PDU req = createSNMPv2PDU_GETBULK( STAFF_TAB_OID, 6 ); ResponseEvent respEvent = mgrSession.send( req, createSNMPv2Target() ); PDU resp = respEvent.getResponse(); if ( resp != null && resp.getErrorStatus() == PDU.noError ) { Vector<? extends VariableBinding> vbs = resp.getVariableBindings(); StringBuilder buf = new StringBuilder(); for ( VariableBinding vb : vbs ) { Variable var = vb.getVariable(); buf.append( String.format( "%s: %s\n", vb.getOid(), variableToString( var ) ) ); } LOGGER.debug( buf.toString() ); } } } |
大佬,能给一下完整代码吗,非常感谢